When Amber & I created the Augusta Stays pattern we decided to have two different fit blocks, to make fit easier straight off the pattern.
The ‘Straight’ fit has a 10” difference between un-corseted bust and corseted waist, and is best for those with less bust-to-waist difference, or those desiring less waist compression. The ‘Curvy’ fit has a 12” difference between un-corseted bust and corseted waist, and is best for those with more bust-to-waist difference, or those desiring more waist compression.
However, we know that isn’t going to accomodate everyone: the body comes in an infinite variety of fits!
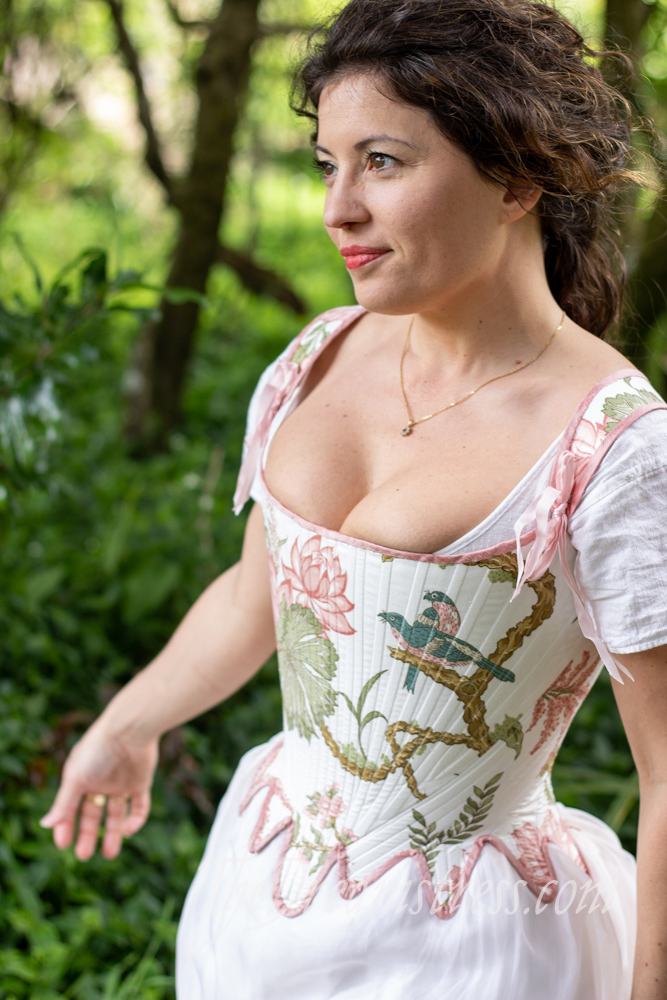
Take Priscilla: she’s wearing the Theatrical Augusta Stays in size 38 Curvy. As you can see, Priscilla has a tiny waist and a lot of bust, and the stays aren’t quite accomodating that bust. (note: these stays were not made for her – dressing up in them and the photos was a spontaneous event during a costume weekend)
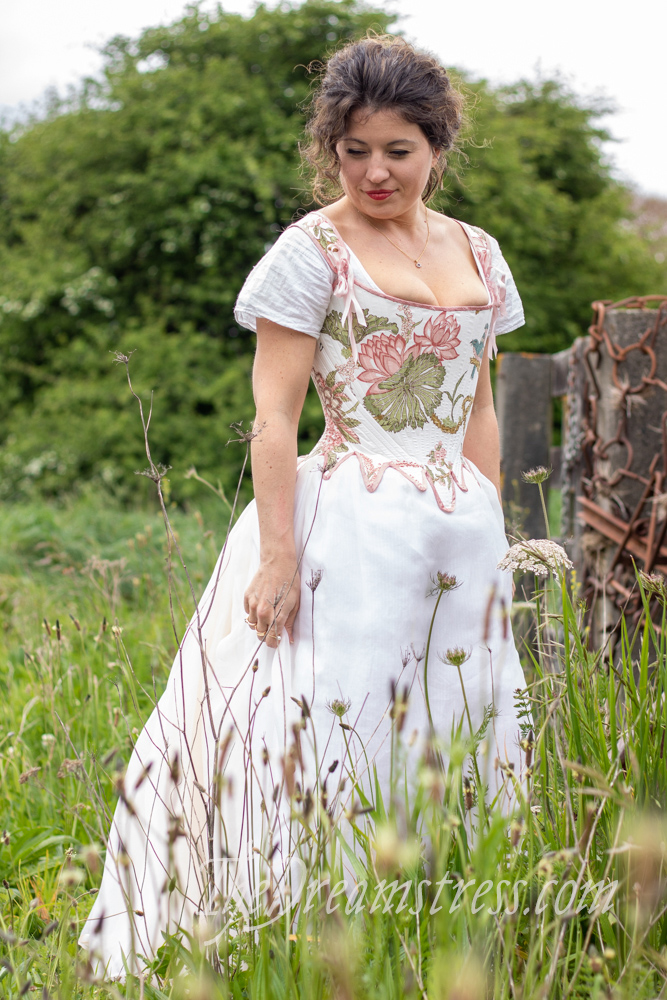
If she were wearing the Historical Augusta stays we could loosen the lacings to provide space, but even that might not be enough for a really curvy woman.
Luckily there is a 100% historically accurate way to give yourself more bust space in your Augusta stays.
It will help prevent boob squish and an unattractive dent, as well as that problem when you have a little ribcage and a full bust, and your boobs try to slide down into the stays because of the gap between your ribs and the stays meeting your bust (a problem that I of the massive ribcage will never experience in person!)
Curved front stays from the 3rd quarter of the 18thc
The Augustas are drafted with a completely straight centre front line, because that’s common on a lot of 1780s stays, and is an easier starting point for sewers used to modern drafting methods. In the Historical version the half front lacing provides flexibility that creates the ‘prow’ front. (the Theatrical version was specifically intended to be a more generic straight front silhouette)
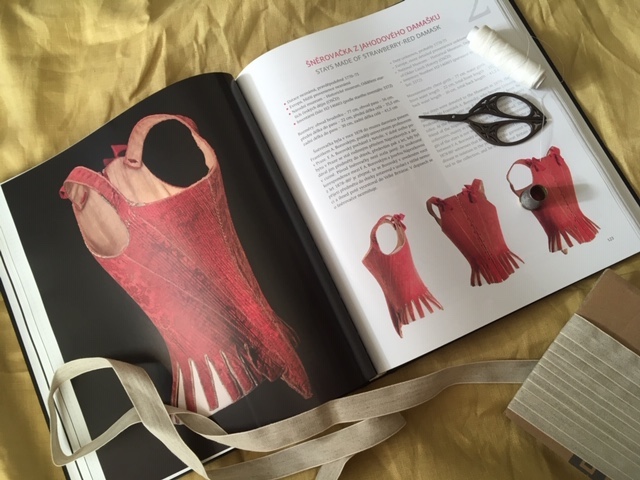
However, not all 1780s stay patterns have straight front seam: some are drafted with a curved front, to further emphasise that fashionable forward thrust.
The 1770s red damask stays in Veronika Å ulcová & Dana Szemályová’s Å nÄ›rovaÄku nebo korzet? Stays, or a Corset? have a distinct curve to the front seam:
As do the 1780s brown jean stays in Jill Salen’s Corsets: Historical Patterns & Techniques:

Both books include patterns of the stays that show their curved front.
Kendra of Demode and Vincent Briggs have both written about curved front stays, and Kendra has compiled a pinterest board with examples.
So, let’s add a curved front to your Augusta Stays pattern!
It’s really easy.
Measurements (aka, the math part)
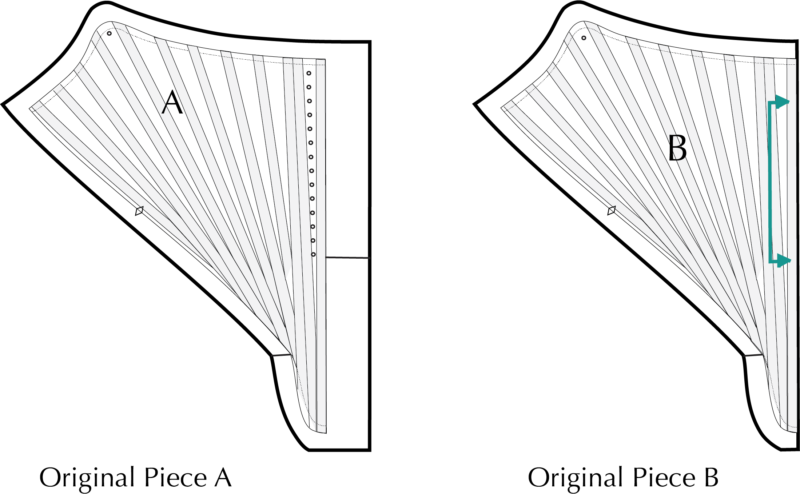
We’ll be working with Piece A (Historical) or B (Theatrical) only.
Measure your bust and waist, and pick the pattern size with the waist size that is CLOSEST to your waist size from the ‘Body Measurements’ section.
Priscilla would pick Size 36 as she has a 27.5″ waist.
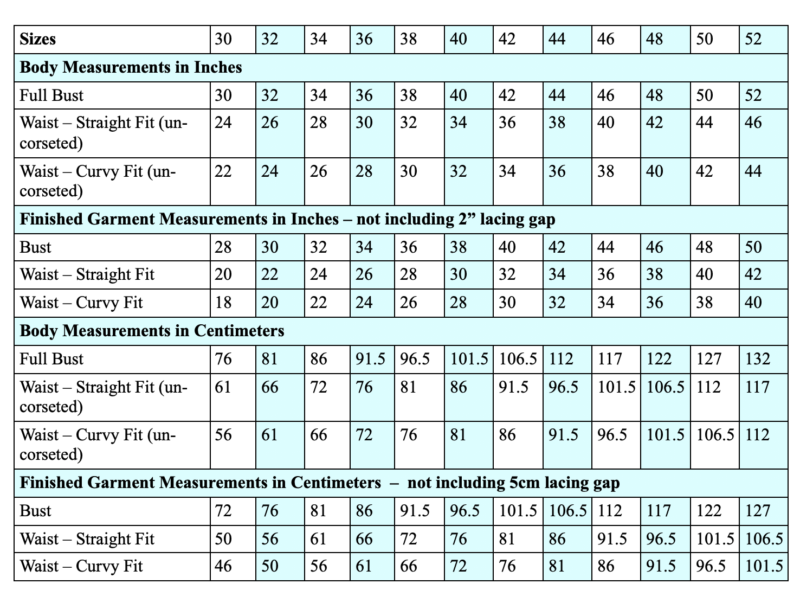
Now, subtract the Full Bust measure for your chosen size from your bust measure.
Priscilla has a 37.5″ bust. Subtract 36″ from 37.5″ and she’s left with 1.5″. That’s the amount she needs to add to the front of her stays.
She’ll be adding 1/2 that amount to Piece A (because it’s 1/2 of the front of the stays), so 3/4″.
If you’re doing the Historical version, you can add a little less, and let the lacing take care of the rest.
Adding a curved front to the Historical Augusta Stays:
Measure out the amount you need to add to the pattern piece at the top of the stays. Then use a french curve to draw out a gentle curve from the ‘snip’ mark at the bottom of the eyelets, out to the marked point.
I’ve shown the 3/4″ Priscilla will need to add:
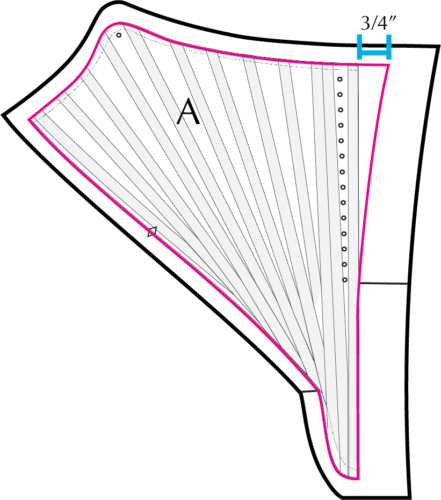
Then re-draw the boning channels to mirror the front curve, as shown. You’ll notice that only bones 1 & 2 from the centre front change – bone #3 stays the same. At different sizes your layout might look slightly different, but you always want to think about keeping the bones nicely distributed and fanned out.
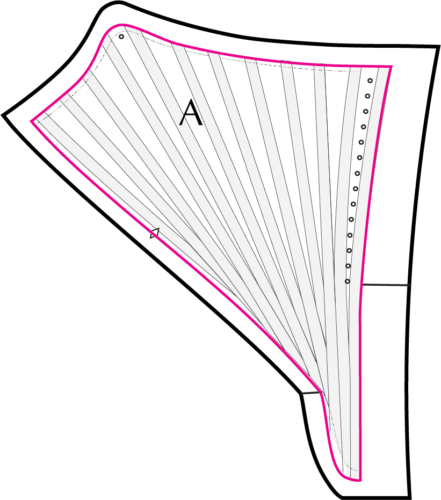
I know they look weird, but German Plastic Boning is totally capable of this! In the actual stays the boning will be curving out, away from the body, not at an angle.
And that’s it! After this you can cut and make the Augusta Stays exactly as given in the instructions.
Adding a curved front to the Theatrical Augusta Stays:
There are three options for adding a curved front, and thus more bust space, to the theatrical version of the Augusta Stays.
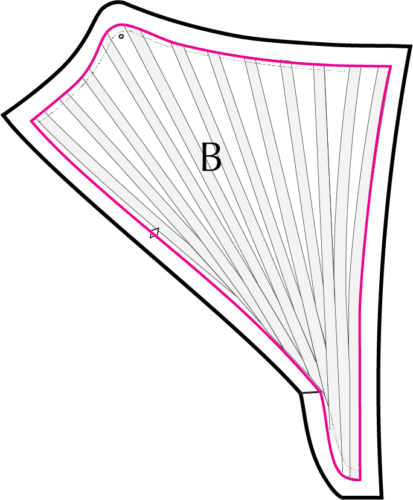
Option 1: a Curved Centre Front Seam
If you’re willing to have a centre front seam in your theatrical stays, you can add a front curve, and a seam allowance, just as we did with the Historical Augusta pattern:
Option 2: A Straight Centre Front Seam & A Godet
If you don’t want to add a front curve to your pattern piece, but are willing to have a front seam, you can add a triangular inset (essentially, a godet) to the centre front seam. It would look lovely with decorative lacing over it.

The triangular inset should be as wide as the entire amount you need to add, and as long as from the top of the stays, to the ‘snip’ mark of the historical boning layout.
Option 3: No Centre Front Seam, and an Inset Gusset
And if you don’t want a centre front seam, or have already cut your front piece, you can add a gusset to the centre front.
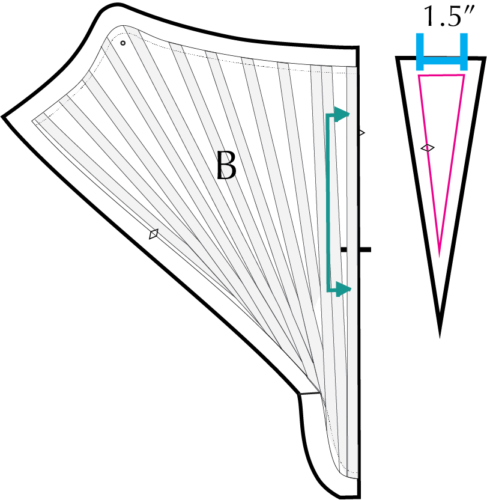
You will need to do this before adding boning channels, using the minimal seam allowances. You have have to rearrange the boning channels slightly to accomodate the gusset (tip: use the boning layout from 1 size down to give yourself enough space).
The triangular inset should be as wide as the entire amount you need to add, and as long as from the top of the stays, to the ‘snip’ mark of the historical boning layout.
Both options with a triangular gusset do exactly the same job that the lacing does in the Historical Augusta Stays. You can even add working lacing over the gusset, to pull it in or let it out.
And that’s it!


Ooh, wonderful tip!
I’m going to assume this is also exactly the trick those of us who are basically a flattened cylinder of bones with boobs attached might want to use in the future. 😉
(I actually did a curved front seam largely intuitively on an experimental set of 1790s stays. Unfortunately before I finally got around to finishing them – I still haven’t -, my figure changed, so… I never got to see just how well it may have worked, and I think by now I will be glad to eventually have a pattern and a set of blog posts to walk me through it. 😀 )
Also, yay for putting the book to good use. 😉
Well, you know that the world is globalised when you find rec for a Czech book on a site from the other end of the planet.
(puts it on wishlist)
Excellent! Glad it’s helpful! I am LOVING that book. So many interesting things.
And the joke is that women cannot do math. Well joke’s on them, because women have been doing engineering (sewing) and chemistry (cooking) for centuries.
That was a really neat tutorial-thanks! So impressive.
Although according to that Czech book cited, stays like this were actually usually made by male tailors. Although many may have been subsequently re-made e.g. to fit someone who inherited them.
BUT I’m extremely impressed by all the homemade Regency to Romantic stays / corsets out there. There’s a fascinating amount of experimental problem-solving in those!
Even if it’s not stays, sewing is all maths: making shifts is maths, seam allowances and stitch length are all math! Even if you don’t use numbers, judging the distances and fitting the shapes is all maths!
That does look like a really cool book. (And thanks for these little peeks, as I don’t speak any Czech) I have read that stays required much more strength, and that needed strength was a reason for male tailors of stays.
I have been thinking about school topics that were derided in the past: only the “dumb” people did woodshop, and only women sewed. But these fields are supremely math-heavy, and math-heavy in 3D.
It’s actually bilingual. The English is a bit funny in places, Czenglish-style, but quite understandable I think.
Neato! Funny, I thought that the English parts were like the little French fashion captions that are untranslated, and that English did not fully share the body of the work. Of course, English serves as the modern equivalent of 18th and 19th century French for cosmopolitanism, and I imagine that the English augments the author’s traction.
All of that to attempt and excuse that I just performed the trope of the lazy American who didn’t look too hard! (sorry) Thanks for the correction, and the link. Some of the suggested books below seem fascinating.
Leimomi, I think I love you for this. No seriously, I have had this problem in every pair of stays, bodies, or even corsets I’ve worn, and I’m not anywhere near a good enough drafter to have figured this out on my own. You’re a lifesaver.
Thank you. â¤ï¸ I’m so glad it was helpful! Mine is just a tiny little twig on a whole pile of research that was started by other people though! Without Kendra & Vincent’s early forays, and all the amazing costume books, I wouldn’t have been able to explain it nearly as clearly.