Latest Posts

Costume College 2017 – I’m teaching!

I’m very excited to be going to Costume College again this year – and to be teaching again!

I’ll be teaching three classes, one each on Friday, Saturday & Sunday.  I’m being quite brave teaching three classes (and sadly, it means I’ll miss lots of other peoples classes – the huge drawback to teaching), but I was so excited about these three topics I couldn’t decide which to pass on, so offered all three as choices.

The first is my favourite rant:

Beyond the Fringe: Unravelling the Myth of the 1920s Flapper

Imagine a flapper. The popular concept is of mid-1920s young women, with fringed dresses, sequined and feathered headbands, sleek bobbed hair, and few inhibitions. This class will explore the historical truth behind the flapper myth, from the British origins of the ‘flapper’ in the 1900s, to the rise in popularity of the term in the 1910s, and the way it evolved into the feminist movement of the 1920s, and was then re-invented over the course of the 20th century. We’ll look at where the iconography of the look came from, as well as the alternatives to flapper-ism in the period.

Friday: 11:00 AM – 1:00 PM

The second relates to my main research topic for the last two years:

The Great War Wardrobe

Clothing for a Fortnight in 1916, thedreamstress.com


An in-depth exploration of WWI-era homefront fashion. Massive societal changes caused by WWI brought major changes to fashion (new types of undergarments, new fabrics, higher hemlines, and a radically changing silhouette), which caused further societal changes in turn. Leimomi will look at how WWI affected fashion by examining both high-fashion designs, and how they were interpreted in daily wear by home seamstresses. In addition, Leimomi will also provide a detailed guide for building your own WWI era wardrobe, drawing from period accounts of average wardrobes and her own experiences in attempting to live as though it were 1916.

Saturday: 1:30 PM – 3:30 PM

And the third is something close to my heart:

Tapa Cloth & Tiki Attire: The Pacific Influence on Fashion

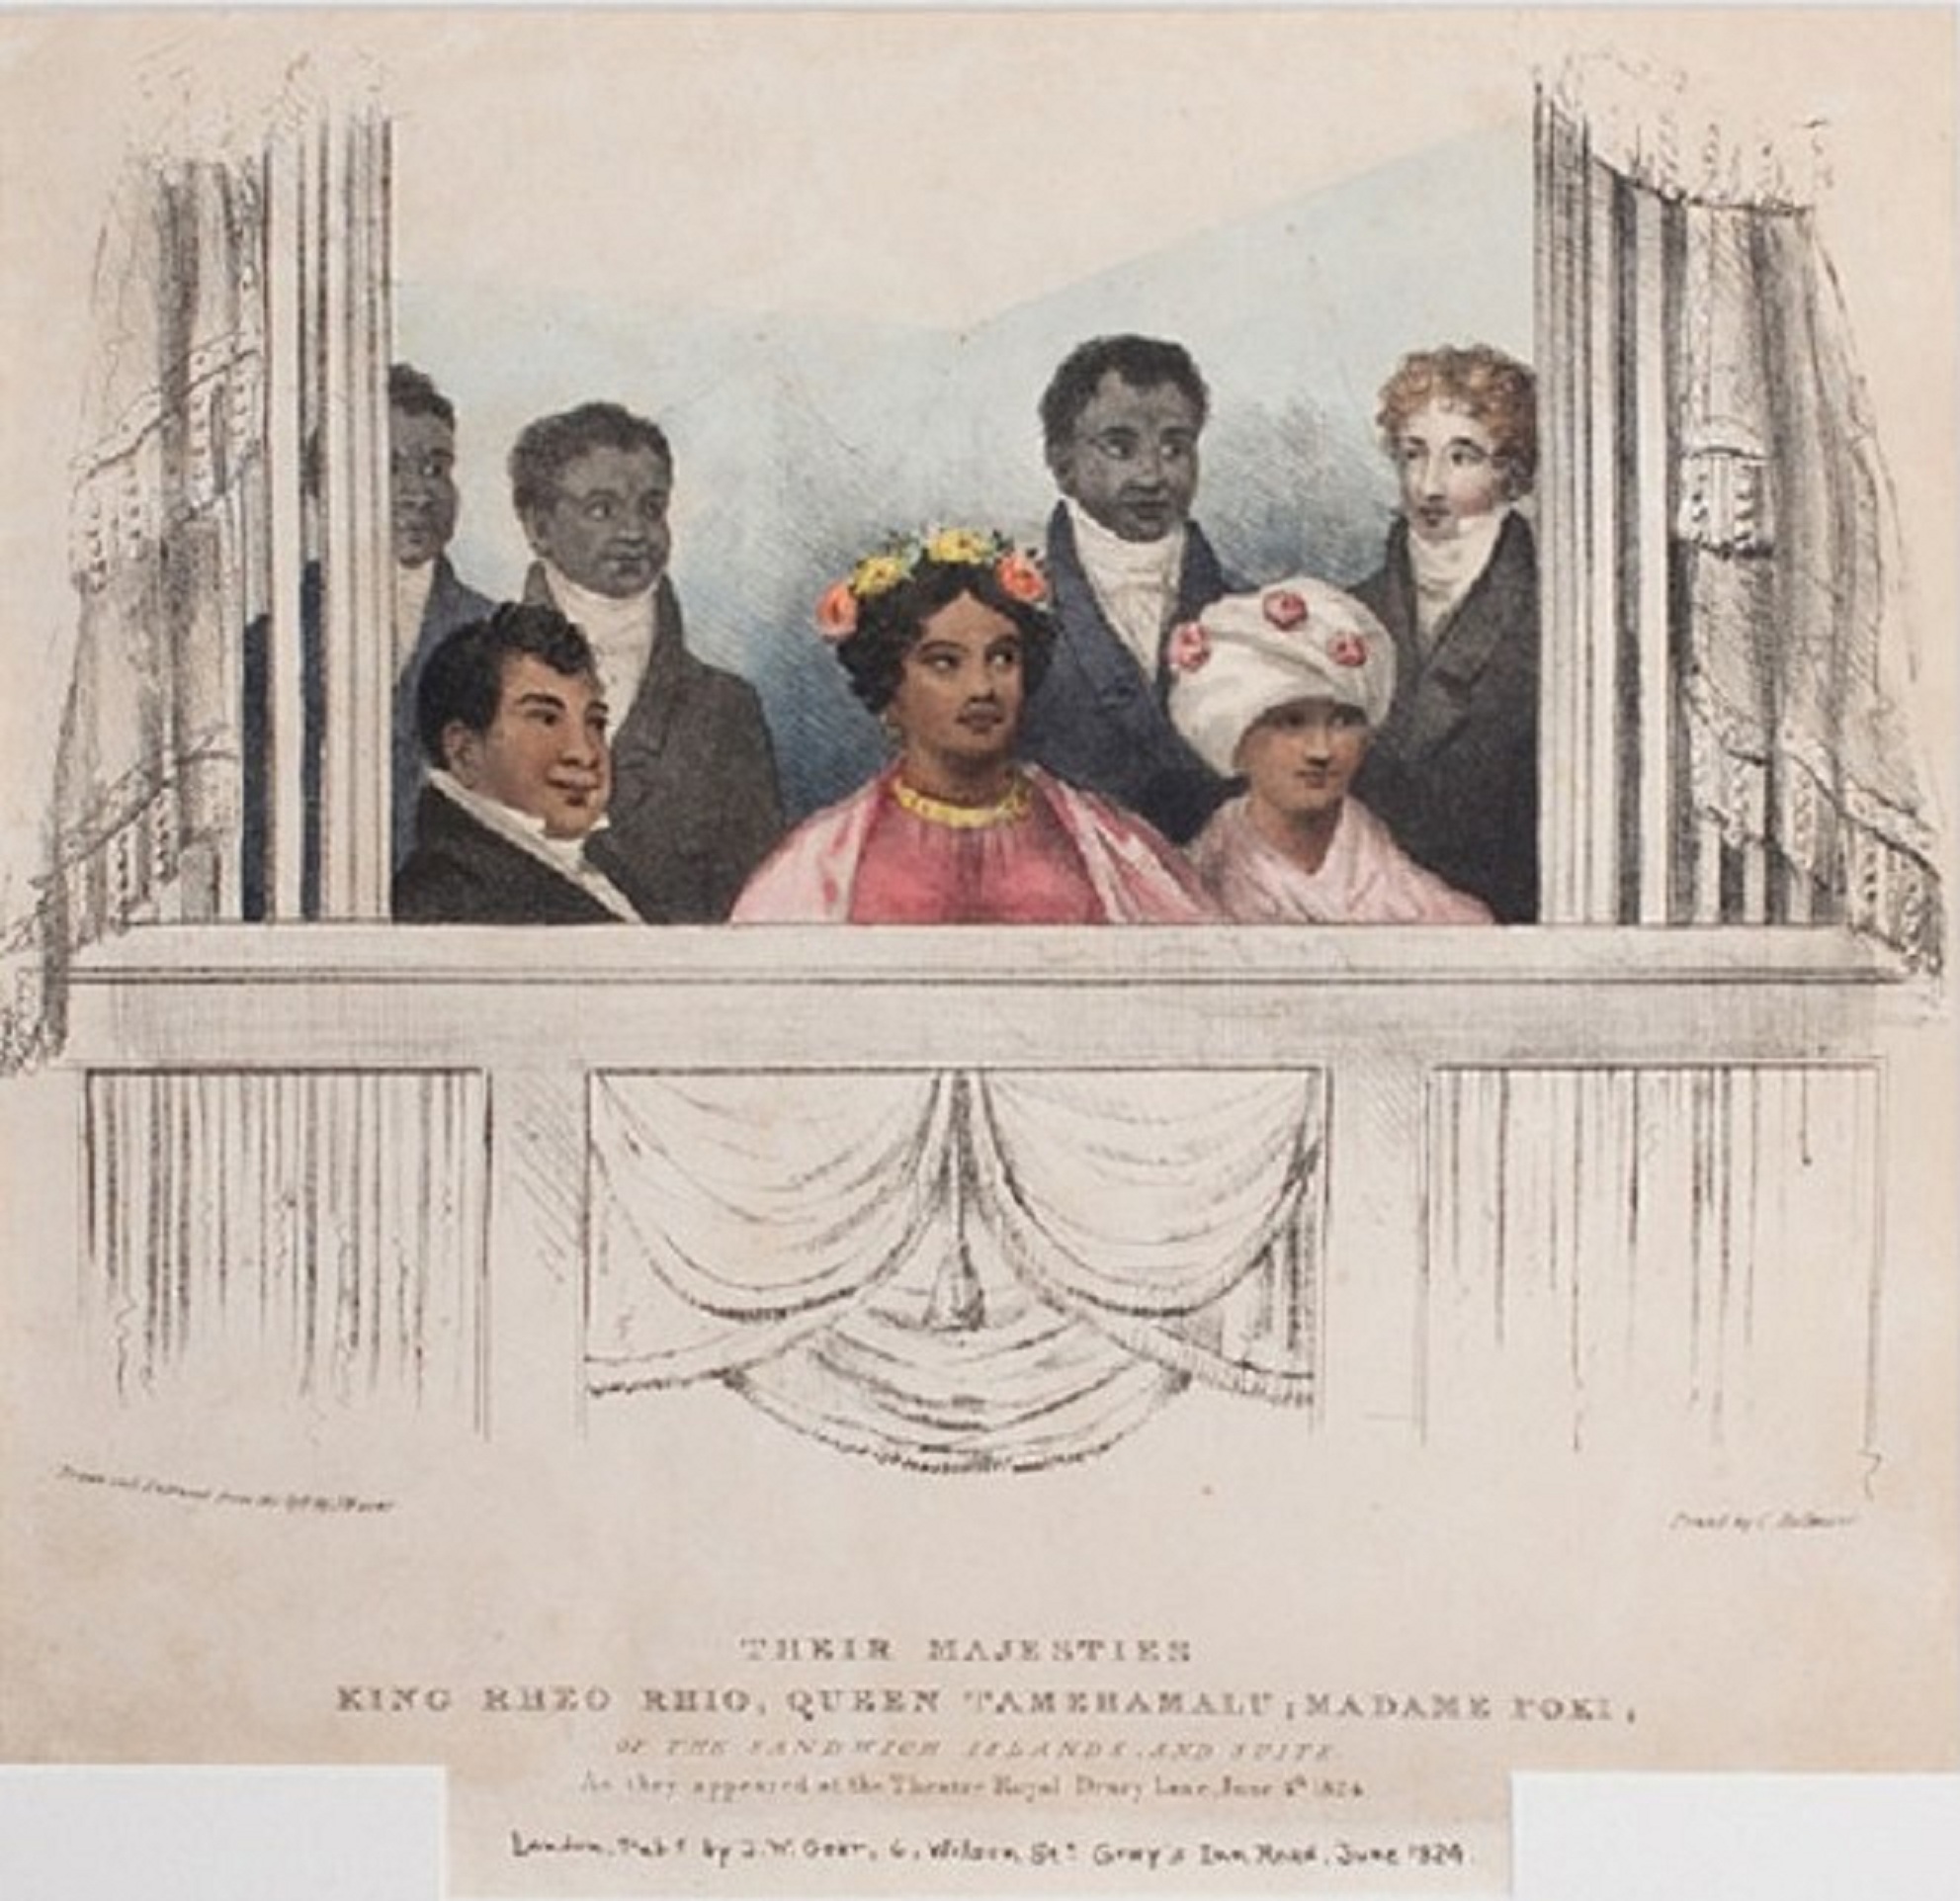
The Hawaiian Royal Party at the theatre

The Pacific holds a special place in the public imagination: encapsulating everything that is glamorous and exotic, it literally epitomize paradise. Learn how this fascination has influenced Western fashion, from the two known examples of 18th century garments made from Tahitian tapa cloth, to the 1820s fashion for turbans ‘a la Hawaiien’, through the Victorian fad for kiwi-feather muffs, and culminating in the mid-20th century obsession with the Pacific, as seen in Aloha shirts, and Tiki fashions by designers like Shaheen.

Sunday: 10:00 AM – 12:00 PM


If you’re coming to Costume College I do hope you’ll be able to make one of my classes!

Rate the Dress: yellow chinoiserie of the 1780s

Last week’s Rate the Dress was a cherry-bedecked Worth gown, and while it got a lot of love, the general consensus was that the cherry pattern  wasn’t quite balanced properly across the dress, and the pigeon breast wasn’t entirely working, even if one was a fan of pigeon breasts.  Plus, the sleeves had so clearly seen better days that it was hard to envision exactly what those better days looked like.  So, all these pulled the dress down to a nice-but-not-fabulous 8.1 out of 10.

This week’s Rate the Dress is 110 years earlier than last week’s, an entirely different colour, and an entirely different style of dress, and yet to me there is  an aesthetic resonance between the two.  Something in the back pleats, the very round flowers, and the puffed cuffs its shown with in the fully dressed version make me think of the two dresses together, and so showing you this one this week just makes sense:

The Met describes this close-backed 1780s dress of floral silk as a Robe à la Polonaise, and while there is considerable discussion in the historical costuming world if that is the correct term for all dresses with picked up skirts, I’ve left the descriptor as the museum has applied it in this case.

The dress features vivid yellow silk, of the shade often described as Imperial Yellow, ornamented with even rows of pink flowers (probably peonies), around which flutter moths and butterflies.  The silk was almost certainly hand-painted in China, and imported into the West.  In Chinese iconography, the combination of peonies and moths symbolises the attraction between men and women, which would certainly give the dress a very flirtatious appeal!

The petticoat and front edges of the overskirt are ornamented with self fabric trim with rounded pinked upper edges, and vandyke pinked lower edges, all pressed into crips pleats.

The Met has paired it with an elaborately embroidered fichu, mushroom hat, puffed cuffs, dress cane, and green shoes.  What do you think of the overall style, and the museums styling?

Rate the Dress on a Scale of 1 to 10

Scroop Henrietta Maria with a drawstring waist thedreamstress.com

How to add a drawstring waist to the Scroop Henrietta Maria Dress

I’ve already shown how to add an elastic waistband to the  Scroop Henrietta Maria dress, but there is another way to add waist definition (other than the simplest of all: wearing a belt, of course!): with a drawstring.

Scroop Henrietta Maria with a drawstring waist thedreamstress.com

Here is how to create a drawstring on the Henrietta Maria.  This technique will work on any loose, straight-cut dress, so feel free to adapt it for other garments.

You’ll be marking the waistband, working buttonholes for the drawstring to enter and exit through, sewing a casing  channel, and then threading the drawstring through.  Easy!

Scroop Henrietta Maria with a drawstring waist thedreamstress.com

You’ll need:

  • Ribbon or twill tape for a drawstring – under 1/2″ wide, and long enough to go around your waist, tie in a nice bow, and hang down an attractive amount.
  • 2.5cm/1″ wide single-fold bias tape, as long as the finished waist measure of your Henrietta Maria (measure around your finished dress, or refer to the Finished Garment measurements in the pattern) + 15cm/6″.
  • Chalk or fabric markers for marking
  • A french curve or ruler.
  • A scrap of lightweight fusible interfacing, approximately 5cm/2″ square.

Tutorial: a drawstring waist for the Henrietta Maria scrooppatterns.com

First, you need to mark a waistline on your Henrietta Maria.  You can use the waistline marked on the pattern, or create a custom waistline, as explained in the Henrietta Maria with an elastic waist tutorial, or in this video:

The waistline can sit anywhere you choose, as long as it’s least 1″ above the top of the pockets.  If you’ve made a dress without pockets, it can sit anywhere at all!

Take the dress off, and use a french curve or ruler to draw over your marked line, smoothing out any rough bits, and making sure it is  clearly visible.  I marked my original line in a pink  Pilot Frixion highlighters, and re-drew it in a black Pilot Frixion pen:


Tutorial: a drawstring waist for the Henrietta Maria scrooppatterns.com

Next, fuse your interfacing to the exact centre front of the dress, placing the square of fusing so the top edge  sits 1cm/3/8″ above the marked waistline

Tutorial: a drawstring waist for the Henrietta Maria scrooppatterns.com

Mark 6mm/1/2″  high buttonholes on the right side of the dress.  Their center lines should sit 1cm/3/8″ on either side of the center front line, with their top edge    3mm/1/4″ below the marked waistline.

Tutorial: a drawstring waist for the Henrietta Maria scrooppatterns.com

Now, work your buttonholes as marked:

Tutorial: a drawstring waist for the Henrietta Maria scrooppatterns.com

Tutorial: a drawstring waist for the Henrietta Maria scrooppatterns.com

Next it’s time to sew on the bias tape to form a casing for your drawstring.

Starting at a side seam, place the bias tape just below the marked waist line, with one long edge  just on the line.

Sew 2mm/1/8″ from the edge of the bias tape.

Tutorial: a drawstring waist for the Henrietta Maria scrooppatterns.com

When you get back to where you started, cut your bias tape off so there is a 3cm/1.25″ or so overlap.  Fold under half the overlap just before you finish sewing, so there are no raw edges of bias showing on the interior.

Tutorial: a drawstring waist for the Henrietta Maria scrooppatterns.com

Now sew the other edge  of your bias tape:

Tutorial: a drawstring waist for the Henrietta Maria scrooppatterns.com

I decided that I wanted a little more definition to my channels, so I stitched an additional line of stitching 1/8″ inside the first stitching lines:

Tutorial: a drawstring waist for the Henrietta Maria scrooppatterns.com

Remove any pen/chalk marks that are visible on the outside of the dress, and then  it’s time to drawstring!

Scroop Henrietta Maria with a drawstring waist thedreamstress.com


Cut open your buttonholes, taking care not to cut through the bias tape.  Use a safety pin or a bodkin to thread your drawstring through the channel, in one buttonhole, all the way around, and out the other.

Tutorial: a drawstring waist for the Henrietta Maria scrooppatterns.com

Tutorial: a drawstring waist for the Henrietta Maria scrooppatterns.com

Finish off the edges of your drawstring by heat-sealing (if they are synthetic), tying them in tidy knots, or string a bead on to each end, and then add a knot, for a little bit of extra flair.

Ta da!  You’re done!  Enjoy!

Scroop Henrietta Maria with a drawstring waist thedreamstress.com