Latest Posts

How to print & tape together a print-at-home pattern

One of the most wonderful sewing innovations of the last decade or so is the print-at-home pattern.  It’s allowed boutique, niche pattern companies (many of which make significantly better patterns than the Big 4 pattern companies) to start up with little capital investment, and it allows seamstresses to think of a project, find a pattern that they like online, and have it instantly – without having to go out to a store, and hope the store has it in stock.

The printable pattern is a particular boon to those of us on the far flung reaches of the globe: not all patterns are available in NZ, and ordering from overseas can take a week or more.  I often sew with very specialised patterns for vintage and historical garments, and these patterns simply can’t be bought in NZ.  Being able to purchase a pattern online, print it myself, tape it out and begin cutting that very same day is AMAZING for me.  I’m so excited that more and more of my favourite pattern companies are releasing print-at-home patterns!

Print-at-home patterns are also awesome because you can print them as many times as you like.  Printing extra copies and giving them to your friends is unethical (and sometimes downright illegal) and takes income away from the pattern makers, making it harder for them to make more awesome patterns, so please don’t do that!  However, it is perfectly legal and ethical to print a copy of the pattern in View A, and then print another one for View B, and another for View C – so that you can easily cut the precise view you want, without having to mark through the patterns.  You can make any mark, alteration and notation you want on each different printed copy, and still know you’ll be able to have a pristine, unaltered copy  of the pattern should you need it.

The one drawback to print-at-home patterns is the printing and taping together – it it can be fiddly, and it is time consuming, but when the alternative is waiting weeks for a pattern, it’s well worth it.  A good system for assembling your pattern can make it go much faster, and will result in a precise pattern, which is quite important for a perfect finished garment.

Here is my system.  It’s pretty self explanatory, but students have told me it helps to see someone assemble a print-at-home pattern before you attempt it yourself.

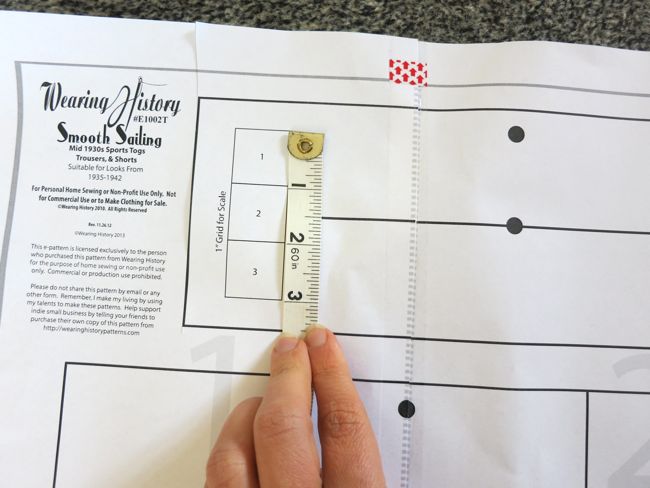
For this tutorial I’ll be using Wearing History’s Smooth Sailing trouser print-at-home pattern, but the method works for all print-at-home patterns (if it isn’t working, you’ve either scaled your pattern when printing it, or the pattern has flaws – which does happen occasionally).

You will need:

  • Your printed pattern pieces – most print at home patterns will accommodate either A4 or 8 1/2 x 11 pages.
  • Cellotape (Scotch tape)
  • Paper scissors
  • A large flat working area

First, print your pattern.  Super easy, but with one tiny, super important thing that you MUST DO.  When you print the pattern make sure you do not fit to page, and do not scale it in any way – it needs to print at 100% with no alterations.  If you fit it to page/scale it the pieces may not match up, and it certainly won’t be the right size!

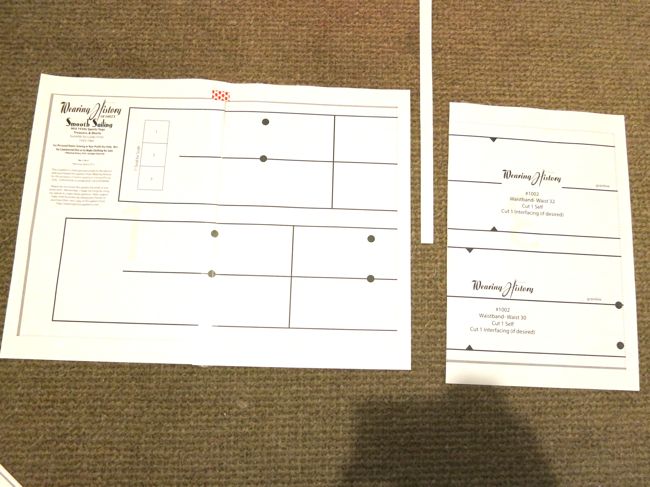
Once you’ve printed it the first thing you should do is find the scale marker on the pattern – on Wearing History patterns they are shown as three squares, each an inch square.  Make certain your pattern printed at the correct scale – if it didn’t, it won’t fit you correctly!

How to assemble print-at-home-patterns thedreamstress.com

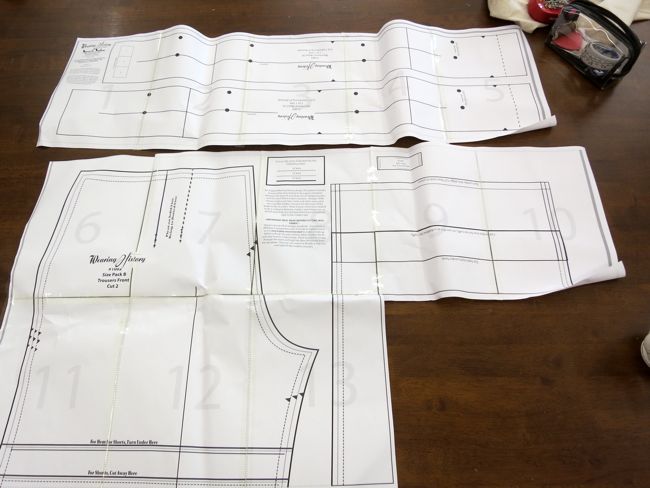
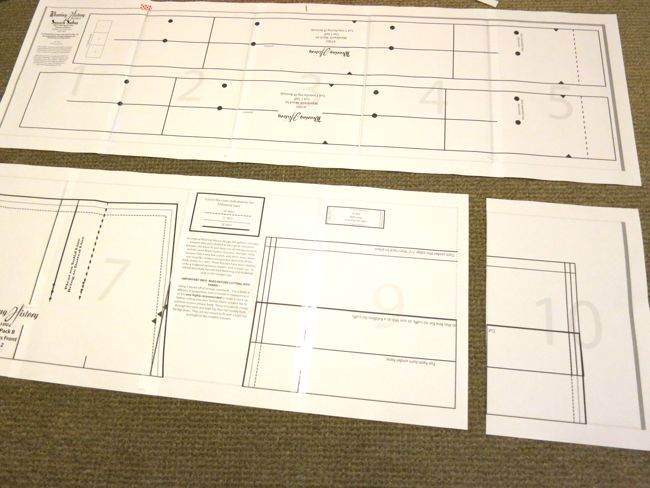
Now you’re ready to cut and tape your pattern.  I recommend laying out all the pieces of paper, following the number guides and the diagram (if there is one) before you begin to cut and tape, so that you can see the whole pattern before you begin assembling.

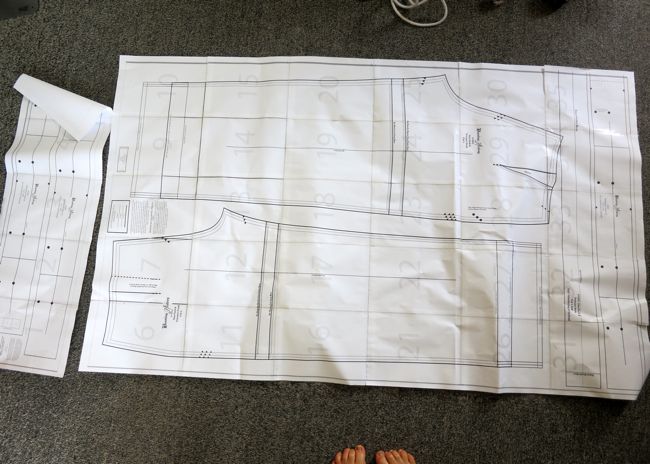
With all the pages laid out, you may find that there are some pattern pieces that do no overlap on different pieces of paper, so you don’t have to tape all the pages together.  In the Smooth Sailing Trousers the waistband pieces (pages 1-5, shown at the top of the image below) have no overlaps with the trouser body pieces (pages 6 – onwards), so you don’t have to tape the joins between 1 & 6, 2 & 7 etc..

How to assemble print-at-home-patterns thedreamstress.com

Start with page #1 (the top left hand piece).  Page #1 stays whole, with no cutting.

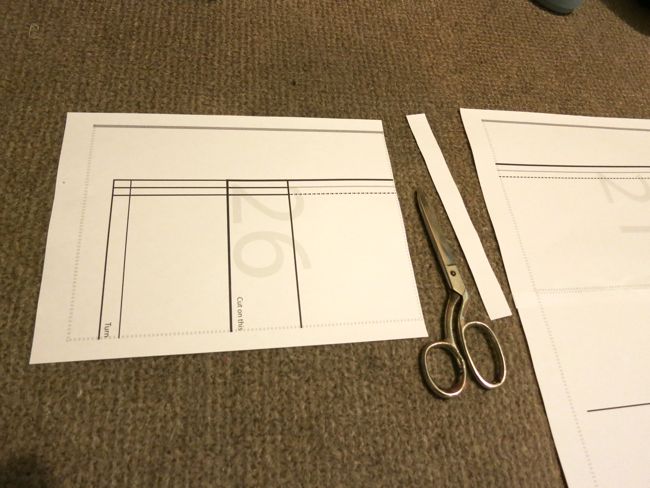
I recommend cutting off the ‘selvedges’ rather than just folding them, because it results in a less bulky pattern, and it’s much easier to perfectly match the lines if you cut.  And the more perfect your line matching is, the more accurate your finished pattern.

Cut off the left-hand ‘selvedge’ (the part beyond the printing) of page #2, lay it next to page #1, overlapping the cut edge of page #2 on to the ‘selvedge’ of page #1, and carefully match all of the lines in the pattern.  Tape it down, using small pieces of tape to hold it while you make sure everything lines up, and then long pieces to tape the entire edge.

Do the same with page #3:

How to assemble print-at-home-patterns thedreamstress.com

Pages #1 & #2 are taped together, and the left-hand selvedge has been cut off page #3

Because no pattern pieces extend from pages 1/2/3/4/5 to pages 6/7/8/9/10 with the Smooth Sailing Trousers, I’m starting the row for  6/7/8/9/10 as a new row, and assembling it just as I did for row  1/2/3/4/5, cutting off only the left hand ‘selvedges’ and taping my row together:

How to assemble print-at-home-patterns thedreamstress.com

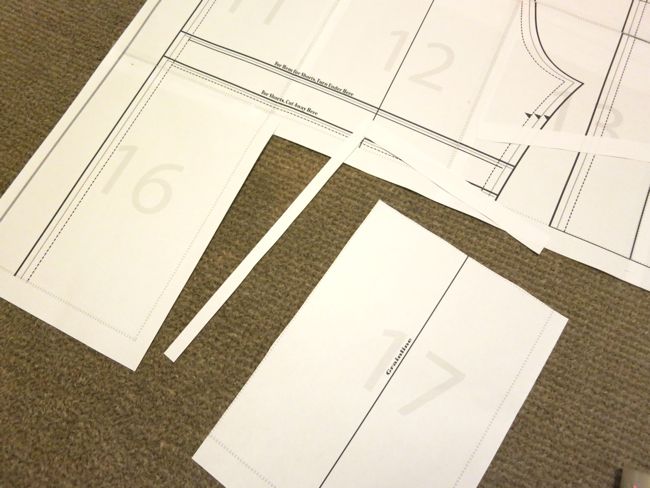
When you get to the rows that join to other rows both at the top edge, and at the sides, cut only the top selvedge off on the most left-hand pieces:

How to assemble print-at-home-patterns thedreamstress.com

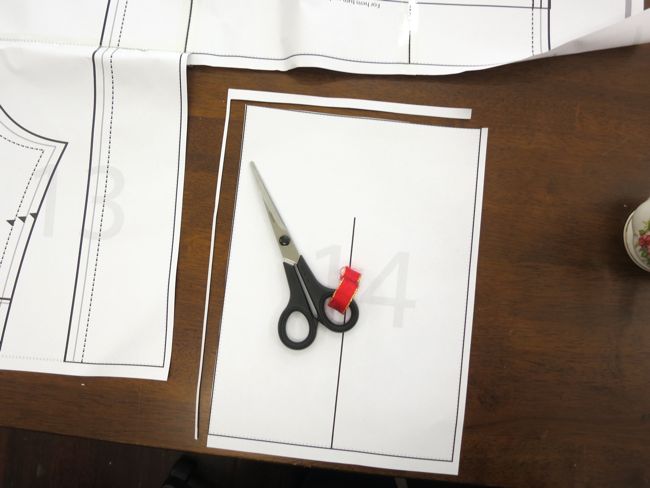
Tape the pages, continuing to carefully match all the pattern markings, and using short pieces of tape to hold things while you maneuver them, and then longer pieces to firmly secure them once everything is perfectly matched:

How to assemble print-at-home-patterns thedreamstress.com

Only the top ‘selvedge’ was cut off pieces 11 & 16, and they were taped to 6 & 11, respectively.

For the all the other pieces, you will have to cut off both the top and left-hand ‘selvedges’:

How to assemble print-at-home-patterns thedreamstress.com

Tape these pieces at top and sides, continuing to carefully match all the pattern markings.

How to assemble print-at-home-patterns thedreamstress.com

Do this until you come to the end of the pattern, and then stand back and admire your pattern pieces (and my bonus toes):

How to assemble print-at-home-patterns thedreamstress.com

Hurrah!  All the lines and markings match perfectly, so you know that the pattern will fit just as it is meant to.  And the pattern is cuttable, foldable, and durable, with every seam securely taped.

You can now cut it out and start sewing (well, be a good seamstress and read all the instructions first!) or, y’know, just let your cat sleep on it:

How to assemble print-at-home-patterns thedreamstress.com

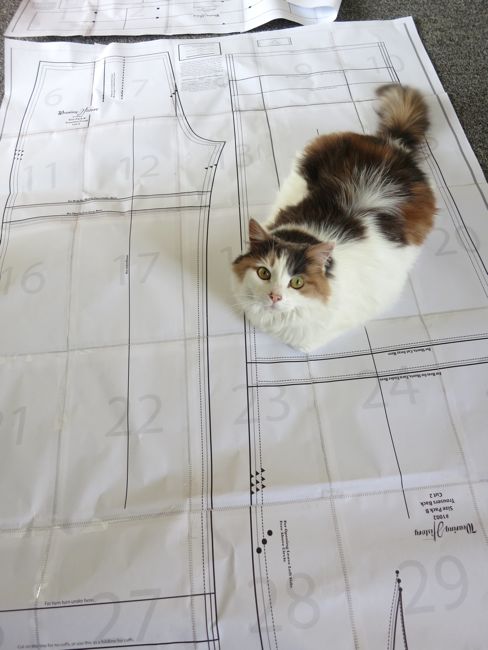
What do you mean you didn’t assemble this for my benefit?

The HSF ’13: Favourites for Challenges 21-26

Woohoo!  HSF ’13 is DONE!  We made it!

So many beautiful creations came out of this year.  Some owe their existence entirely to the HSF, some we would have made anyway, but the HSF allowed more people to see and enjoy them.  I’m so proud of myself, and so very, very inspired by all of you!

As the year has passed I’ve been sharing my favourites for each challenge in sets of 5.  I shared my favourites for  Challenges 1-5 here, and for  Challenges 6-10 here, and for  Challenges 11-15 here, and    for Challenges 16-20 here.  You can see  all  the creations for each challenge either through the comments for each individual challenge page,  or through the  Facebook group albums).

My favourites are the ones that most inspire me as a seamstress, and best reflect the goals of the HSF: to keep creating, and to push ourselves as sewers and historians, no matter what level we are starting from.  There are always too many to pick as favourites, so check out the full albums and the links through the comments on each post to see all the other fabulous things.

Challenge #21 —  Green  (and  the facebook album)  

  1. Paola’s green silk 1810s dress  – Such a beautiful interpretation of the fashion plate.  I really feel like I’m stepping back in time looking at it – not just into a costumed film.
  2. AsÃ¥ of Fashion Through History’s green wool cotehardie — This is one of the pieces that is really making me fall in love with Medieval fashions.  So gorgeous!
  3. Mieke’s very green Regency frock  — Because you can’t get any greener than that!  And it’s beautifully made in the best HSF tradition.
  4. And a bonus one: Lauren’s 1780s inspired Weddingote, because if you make a HSF wedding dress it has to be a favourite (and obviously it’s stunning!).

Challenge #22 —  Masquerade  (and the facebook album  and seriously, you must look at the album for this one, there were so many amazing projects!)

  1. Tracey’s 18th century moth/butterfly  — I’m guessing at what this is, but it is fabulous, and striking, and very masquerade-y!  Check out how the watteau pleats turn into wings!
  2. Isabella’s 1900s Fairy Queen  — She took two bridesmaids dresses and made them look fabulous and historical fantasy-y!  There is hope for every bridesmaid everywhere!
  3. Dawn’s macabre widows hat  — Take an 1890s mourning outfit, and a fantastic macabre hat with spider-web veiling and ravens = awesome costume!.

Challenge #23 —  Generosity & Gratitude  (and  the facebook album)

  1. Zietenzauberin’s front fastening stays — A gorgeous reproduction based on some of the wonderful research that Sabine has done.
  2. Danielle of L.M. Sewing’s chintz anglaise  — A charming gown, and she did a wonderful job of sharing her research into chintz, and Koshka’s tutorial which she used to drape her gown, which was the whole point of the challenge.
  3. Hvitr’s fabulously feathered tellerbarret  — Between this amazing hat and the two great tutorials/research articles that she used and linked to, I know know something about these (other than ‘those cool big hats in Durer paintings) and I’d feel willing to tackle my own – though I doubt it will be quite as cool as hers!

Challenge #24 — Re-Do  (and  the facebook album)

  1. Mouse Borg’s 18th century mitts  — I’m so envious, because mitts are something that I’ve wanted to make ALL YEAR LONG, and I will be so proud if mine are half as good as hers!
  2. Cathy of Loose Thread’s Himation  — Cathy has been working on this all year, and it’s so exciting to see it done, and like everything she makes it is meticulous in construction and research.
  3. Chelsea’s of A Sartorial Statement’s late 18th century swallowtail jacket— A beautiful re-do of the Separates challenge, and I love that this is a fully finished wearable toile – made from a bedsheet!

Challenge #25 —  One Metre  (and  the facebook album)

  1. Kelly’s silk bergere.  A metre of silk hand-cut into metres and metres of trim, with metres and metres of amazing hand embroidery!  I’m in love!  I’m in awe!
  2. Kelsey’s 1830s Swedish jacket  — What a glorious example of how much garment you can get out of a metre!
  3. Mieke’s 18th century caps  — She made two of them: one pleated, one ruffled, and they are both impeccable.
  4. And a bonus one, because Quinn’s gaiters are just too adorable to not show them to you!

Challenge #26 —  Celebrate!  (and  the facebook album)

  1. Jennifer’s 1920s party dress.  Definitely a celebration piece!  It just begs to be danced in!
  2. Kitty’s 1797-1800 spencer  — Beautifully made, beautifully researched, and a stunning example of perseverance.  Now that’s something to celebrate!
  3. Le Dressing de Melle de l’Isle’s 1810’s dinner dress – it looks like it stepped out of a fashion plate!  I’m terribly envious of the dress, and equally envious of her shawl!

What an amazing year!  So many things to love, so many accomplishments!  What’s your favourite sewn accomplishment of the year?  And which HSF projects were your favourites?

And a final question: should I continue to do these posts for HSF ’13?  If so, I would do them every 4 challenges.

The ‘Who cares about Bulls & Bears when you can have Bunnies’ Dress

And we’re off!  My first HSF ’14 challenge of the year is done!

This is the 1929 “Bulls, Bears & Bunnies’ dress, and the ‘Economic Sunrise’ hat.  (The belt doesn’t get a name.  It’s just a belt.)

The 1929 Bulls, Bears & Bunnies dress thedreamstress.com

I actually finished the dress on Boxing Day, but I only managed to finish the hat and belt this week.

The dress is named for the exceedingly un-bullish economic crisis of 1929-32, which perfectly covers the dates of the dress, and for the fabric:  bunny patterned rayon!

Bunny patterned rayon thedreamstress.com


I found the fabric at Arthur Toye’s in Wellington during the CBD Craft Crawl.  Well, I say ‘I’ found the fabric, but really I was looking at all the rayons for something to make another version of the Garden Party dress out of, and Juliet noticed this and said “Oooh, bunnies!” and I pounced on it and said “That’s perfect!”.

Uh-oh.

So we had the polite argument about who saw it first/wanted it more, because of course there was only 3m left in the shop, but Juliet very nicely let me buy the whole length so I could use what I needed, and then I’ll be sending her the rest.

I say very nicely, because my dress took 1.9 metres (and I had to scrimp and finangle and play fabric tetris like mad to get it down to that from the 2.7 it usually takes) , so she’s only got just over a metre left to make a blouse!  Such a sweetheart!


The 1929 Bulls, Bears & Bunnies dress thedreamstress.com


There is a lovely symmetry to starting 2014 with this frock: I started 2013 with the Gran’s Garden dress, made from the same pattern.  It’s such a useful, versatile pattern for the summer (OK, slightly less versatile with bunnies on it, but still, BUNNIES!).

The 1929 Bulls, Bears & Bunnies dress thedreamstress.com


Unfortunately this rayon is a bit shinier and clingier than the Gran’s Garden rayon so rather emphasises bits I would rather NOT, as I discovered looking through the photoshoot photos.  So in the future I’ll be a good little ’30s girl whenever I wear it and put on a girdle and longline bra!

The 1929 Bulls, Bears & Bunnies dress thedreamstress.com

I wear the Gran’s Garden dress without a belt, but felt this one need a bit more, so made a belt of ivory rayon with strips of velvet ribbon and a vintage buckle in darkest blue.  Then I got ambitious and made over a fedora into a cloche, and trimmed it with a bit of  cotton left over from the neck-hole of one of my early 18th century chemises, and extra blue velvet ribbon.  Using the fabric from the centre of a chemise felt particularly make-do-y, and re-working a hat also fit.

The 1929 Economic Sunrise hat thedreamstress.com


The dress itself is only a nod to an era when sewing was about making do, and when every bit of fabric counted.  Getting it out of 1.9m was quite an accomplishment in frugality, and it was helped by the fabric itself.  Bunny patterned fabric is unlikely to have been used for adult wear, though novelty animal fabrics were very popular for children, but the small pattern, restrained use of colours, and non-directional print are all spot-on for the early ’30s.

The 1929 Bulls, Bears & Bunnies dress thedreamstress.com

I’d hoped to do a photoshoot in the dress on my wilderness road trip, but the weather conspired against me.  Every time I was somewhere where there was an iron and I could press it it rained, and if it didn’t rain, it hailed.

So once I was home Mr D and I went for a drive round the bays and stopped at the boat sheds at Hataitai beach to catch these.

The 1929 Bulls, Bears & Bunnies dress thedreamstress.comThe 1929 Bulls, Bears & Bunnies dress thedreamstress.com

Just the facts, Ma’am:

The Challenge:  #1 —  Make Do & Mend

Fabric:    1.9  m of rayon at $12pm, bought in the Arthur Toye 50% off sale

Pattern:  1930s Garden Party Frock pattern, with curved waistline

Year:  1929-32

Notions:  rayon bias binding from stash, ivory rayon for belt, belting, vintage buckle, straw fedora ($4), velvet ribbon, scrap of ivory cotton.  Thread.

How historically accurate is it?  Very, except for the inappropriate levity of the fabric, and I overlocked the interior seams because I want to be able to just throw this in the wash.

Hours to complete:  9: 4 for the dress, and another 5 for the belt and hat

First worn: 6 January just around the house, and then on the 7th to teach a class.

Total cost:  $26  Totally worth it! (did I mention the BUNNIES!)

The 1929 Bulls, Bears & Bunnies dress thedreamstress.com