
Remember this petticoat?

Petticoat, 1855—65, American, cotton, Metropolitan Museum of Art
I’ve posted it as inspiration for pretty much every HSF challenge it would qualify for: Under it All, White, Eastern Influence, Embellishment…
Clearly I’m madly in love with it, and I’ve always wanted to recreate it, but the dream seemed impossible. I simply don’t have the time to do the amazing handiwork, and what were the chances of finding a similar fabric?
And then this arrived at The Fabric Store (yes, that’s actually it’s name):
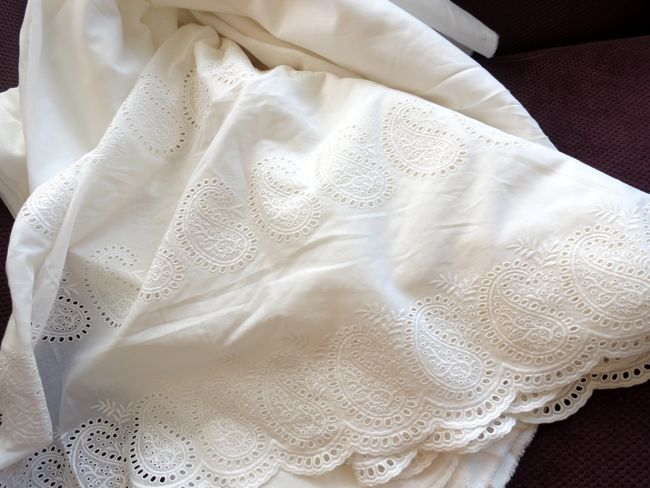
Ah-maze-ing!
Naturally, I had to have it. But it wasn’t exactly cheap…
I restrained myself for two days, and then had to go back to TFS for a necessity, and I saw that half the bolt was already gone. So I bit the bullet and forked out (brace yourself when you see the price below) and bought four metres of it – which may have been slightly overkill.
I didn’t regret it, because I was in the shop again a week later and it was all gone.
I’ve been desperate to make it up ever since I found it a year ago, but there were other commitments for every challenge, and it just never happened.
Then, after I’d already finished my Smooth Sewing trousers for Innovations, I came across the fabric again, and got ambitious and attempted to make the petticoat up as a second Innovations entry (my innovation would have been bleach, and decorated underthings). I quickly realised it was going to be much more complicated than I had planned.
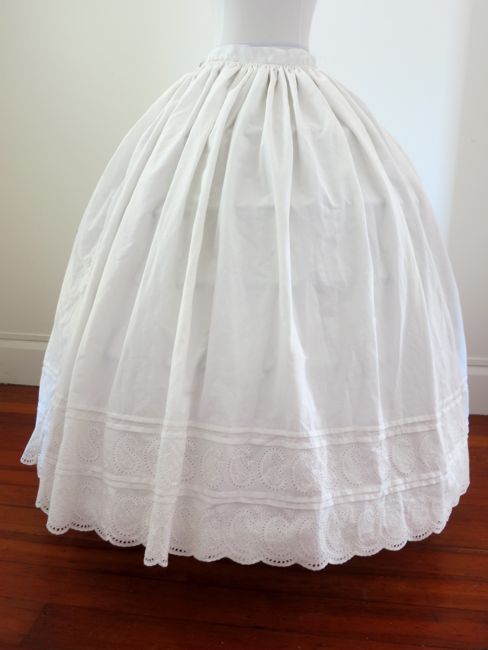
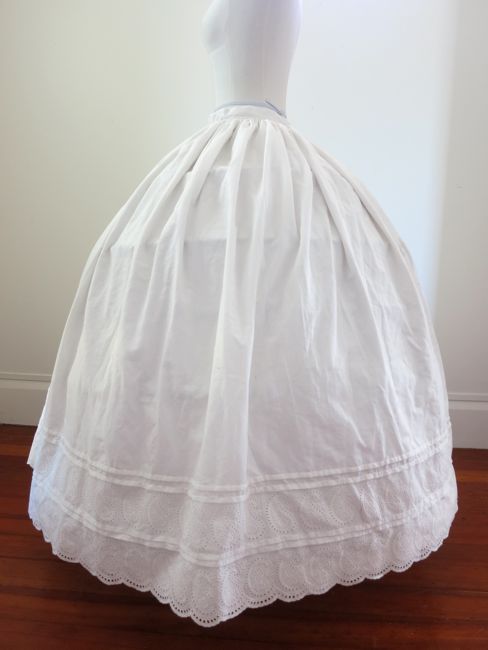
The first problem was sorting the rows of paisley embroidery. My inspiration petticoat only has the one border, and 6 rows of tucks. My fabric had a wider border, and then three further rows of paisley embroidery.
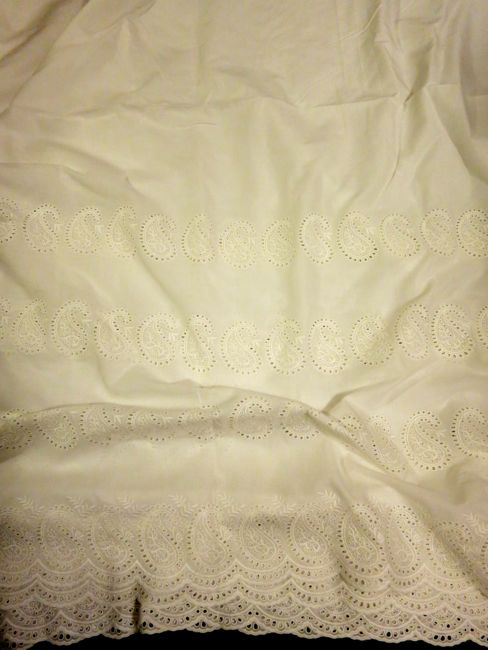
To best match the aesthetic of ca. 1860 originals, I cut out the two middle rows of paisley embroidery (I’ll use them to trim a matching set of chemise and drawers, or to create a faux paisley muslin shawl) and then hid the join seam in a tuck. I’m pleased with the paisley border, double tuck, row of paisley embroidery, double tuck pattern that is my end result.

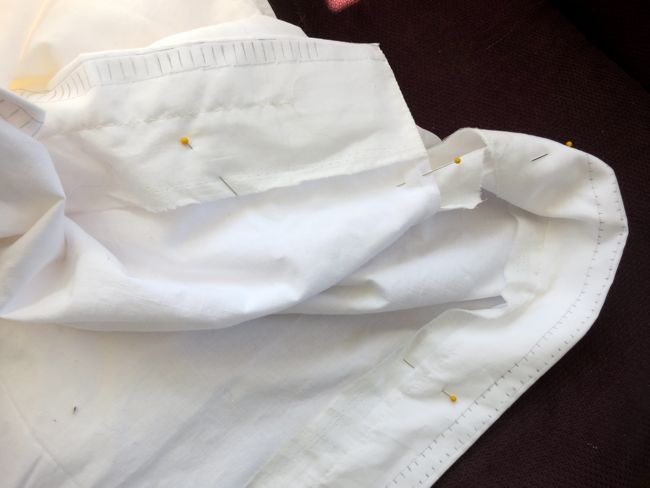
My other big problem with the weight of the fabric. My fabric is a very light cotton voile – much finer than the fabric my inspiration petticoat would have been made out of. So in order to get it to sit right around the waistband and to hang correctly over a hoopskit I had to add another layer of fabric with a similar hand to an 1860s original. I ended up using a vintage cotton sheet, as none of the other white fabrics I had on hand were the right weight. And, of course, working with two layers of fabric instead of one makes everything infinitely more difficult.
So instead of being a one-day project, it turned out to be a one-hour-a-day-for-four-weeks project! This is what happens when you quarter-inch cartridge pleat three metres of fabric…
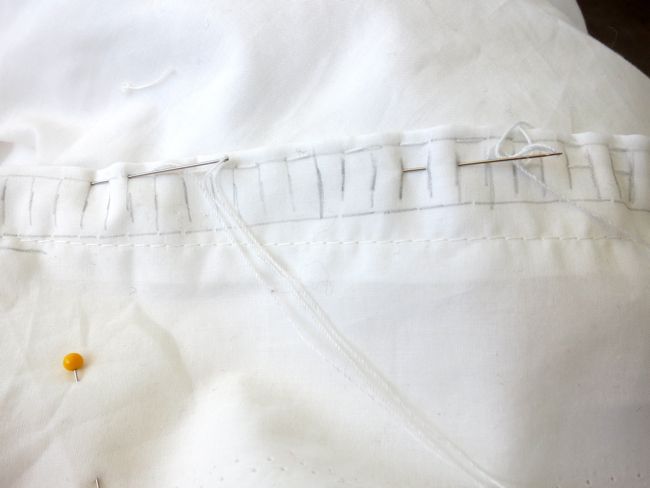
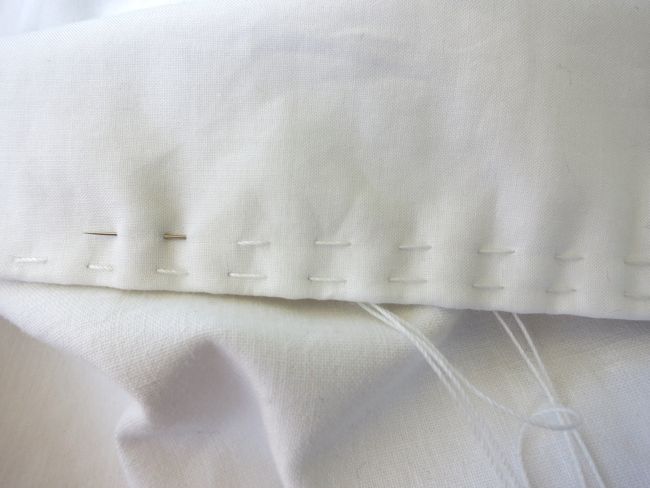
Annoying, yes, but the teeny cartridge pleats do look beautiful on the finished skirt:

Not getting it done for Innovations turned out to be a blessing in disguise when The Project arose – I had only a couple of hours of work to do the last of the pleating and hand-work the buttonhole to have it finished for Under it All. Not quite the corset I’d planned, but so wonderful to have fulfilled my dream of a paisley petticoat!
Seeing it on the hoopskirt reminds me that it really is time for me to make a new, proper, and slightly smaller, set of bell hoops.
The Challenge: #4 — Under it All
Fabric: 3m of paisley border-print cotton voile ($25 per metre, but I’m counting it as $15pm, because the rows of paisley embroidery I cut out would easily by $5pm as trim – that’s fair, right?), plus a vintage sheet ($4 at an op-shop)
Pattern: None, just based on squinting at period examples. I think 3 metres may have been slight overkill in width though.
Year: ca. 1860, just like the original it is based on. I wanted it to fit in with the most extreme hoopskirt silhouette, and to come from a time when a mix of hand and machine sewing would have been plausible.
Notions: Thread, a fabric lingerie button ($2 for 50 at an op-shop, so 4 ¢ a piece – score!)
How historically accurate is it? The aesthetic is spot on, but the fabric is far too lightweight to be period accurate, and I know of no examples of double-layer petticoats from this period, so 60%. Getting your fabric right in hand, as well as fibre content, is so important…
Hours to complete: 21. I’m a very slow cartridge pleater!
First worn: Not yet, but I’m enjoying admiring it on Isabelle!
Total cost: $49.04

Oh, how pretty!!! It seems almost a shame to call that a petticoat..
Gah! You weren’t kidding about the price. But it IS lovely and looks great, so it’s a win :3 I really like the pin tucks with the paisley row in between.
Really beautiful!!! what a gorgeous petticoat ! I wish one day I could do one like yours 🙂
So gorgeous! The fabric was worth every penny!
Pretty! I also LOVE that inspiration petticoat. Now you need a wrapper to wear with it so you can show off your beautiful petticoat.
Best,
Quinn
The most beautiful petticoat I have ever seen! I live in the Southern United States and there is a tradition here of recreating the South prior to the Civil War. I’m sure that every one of those ladies would line up and pay dearly to purchase this petticoat. It truly is stunning, thank you so very much for sharing it with us!!
Isn’t it wonderful to actually have that dream petticoat? It is so lovely. What a great thing, despite the cost, to have exactly that eyelet pattern at the bottom!
Just wonderful! Congratulations!
I love it!!!!!
Worth every penny. It’s beautiful.
I can see why you were inspired! That is a gorgeous piece and your interpretation is just as beautiful. Love it!
You know, you just can’t believe that such things happen and I totally see why you had to buy that fabric. Very pretty.
It’s fantastic! That cartridge pleating was definitely worth it, and it’s just sooo pretty that I’m inclined to agree with those who say it should not be hidden as a petticoat… you should use it in an undergarments talk or something, it needs to be seen!
Yay! Congrats…..so LOVELY….
Considering how many of your SewFortnightly items come from stash or bargains, I think you well deserved one that cost a bit. The embroidery is beautiful.
A smocking pleater would make those tiny cartridge pleats go a lot faster, but wouldn’t be exactly period construction technique. They look wonderful.
It’s gorgeous, probably just as well the Fabric Shop closed here after the earthquakes; I’d be permanently broke!
But beautifully clad!
Now I wish I had time to make one! I have a king-sized sheet set aside to make one very similar to that. My secret for cartridge pleating is to use 2 needles and do both rows of stitching at the same time. It really isn’t hard to keep the 2 rows of stitches even and it cuts the time in half.
I’m very impressed. It replicates the look and feel of the original really well.
This morning, my manager came in to work wearing a dress made of this fabric, but in green. It’s a beautiful fabric.
I know that $50 can be a chunk of change when on a budget. I’m there right now. However if it can be found…then the fabric is indeed of that value. All of that gorgeous embroidery and filigree cut outs are time consuming and take work to do, whether by hand or machine in a factory. I’m willing to spend a chunk of change, if it can be found, for a wow and this is definitely a wow!
And at least they wore layers of petticoats…
Laurie
This is stunning! Seems a shame to hide it under other garments.
Wow!! It turned out great!! I love it when I can find just the right fabric!
I can’t wait for The Project’s unveiling!!