
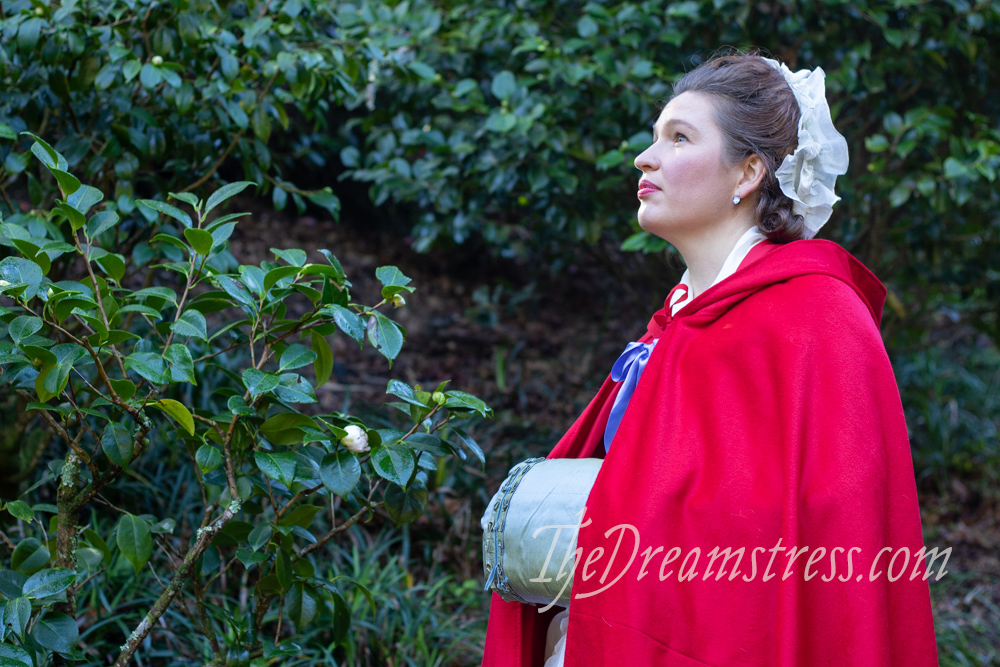
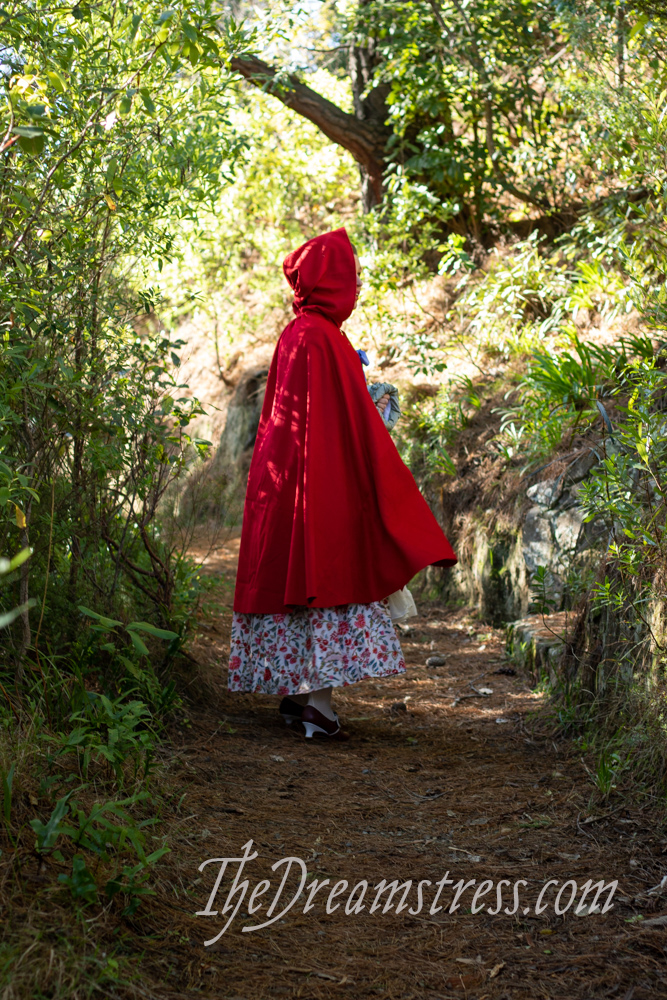
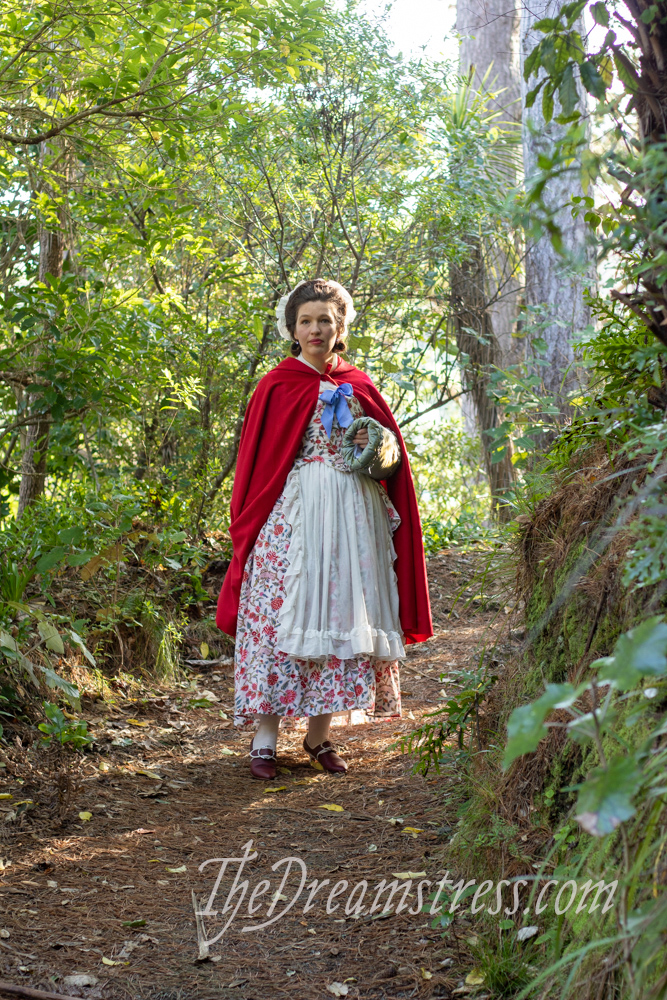
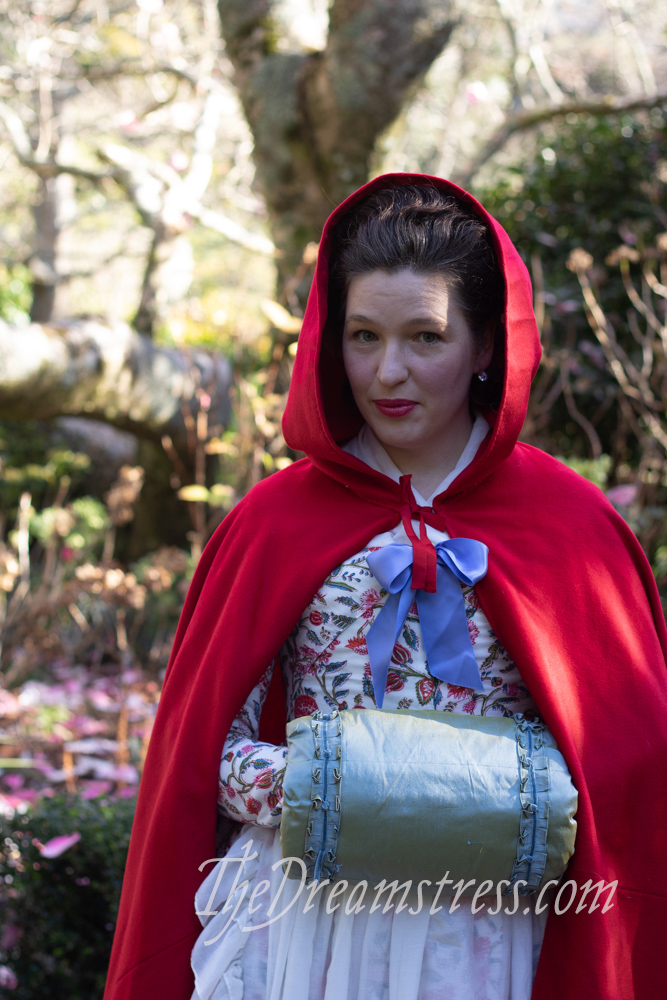
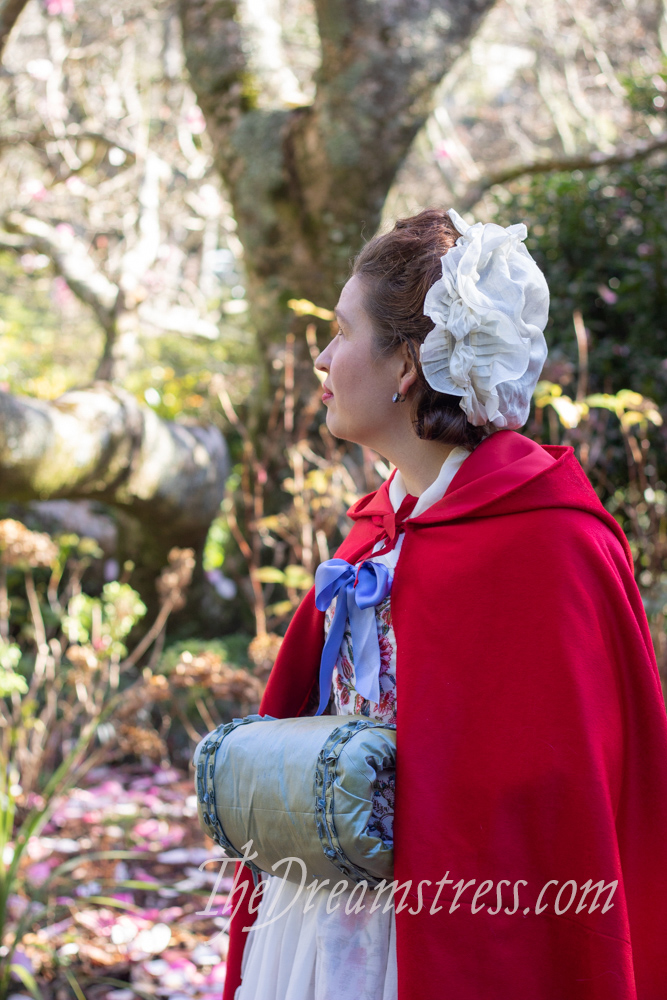
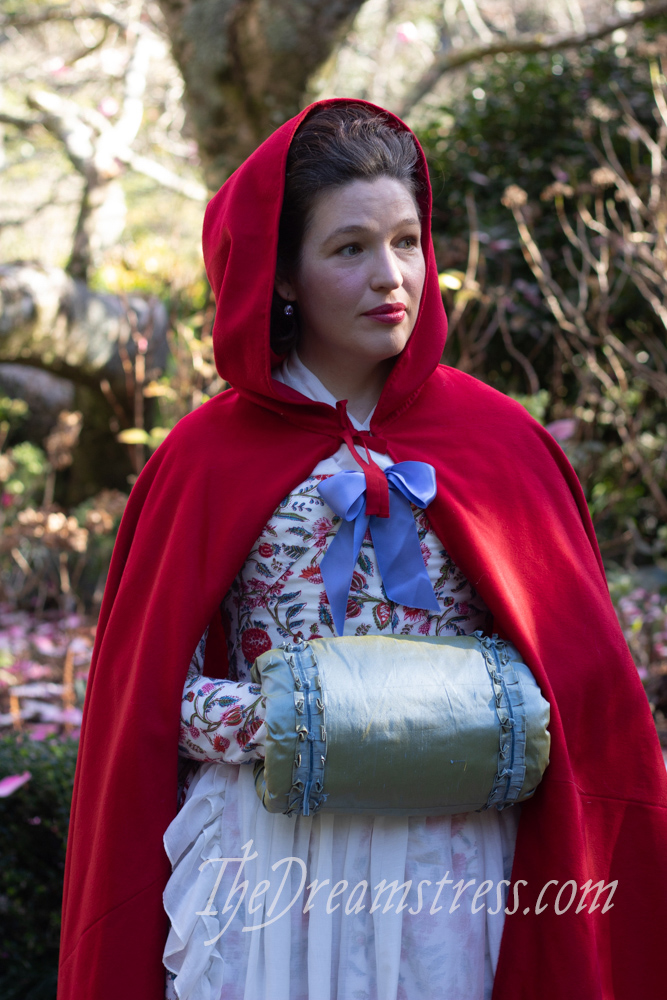
Like every historical costumer ever, I’ve always wanted to make an 18th century red wool cloak. Who doesn’t want to be deliciously cozy and comfortable while dressing up as an actual fairytale!?
When my friend Theresa announced that she was taking advantage of the New Zealand-Australia travel bubble and coming over to see us – and wanted to dress up and do a photoshoot – I knew it was time for my cloak. After all, it would be midwinter in NZ and we’d need to keep warm!
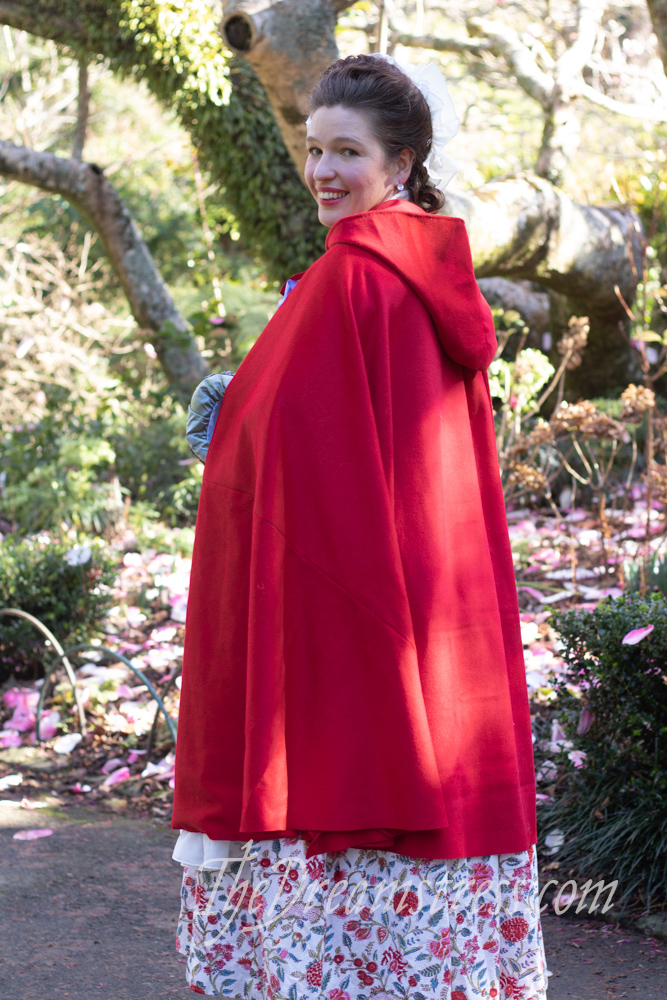
Sadly, Delta popped our bubble, and Theresa’s trip was postponed. The photoshoot didn’t happen, but my friend Averil helped me with one to show off the finished cloak and my extremely exuberant Amalia ensemble.
So how did I make the cloak?
The Cloak Fabric
Extant 18th century cloaks always look so lush on their mannequins that I’d always assumed they take meters and meters of fabric.
Years ago I bought a bunch of red wool with a cloak in mind. I didn’t love the shade or the feel of the fabric, but it was extremely affordable. Lately I’ve been enjoying a slower, more purposeful sewing process, and I’ve realised that life is too short for fabric I don’t love.
 So when a reason for the cloak came up, I thought I’d see if my luck was in at the local fabric shops. Oh, was it ever!
Did The Fabric Warehouse have any pure wool in red? No… But…they had a silk-cashmere plush in the most divine red! They had got it from a stash clearance from a woman with extremely good taste in fabric.
But…only 2.2m. But piecing is period! And it was such beautiful fabric I was sure I could make it work, directional plush and all.
So I bought the lot, chucked the stuff I’d originally bought up on Trademe, and ended up even, but with fabric I loved.
To face the cloak and line the hood I found the red silk taffeta I’d originally planned to make my Regency Janeway spencer out of.
It matched like searched a 100 fabric stores to find the perfect shade!
The Cloak Pattern
I based my cloak on the one in Costume Close up, using their pattern and construction details, but adapting it to the width of my fabric. I also studied all of Jean Hunniset’s cloak patterns, and her notes on them.
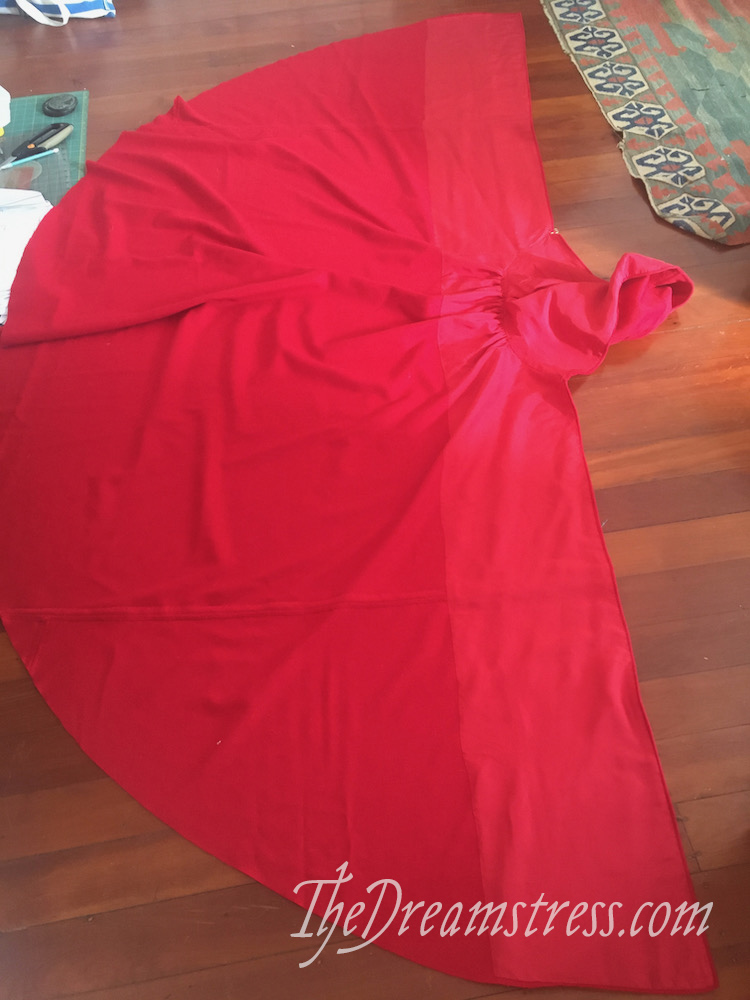
The cloak is basically an elongated half circle, with a full width of fabric down the centre of the cloak, and then two half widths forming the points of the circle.
The original cloak was made from 140cm wide fabric. Mine was 160cm.
Some historical costumers like to cut their fabric down to match the width of the original garments, but I prefer to use width the fabric is woven to. In my mind, using the full width and the selvedges is more accurate than artificially cutting a narrower width. It’s certainly what period sewist would have done if given the same fabric. This is why we can never be truly historically accurate – and there’s no exact science to determining accuracy!
By very careful cutting, and a little judicious piecing, I was able to get a 108cm cloak out of my fabric – just like the original.
(all together now: piecing is period!)
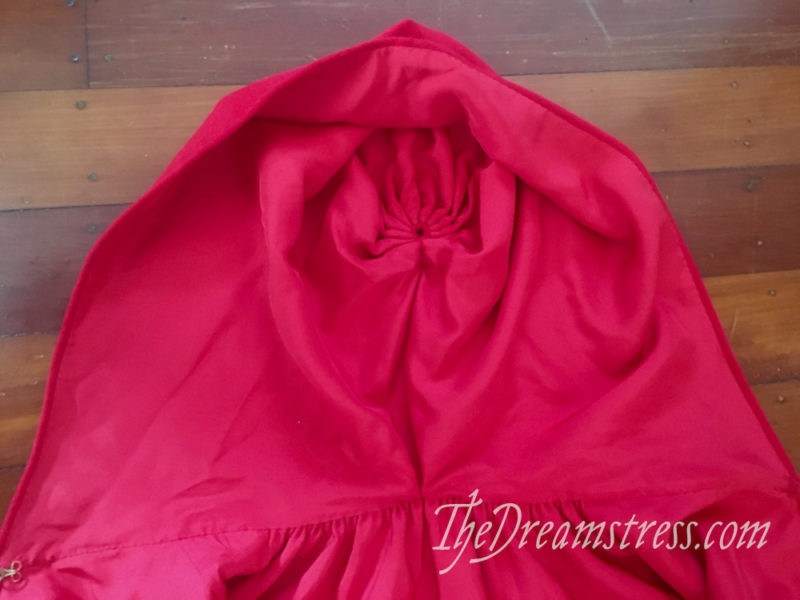
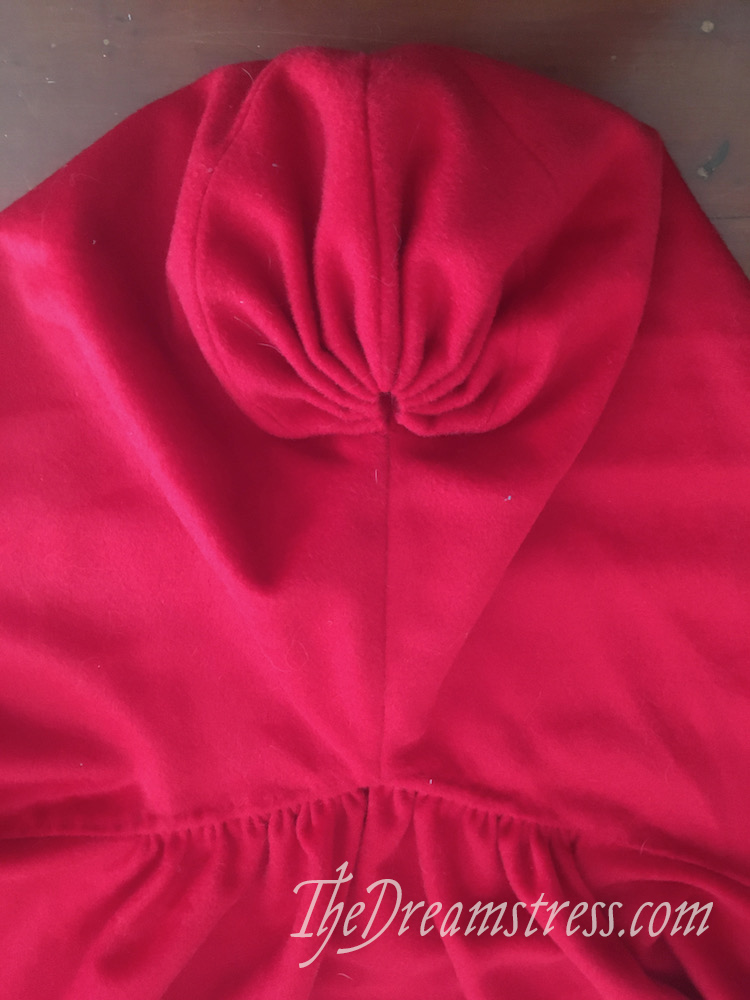
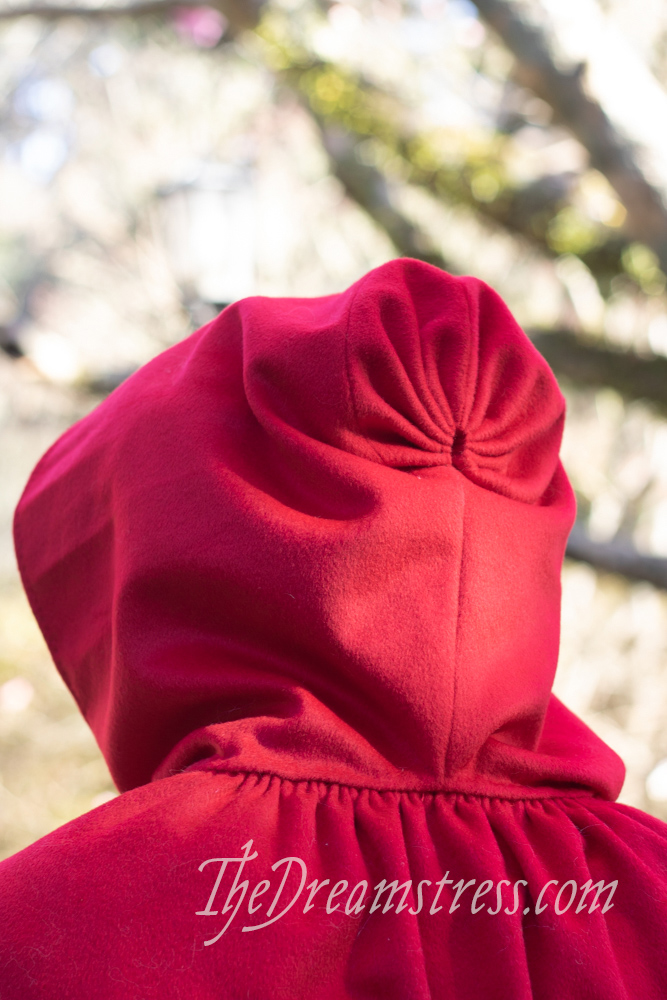
My hood is a little bigger than the original, to accomodate higher 1780s hair (and because I have a big head). I had to piece the hood as well.
The Cloak Construction
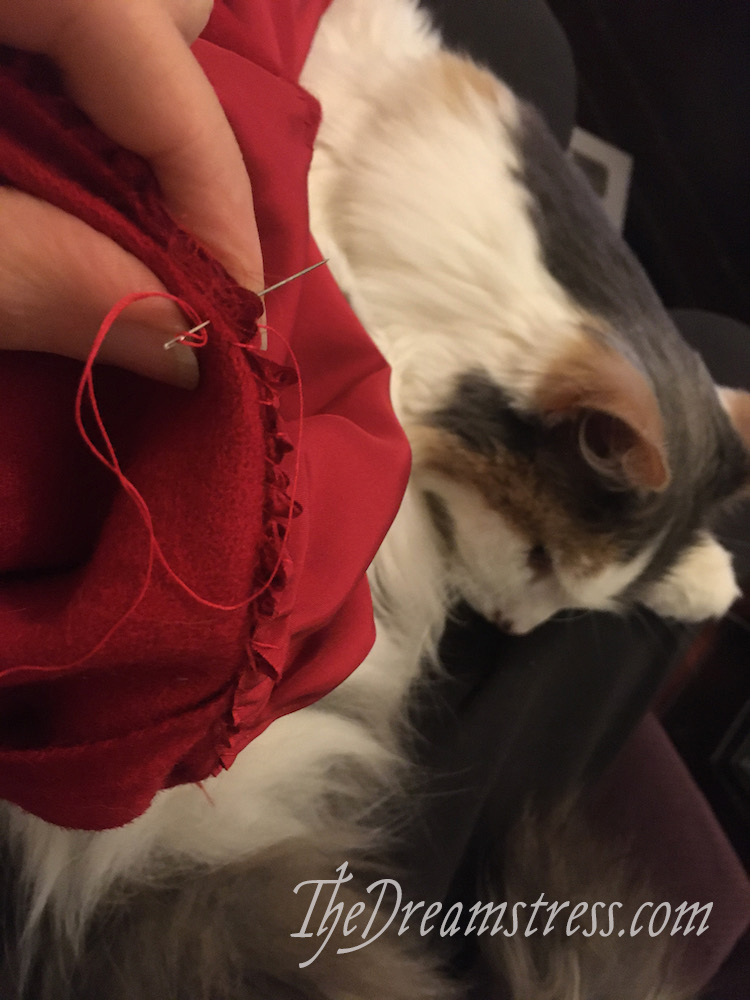
To save my hands, which always suffer in winter, I machine sewed the cloak seams. I risked it, and indulged myself by handsewing the rest.
Since I wasn’t stressing about stitch accuracy, I herringboned down my seams. Whipstitches might be more accurate, but herringboning made me happier.
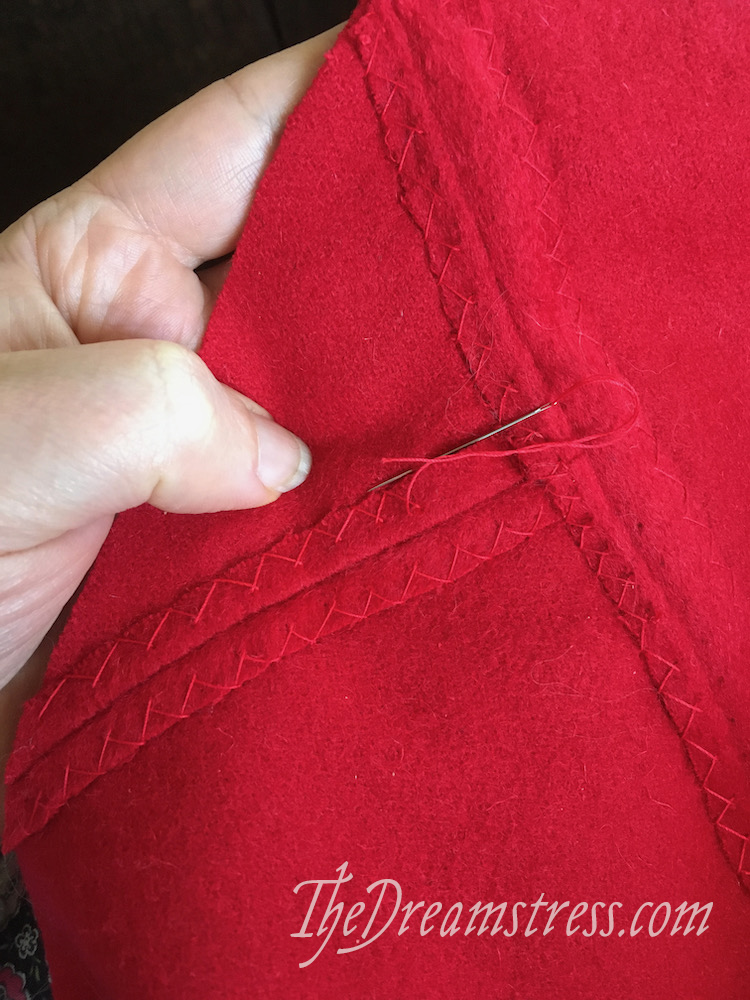
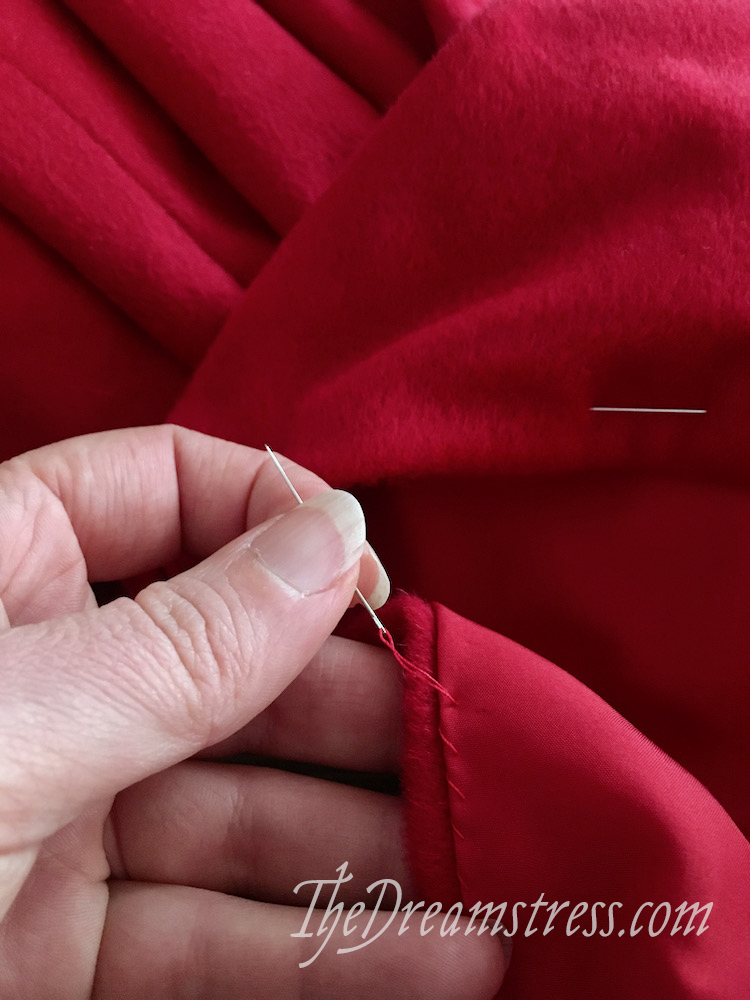
The silk hood linings and front facing did get whipstitched down though.
It took me a bit to decide on the hood construction.
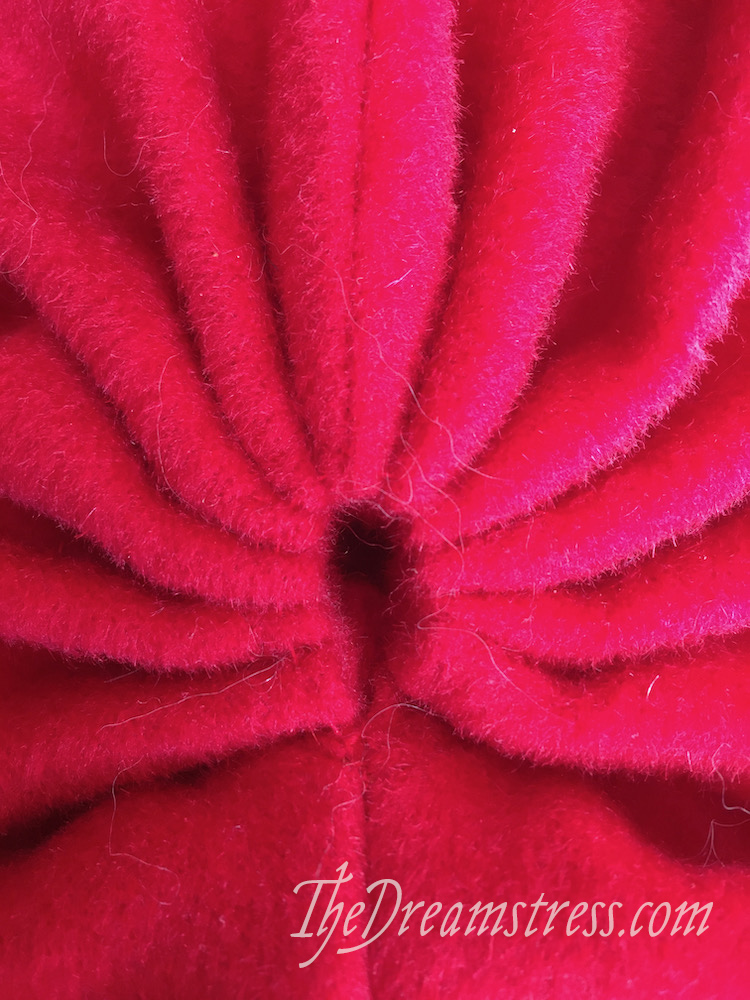
The pleats themselves weren’t hard. It just took figuring out the right number of pleats, and gathering them in with cartridge pleating.
However, I wasn’t sure how the pleats and lining should interact. Should the outer and lining be pleated in separately, and caught together? Or should the lining be joined to the outer, and then the lining and outer pleated together?
I settled on the latter:
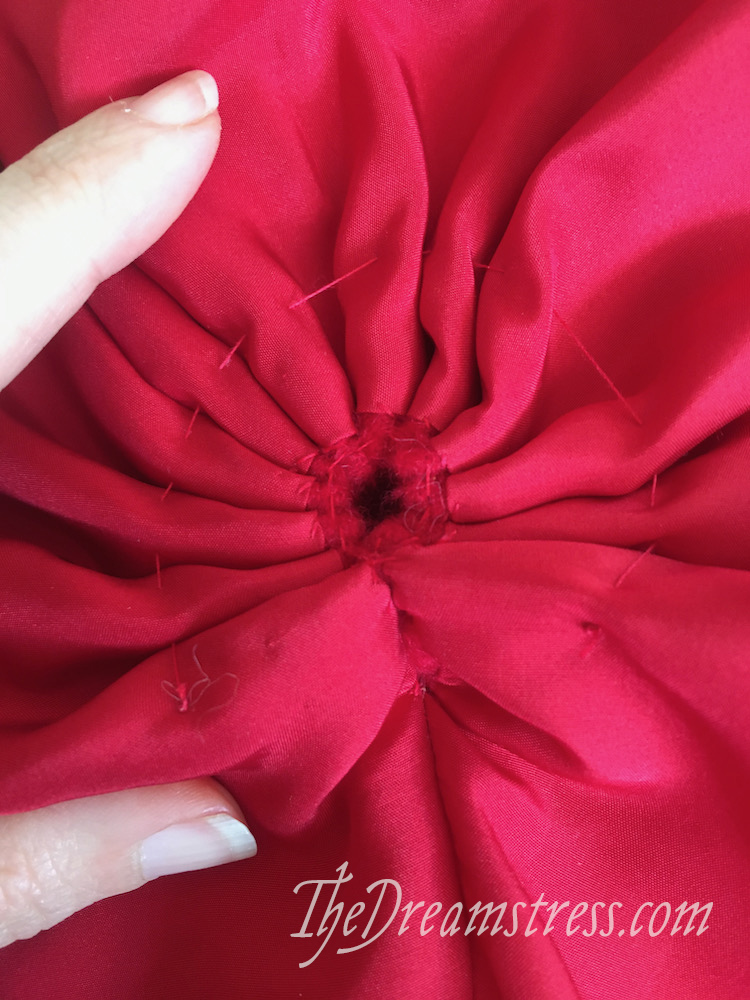
I whipstitched the lining to the outer, gathered in both, and then used an extra line of gathering stitches to hold the back pleating stable.
I’m rather pleased with how it turned out!
The body of the cloak was gathered with cartridge stitches in the neck, and pulled in to fit the hood. I backstitched the hood to the body, and then whipstitched the selvedges up into the hood.
The the whole thing got covered by the hood lining.

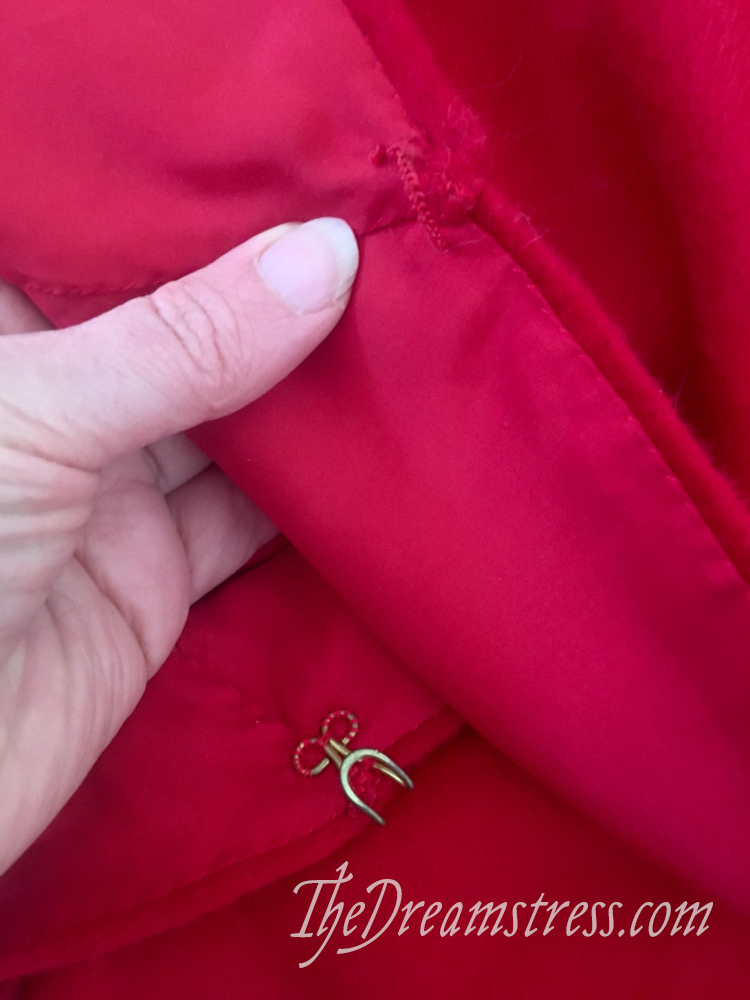
For the photoshoot I tied the cloak closed, but decided that was an extremely annoying way to fasten a cloak.
I’ve since replaced it with a hook and thread loop.
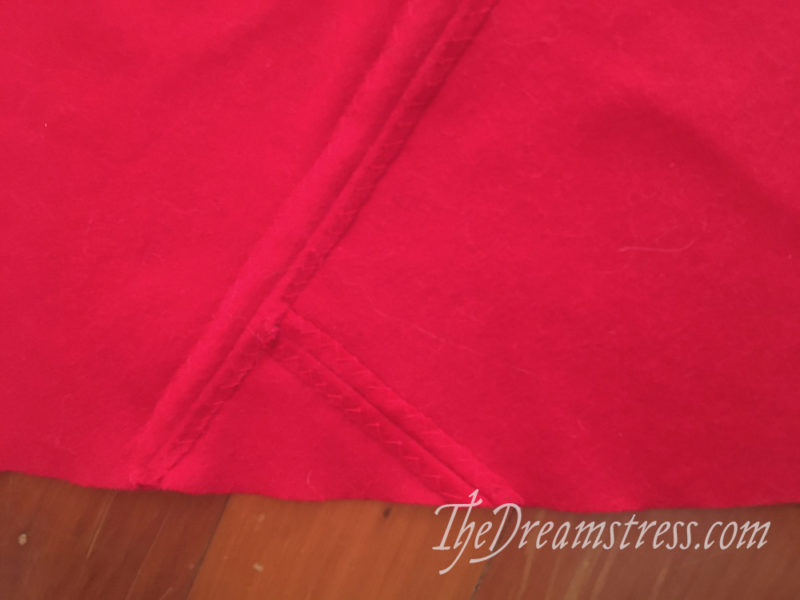
The hem of the cloak, just like the originals, is left raw. Three cheers for tightly woven and fulled wool!

Overall I am utterly thrilled with my cloak, and it’s utterly delightful to wear, and everything I hoped it will be.
Well, almost everything. I did make one mistake. The original cloak had a silk taffeta facing, and a lightweight silk hood lining. My taffeta fit so perfectly and matched so perfectly that of course I used it in my hood. Hoods are one place you don’t want your fabric to scroop! The hood is distractingly noisy when I wear it.
However, that very clever fabric usage does mean that the cloak qualifies for the HSM Challenge #11 for 2021: Zero Waste. There wasn’t a scrap of either of my fabrics left!
The Historical Sew Monthly 2021 Challenge #11: Zero Waste
What the item is: An 18th century cloak
How it fits the challenge: The clever construction of 18th century cloaks mean that they use fabric very efficiently, with no leftover scraps.
Material: Silk-cashmere plush, with silk taffeta facings and hood lining.
Pattern: Based on the one in Costume Close Up.
Year: ca. 1785 – these cloaks were worn from at least 1750-1810, but my hood size was specifically made to accomodate 1780s hair.
Notions: cotton thread, a brass hook.
How historically accurate is it? Due to physical constraints it’s partly machine sewn. My research suggests that the silk-cashmere plush was an accurate 18th c fabric, but I’m not absolutely certain it would have been used for a cloak like this.Maybe 80%.
Hours to complete: 10ish hours of happy handsewing, 30 minutes of machine sewing, and a couple more hours of patternmaking and cutting out.
First worn: Early August to celebrate the first of the magnolias.
Total cost: $70-ish. I intend to get plenty of use of this to make it well worth it!
oh, that is truly a thing of beauty and a joy forever! i love that it is made of such luxurious fabrics, and that the lining matched perfectly as it did in a serendipitous way.
i’m thinking we should bring back cloaks? i just acquired a vintage tweed cape and can’t wait for cold weather to wear it…there is both comfort and glamour to cloaks and capes.
the scarlet colour is just so happy-making, too. such a nice complement to your historic outfit.
Mmmmmm a gorgeous red cloak! It’s on my sewing list too I’ll admit …
Three cheers for the zero waste of fabric! I always get so satisfied when I manage to eke out another garment from my off cuts. Kudos for looking after your hands too – the push for eternal hand sewing is impossible for me due to a history of RSI in both wrists and hands, so joining the club of historical costuming sometimes seems a bit exclusive.
What a wonderful wardrobe addition!
Your cloak is beautiful! I think we should bring them back for everyday wear.
Gorgeous red cloak.
As the owner of two capes for over 50 years, I can advise that they are totally unusable with car seat belts. However, back in impecunious student days when travel was by bus and train, they were marvelous. A long front zip and zipped hand holes meant I could curl up inside fairly safe from the wandering hands of others – and was warm too. When walking, I just wore it, but it didn’t work with a backpack! For carrying a suitcase, I had an extra zip on each side seam which allowed me to pop my hand through in the right position for carrying.
Not historical, but so many people took sketches I hope there are other ‘travelling capes’ out there! But now I want a red one…
Marvelous! It’s just so pretty, and so comfy looking. I, too, like having armholes in a cape. I also just like capes.
It is turning autumn, here in the northern hemisphere, which makes the look absolutely fitting for cooler days and thoughts of costumes and history.
Dear Leimomi,
Your happiness in the scrumptious new cloak shines in each of the photographs. May it find lots and lots of wear.
The material sounds luscious. The word “plush” by itself here has echoes of Victorian plush used for upholstery. It often covered horsehair filling and I have a faint memory as a tiny kid of being prickled by an end of horsehair that had wormed its way through a plush cushion. Back then, little girls’ dresses were quite short, and if you weren’t wearing tights, the backs of your legs often picked up marks from that period’s often unforgiving furniture. Ow! However, mix “plush” with “cashmere” and “silk” and warm and snuggly luxury is what came to mind, especially in that wow color.
Thanks kindly, finally, for the tutorial on how to make it. I’ve had a few yards of red wool Melton waiting since at least 2016, and knew I wanted to use Costume Close Up as the pattern, but just didn’t have the go to simply DO it. Maybe now I do 🙂
Very best,
Natalie in KY
Gorgeous! And I suspect you will need to take great care to avoid it becoming a silk/cashmere/Felicity blend!
Exciting! It’s lovely. It’s very exuberant with your floral outfit. And your hair looks great!
I was able to examine an extant 18th century red cloak and found that the pleats at the back of the hood where the lining meets wool were as you decided to do it. Stitched together and then pleated to bring the hood into the correct shape. 🙂
Best,
Quinn
Beautiful!
One of my convict ancestors (transported to Australia for stealing a linen sheet) was arrested wearing a red cloak, in London in 1802.
I wonder if it looked something like this?!
It’s lovely and suits you so well. The last photo is delightful!