
I really love including multiple bust cup size options in Scroop Patterns. I did it with the Ngaio Blouse and the Robin Dress, and there are multiple fit options in all my stay and corset patterns.. I also considered including cup options in the Summit Dress pattern too.
I was on the fence because I didn’t want the pattern to move too far from its source patterns: the 14th/15th century garments excavated at Herjolfsnes. To help me decide, I did some quick calculations on how much extra paper it would take to include them.
It would have been over 100 A4/US Letter pages in Size Pack C. Or 7 (!!!) A0 pages. Oof.
The Summit is already a big pattern: nobody wants a pattern that big.
So instead, here’s a tutorial on how to add your own bust dart, and do your own FBA on the Summit Dress. I think this is even more helpful, because you can use this method on other garments with an interesting side-front not-a-princess-seam.
Yeah, these seams here? Not a princess seam. Not useful for anything remotely substantial in the way of bust fitting:

They help create amazing swish in the dress, and are really cool design lines, but they don’t get close enough to the bust apex to be a princess seam.
So here’s how to add a bust dart that IS helpful in the way of substantial fitting.

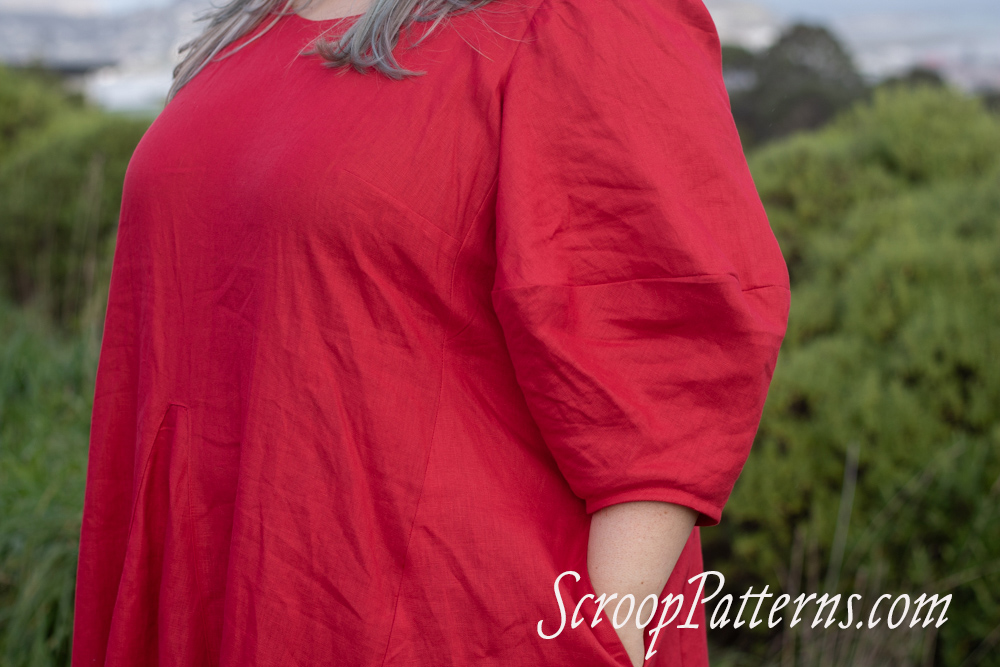
I did it for the sample dress that Dani models above, to demonstrate.
For this exercise we’re going to do this for an imaginary lady. Let’s call her Mehitabel.
How to add a bust dart to the Summit Dress.
You’ll need two measurements:
- Sewing Cup Size
- Bust Apex
To find these accurately, make sure you’re wearing the type of bra you intend to wear under the Summit Dress while you take your measurements.
Find your cup size:
Your sewing cup size is the difference between your high bust measurement, and your full bust measurement. This may be different than the bra cup size you wear.
It’s easiest to take and calculate in inches, so that’s what I’ll be using.
Take your full bust measure by wrapping a tape around your back and the fullest part of your bust. The tape should be parallel to the floor. Take a measure that is just tight enough to sit firmly around you without denting in to your bust.
Mehitabel’s full bust is 49”
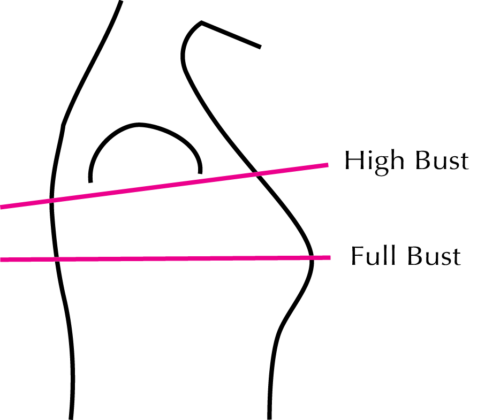
Take your high bust measurement by wrapping your measuring tape around your back, under your arms, and across your chest above any bust flesh.
Mehitabel’s high bust measurement is 44”
Now, subtract your high bust measurement from your full bust measurement.
49 – 44 = 5”
Mehitabel’s difference is 5”, which means she has a sewing cup size of DD/E
Difference Sewing cup size
1 inch A
2 inch B
3 inch C
4 inch D
5 inch DD or E
6 inch DDD, EE or F
The Summit Dress was fitted on a body model with a C cup, and best fits a B or C. We’re going to use a 2” B cup difference for making our adjustments.
So, with a 2” difference between high and full bust, you want to choose the pattern size that is 2” bigger than your high bust.
That means we’ll be working with a Size 46 for Mehitabel: 2” bigger than 44.
46 is 3” smaller than Mehitabel’s 49” bust measure, so we’ll be making a 3” adjustment to the pattern.
Figure out what what size is 2” bigger than your high bust, and how much of an adjustment you’ll be making to your pattern.
Keep that number in mind as we move to the next step.
Find your bust apex:
Your bust apex is the point of your bust bulge (yes, that’s the technical patternmaking term for it!): usually this means your nipple. We need to mark it on the pattern, so you’re going to measure down from your shoulder, and across your chest from point to point:

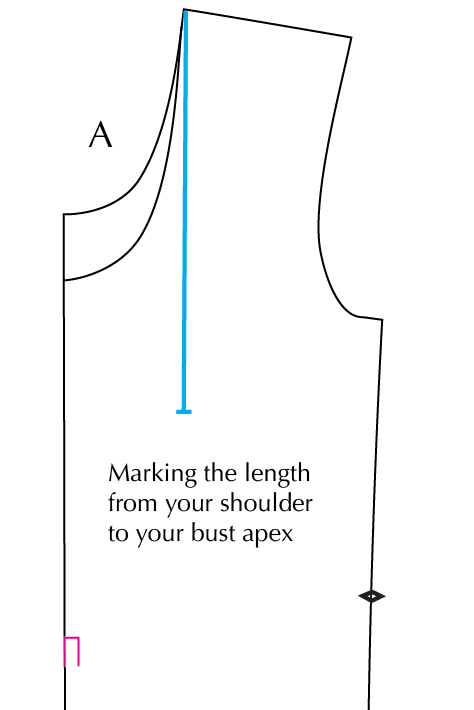
Work with Piece A in the pattern size that is 2” bigger than your high bust.
Measure down your body from the your shoulder directly below your ear, to your bust point (aka, your bust apex, your nipple).
On Front A draw a line parallel to the centre front from the neck point, to the length you just measured:
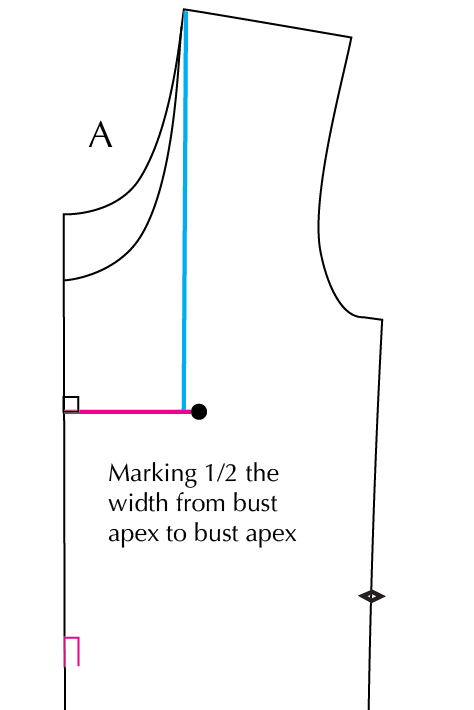
Now, measure across your bust from left bust point, to right bust point.
Divide this measurement in half.
Draw a line which just touches the bottom of the vertical line, at right angles to the CF, all the way across to your side-front seam. Mark a point at your bust apex.
And now we can…
Add a bust dart
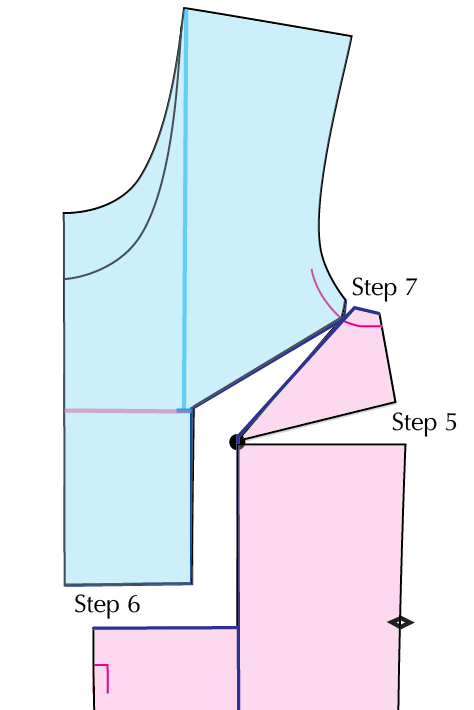
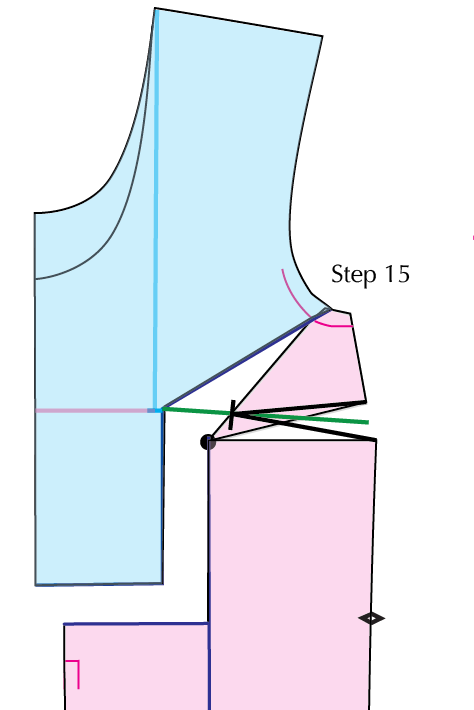
- Draw a diagonal line from your bust apex point to 1 1/4”/3cm up the armhole curve from the lower point of the armhole.
- Draw a vertical line which runs parallel to the centre front from your bust apex point all the way to the hem.
- Draw a horizontal line at right angles to the centre front and the Step 2 vertical line just above the pink rectangle marking the top of the godet insertion.
- Mark the 1.5cm seam allowance at the bottom of the armhole.

- Cut across the horizontal line that intersects the bust apex point from the side-front seam to, but not through, the bust point. You’re going to use the dot as a hinge point.
- Cut across the Step 3 horizontal line, and up the Step 2 vertical line, through the bust point (making sure that there’s still a bit of paper between this cut, and the one from Step 5), and out to, but not through, the seam allowance line.
- Cut in the seam allowance line to, but not through, leaving a little bit of paper to act as a hinge point.
Your pattern will look like this, with hinge points at the bust apex point and armhole that you can use to spread the pattern pieces to add length and width for a bust dart:
- Slip a large piece of paper (or several small pieces of paper) under all the slashes you have just made. Make sure that the paper sticks out beyond the open triangle from Step 5 an inch or so just at the triangle.
- Go back to the cup size and the adjustment that you calculated you would need for your pattern.
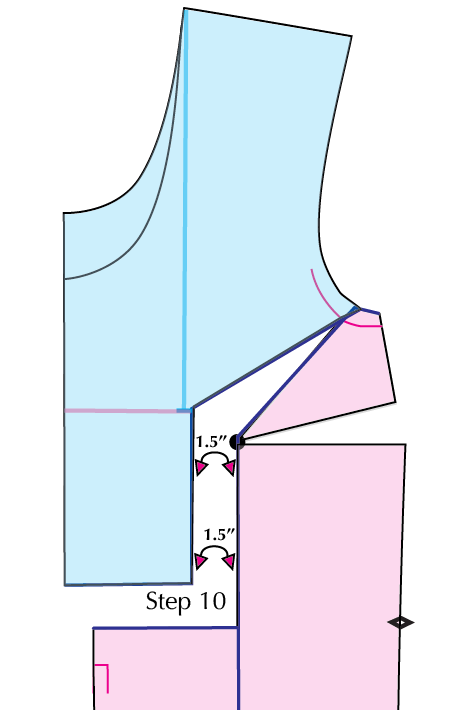
Mehitabel needs a 3” adjustment. We’re going to add 1/2 that measurement to the pattern piece, because it’s 1/2 the front. - Keeping the gap an even width, spread the vertical slash 1/2 the total adjustment needed (this is the difference between the pattern size you are working with and your full bust measure.).
Mehitabel has spread hers 1 1/2”:
- Tape the pattern pieces down, using small pieces of tape that just hold the pattern securely in place. You still need to mark a dart, and don’t want it to be too hard to write on the tape!
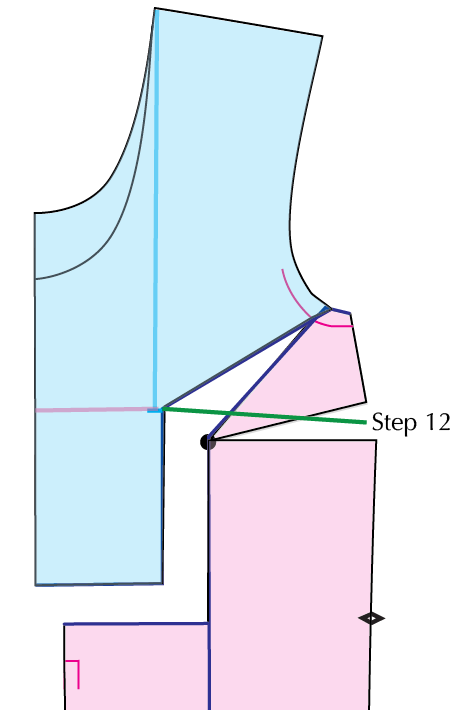
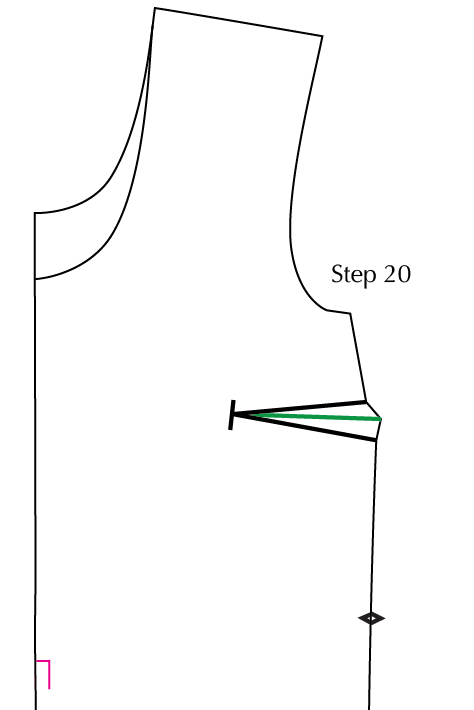
- Measure the gap of the open triangle in the side seam, and mark the centre point. Draw a line out from the angled inner corner of the upper bodice piece to marked centre point. This will be the centre line of your dart.
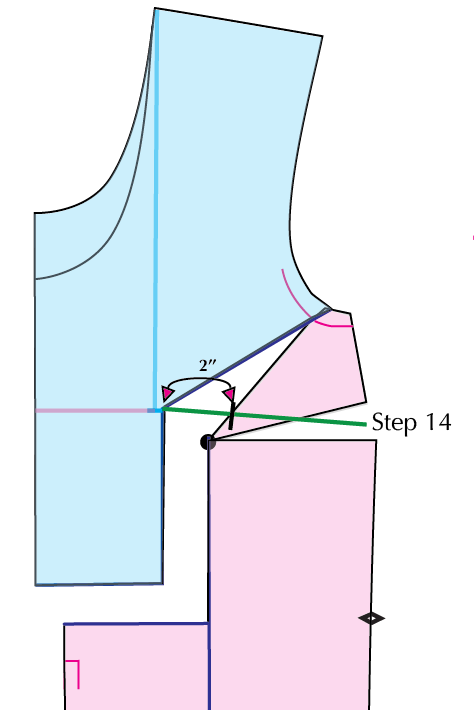
- Measure back along this line from the bust point to mark your dart tip. You never want your dart tip to end right on the bust point. The larger your size, the further back it should sit. If know how far away from your bust point to your dart tip is attractive on you, use that. If not, use this guide:
- For bust sizes 30-38, measure back 1”.
- For bust sizes 40-46, measure back 1.5”
- For bust sizes 48-50, measure back 2”
- For bust sizes 52-56, measure back 2.5”
- Mark your dart tip.
Mehitabel has a 49” bust, so she’s be marking her dart tip 2” back from her bust point.
- Draw lines from the marked dart tip, out to each end of the open triangle on the side seam. This is your dart. It’s probably going to look smaller than you expect a dart to look for your size. That’s because it’s only going to a side-front seam: not all the way to a side seam.
- Tape the dart and all other gaps in the pattern down securely.
- Tape a long strip of paper down the centre front edge of the pattern to re-establish the centre front line.
- Carefully fold the dart on the dart centre line, bring the two outer lines of the dart together, and press the dart down, as you will when its sewn in the dress.
- Cut along the side seam over the dart to smooth out the edge.
- When you open it up there should be a small triangle added to the side seam, which shows you where the dart goes:
And that’s your bust dart added! Just sew it in like you would any other dart.
Altering the godet height on the Summit Dress
Now, there’s just one more thing you should do. If you are larger busted, the top point of the godet may sit too high on you to be flattering. Let’s change that so that it sits at a point that’s right for your body.

Hold the pattern piece up to your shoulder, and measure straight down your front, over your bust, to where you want the godet to start.
The pattern is designed to have fullness from the natural waist, but where it starts is entirely up to you. Do you like fullness from just under your bust? From a high waist? From your natural waist? Mark the point that corresponds to that.
For Dani’s dress, we moved the godet start point down 3”, so it started just below her natural waist.
Once you’ve picked a new top point that you like, alter the godet to match. If you don’t want a lot of extra fullness you can simply take the amount you moved the godet start point off the bottom of the godet piece.
If you do want maximum fullness, use the lengthen-shorten lines to change the pattern, re-draw the angled side seams of the godet piece, and then check them against the length of the piece A centre front hem-to-godet-top point. Adjust as needed.

Enjoy your customised Summit Dress pattern!
This is the clearest explanation of an FBA that I have ever seen! Your diagrams are especially helpful, as it has always been a mystery to me as to where the bust apex goes after slashing and spreading the pattern pieces. Thank you so much for sharing this tutorial 🙂
Thank you! I was afraid I was too wordy, so I’m very pleased to hear this was helpful!