Latest Posts

HSF Challenge #24: Re-do: Pamela & Lynne’s 1905 Greek Key dress

I’m doing something a bit mad for the Historical Sew Fortnightly Challenge #24, in which you re-do one of the earlier challenges.  My goal is to re-do ALL the challenges.

I know!  Ambitious!

OK, I’m not making 23 separate items, but my goal is to make/finish a collection of items which together would qualify for every single one of the challenges so far.

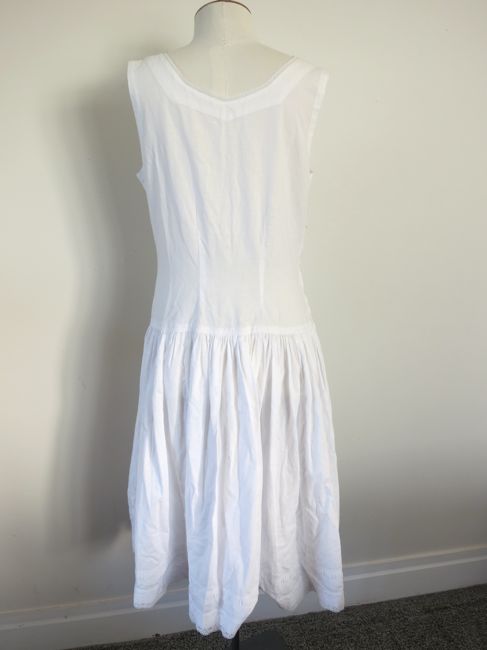
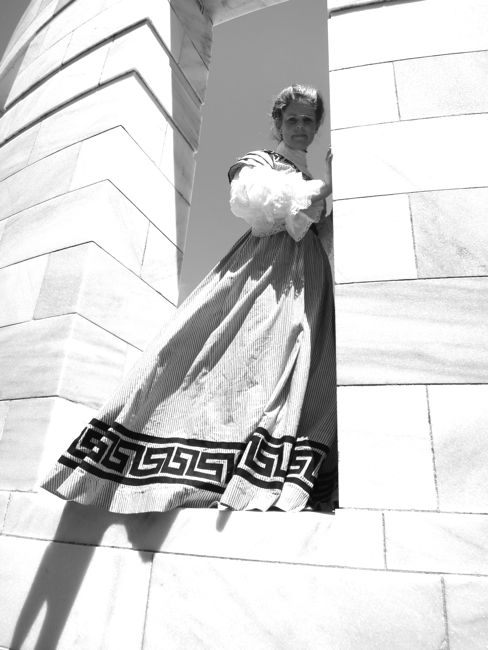
To start with, here is the 1905 Greek Key Reception Dress, which covers 10 of the 23 challenges:

The 1900s Greek Key dress, thedreamstress.com

There is a wonderful story behind this dress.

The dress proper isn’t actually my work: it was patterned up  by the wonderful Lynne (who frequently comments on my blog, and who gave me the fabulous fir sleeve for the Fur & Scales muff), and sewn by her equally wonderful friend Pamela for a production of the Importance of Being Ernest some years ago.

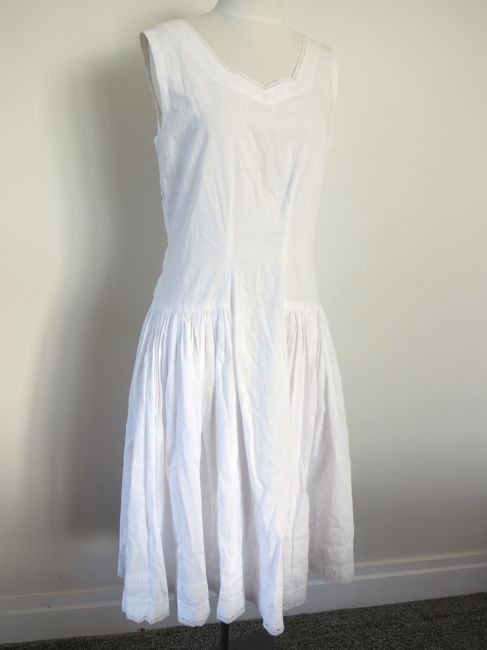
Being Lynne, she did a beautifully researched garment that was equally beautifully made – far more so than any theatre could hope for!  The gown is a perfectly patterned version of the 1905-7 Afternoon Dress in Janet Arnold’s Patterns of Fashion.  It was definitely the best costumed regional performance of IoBE ever staged.  The few big concessions to theatre-wear were price (no budget) and washability.  The dress is cotton and the sleeves and collar/yoke were done in synthetic lace, and the meander motifs at the hem were simply ironed on.

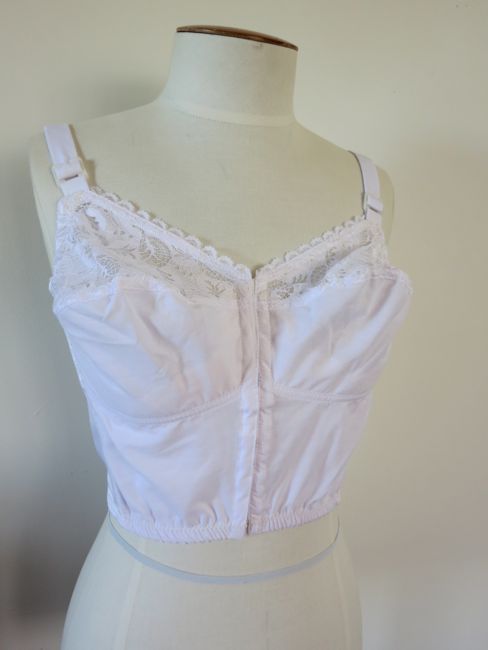
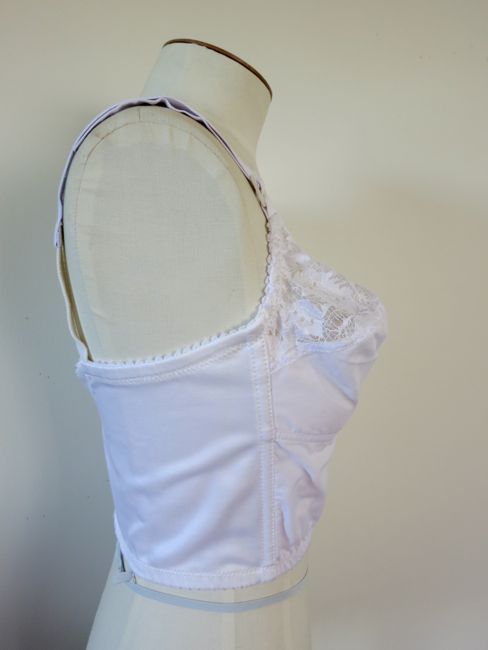
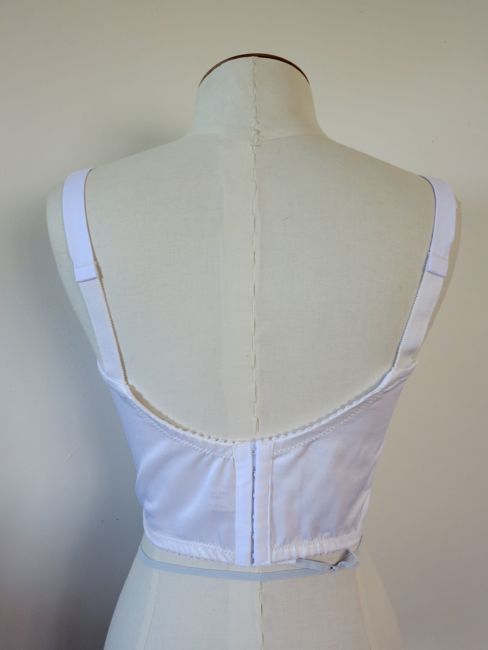
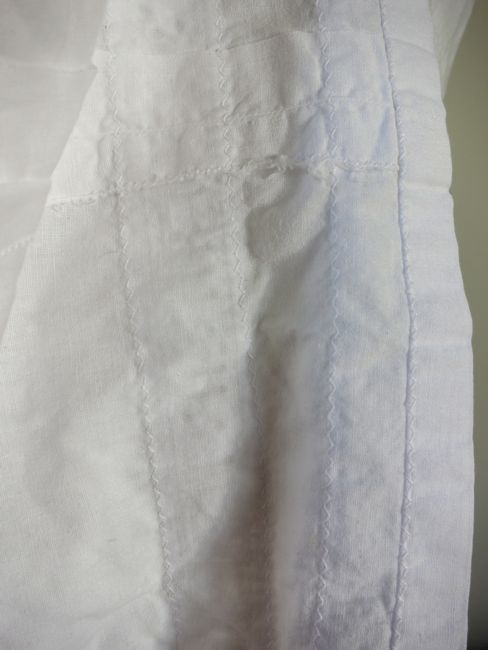
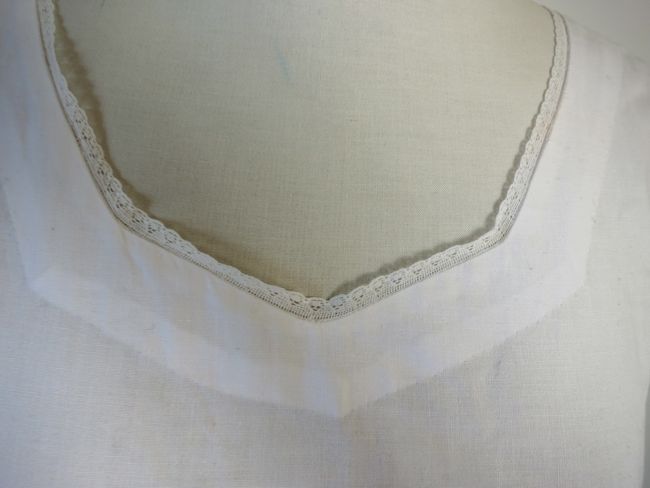
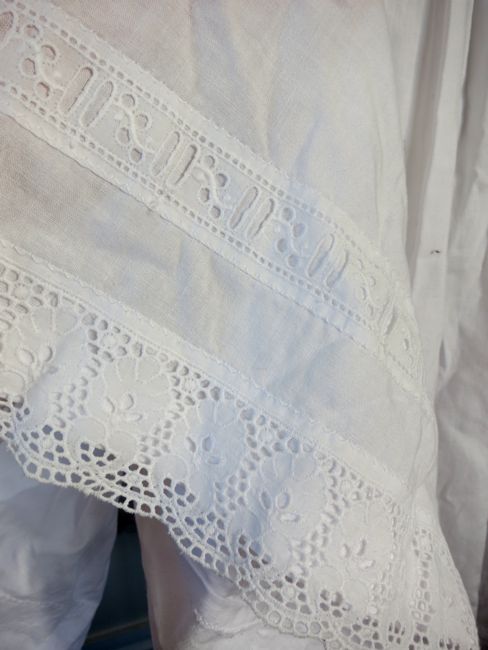
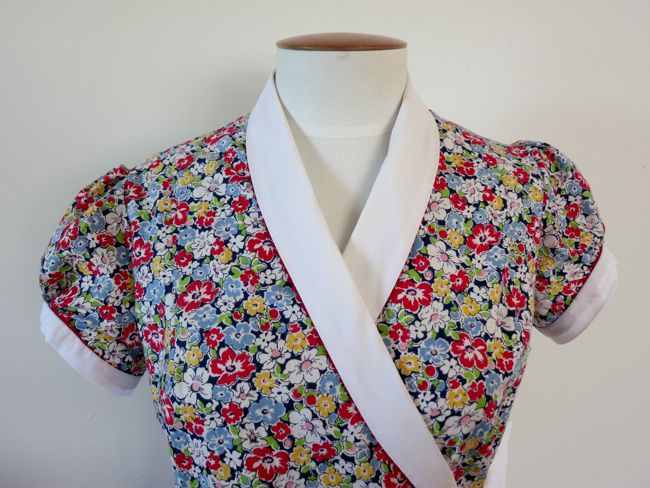
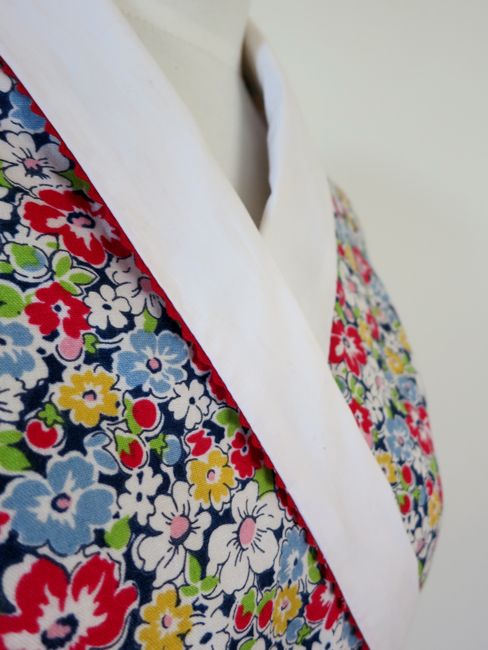
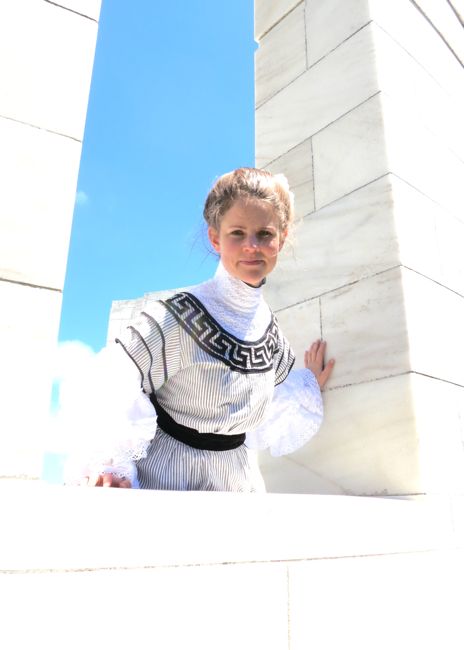
While perfect for stage costume, the sleeves and yoke were a bit worse for the wear from a few performances.  The body of the dress, however, was in perfect condition.  So I removed the sleeves and yoke and remade them in white cotton and cotton lace.

The 1905 Greek Key reception dress, thedreamstress.com

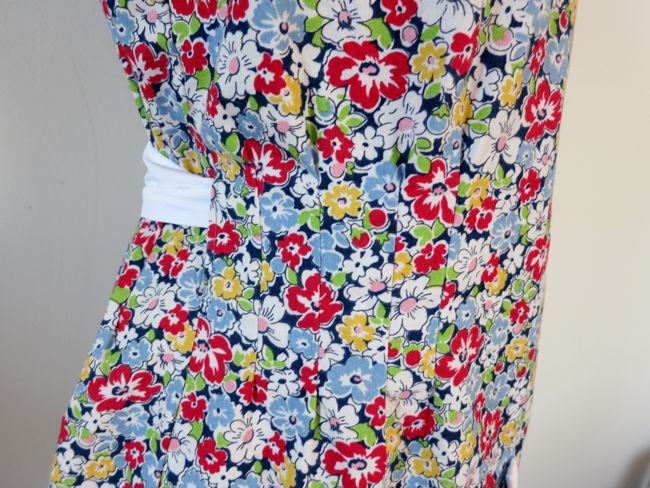
I also added some interior engineering to hold the dress in place (actresses may have to bend and move and get undressed quickly, but models don’t), re-stitched on all the hooks and bars which were coming loose, and re-did the sash in black velvet.  Finally, I sewed down the meander trim around the hem, a process that I thought would be done in an hour and took me over 5!

The 1905 Greek Key reception dress, thedreamstress.com

Remaking the dress was a bit worrisome, as it isn’t even my size – it’s made for someone three inches shorter than me, and a size and a half smaller.  So I had to guess on sizing throughout the construction process.

When it was finished I had to find someone to wear it, which was also a bit tricky.  I’m lucky that dear A agreed to model for me – she’s even tinier than the dress is, so our photoshoot has an adorable sense of ‘teenage girl puts her hair up for the first time and borrows Mum’s party frock to feel elegant for an afternoon’ in some shots.

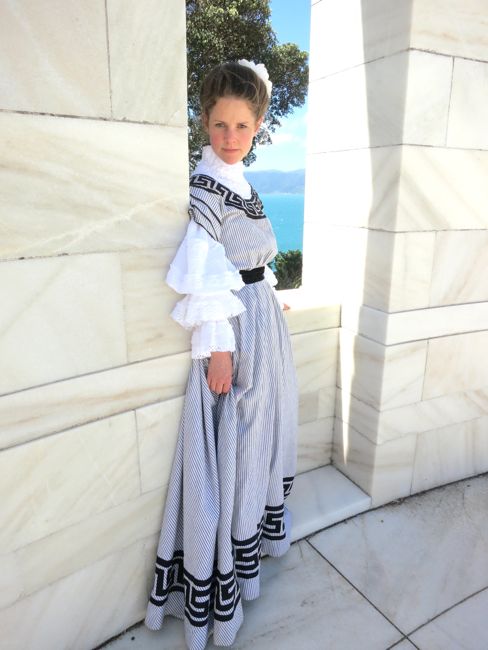
For the photoshoot, we went to the Massey Memorial, the burial site of William Massey, New Zealand Premier from 1912-1925.  The Memorial is perched on an isolated hill on the Miramar Peninsula, overlooking Wellington Harbour.

When we set out it was the perfect day for a photoshoot: blue sky, but with cloud cover just over the sun, giving lovely bright, diffused light.  And then the minute we arrived at the location the cloud blew away and we were left with stark, glaring sunshine reflecting off the white marble.

The 1905 Greek Key reception dress, thedreamstress.com

But we persevered, and got some lovely images out of less than ideal conditions.

The 1905 Greek Key reception dress, thedreamstress.com

The 1905 Greek Key reception dress, thedreamstress.com

The 1905 Greek Key reception dress, thedreamstress.com

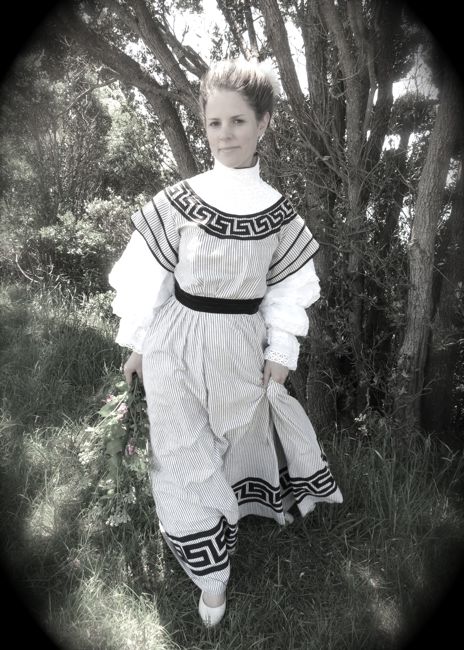
I have slight reservations about the poof of the sleeves, but overall I’m thrilled that the dress is getting a second chance to be a star.  It was such a beautiful garment when I received it, and now it’s got a new spin.

So what challenges does this frock cover?

#2: UFO  – I meant to get this dress done for Challenge #18, but it wasn’t done in time, so it’s definitely a UFO.

#4: Embellish  –  The decorative details are really what make this garment: the Greek-Key motifs, and the lace trimming on the upper bodice and sleeves turn it into something fabulous and unique.

#6: Stripes    Black and white stripes = fantastic

#10: Literature  – This one is a double – first, the dress was originally made for Gwendolyn in The Importance of Being Ernest.  Plus, although 1900 is a bit late for Anne of Green Gables as a young girl (her children, after all, were old enough to go fight in WWI), the HUGE puffy sleeves of this frock were certainly an Anne moment for me.  I was a bit astonished when they turned out to be so big based on Arnold’s pattern!

#12: Pretty Pretty Princesses  – this dress is certainly very frilly and princess-y, but to make it even more apt, here is Princess Ingeborg of Denmark (another awesome princess) reading to her children in a Greek-key bedecked frock that is slightly reminiscent of this one.

Princess Ingeborg of Denmark with her 3 daughters

Princess Ingeborg of Denmark with her 3 daughters

#13: Lace and Lacing  – Note the masses of lace on the guimpe and sleeves?  Mission accomplished!

#15: Colour Challenge White  – All the parts I had made are white!

#18: Re-make, Re-use & Re-fashion  — The challenge which I originally started working on this dress for.

#19: Wood, Metal, Bone  — OK, this one is a teeny bit of a push, but there are bones in the collar.

#23: Generosity & Gratitude  — Thank you, thank you, THANK YOU Lynne for the amazing dress, with all the really hard stuff already done!  I’m really excited to have ‘collaborated’ with you!

And obviously:

#24: Re-Do

So, 10 challenges down, 13 more to go!

The 1905 Greek Key afternoon dress, thedreamstress.com

The Challenge:  #24: Re-Do

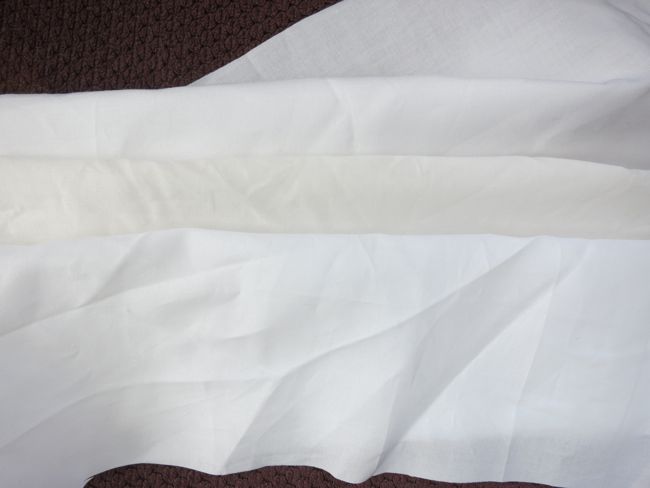
Fabric:  1m cotton lawn for the sleeves, scraps of cotton sateen for the yoke facing – all from stash, leftover from other projects

Pattern:  1905-7 Afternoon Dress from  Janet Arnold’s Patterns of Fashion

Year:  1905-7

Notions:  Thread (LOTS of it – I used up 3 spools of black on the meander border, and 1 of white on the sleeves and yoke), metres and metres of white cotton lace (stash – at the most I paid 60 cents a meter for it, but it was so long ago I can’t remember, which means it doesn’t count, right?).

How historically accurate is it?  This one has me baffled on how to answer it.  I un-did the theatre-friendly construction and re-did it to be fussy and historical, but while re-making is a very historical process, my actual techniques weren’t.  Maybe 65%?

Hours to complete:  12.  The lace of the yoke is narrow pieces sewn together, the hem applique took forever, the sleeves have pintucks…you get the picture!

First worn:  As a re-make, Sunday 24 Nov  for the photoshoot!

Total cost:  $0 to me!

Frances and Gertie and the Barbras (and a petticoat slip)

I’ve found some fabulous and rather random things at op shops and other stores lately.  First, meet Frances:

Frances the dressform thedreamstress.com

Obviously she’s not going to be called by her full name most of the time 😉

Frances the dressform thedreamstress.com

I’m very excited about having something to photograph tap pants and trousers on properly, and she’s almost exactly my size, which is an added bonus.

Frances the dressform thedreamstress.com

She was sitting in the window of an op shop that I drive past on an almost daily basis, along with two identical companions, and after three days I decided that I really needed her, though having a bottom just sitting around my bedroom is a bit odd!

The next finds are on a theme.  Some of my sewing students told me that a completely random store had got ahold of a whole selection of dead-stock 1960s undergarments from a factory clear out.  Finding them involved going out to my least favourite part of the greater Wellington area, but I persevered and got:

A side-zip body girdle:

Side zip body-girdle

Side zip body-girdle

And a soft bullet-bra:

Bullet bra

I love how low these all dip in back:

Bullet bra

And a front-fastening body girdle:

Front fastening body girdle

Front fastening body girdle

Front fastening body girdle

And, best of all, two longline bullet-bras:

Longline bra

I can’t believe it has taken me this long to discover longline bras!  They are the best thing ever!  Instant waist definition, with no effort or pain!

Longline bra

Also, the fact that they fasten front and back?  So cunning!

Longline bra

I mainly bought all of the pieces to study construction techniques, and to take patterns from the bras.

It’s really interesting studying 1950s-80s factory-made NZ clothing, because the NZ garment industry was so protected for all of those years that there wasn’t a lot of incentive to update techniques or equipment or styles.  This means that I sometimes pick up a garment (granted, usually basics like pencil skirts, and things that weren’t attempts at the heights of fashion( and assume its from the 1960s, but in a NZ context it is actually 10 or 20 years later.

These undergarments are a perfect illustration of that.  The store had the factory guides to each garment, and the guide posters were definitely mid-1960s, and the patterns for the undergarments were definitely drafted in the mid-1960s, but based on annotations on the boxes of undergarments, they continued to use the same patterns for years – possibly as late as the early ’90s.

So my undergarments may be significantly more recent than the 1960s, but the are definitely made from 1960s patterns, and  used the same techniques that would have been used in the ’60s, but with some updating of materials.

To end on a slightly sweeter note (this whole post is on the edge of my propriety boundaries!), I found this adorable petticoat-slip (completely unworn!) at an op-shop for $6.  And it fits me perfectly!  But I’m tempted to be good and not wear it.

Petticoat slip thedreamstress.com

Petticoat slip thedreamstress.com

It’s beautifully made: a mixture of hand and machine sewing.

Petticoat slip thedreamstress.com

Petticoat slip thedreamstress.com

Petticoat slip thedreamstress.com

Once again, I’m a bit confused about dating, but I think late 1940s.

Petticoat slip thedreamstress.com

Isn’t the broderie anglaise gorgeous?  Machine made, but still a thing of beauty.

HSF Challenge #23: the Ettie Mae Hooverette Dress

When it came time for the HSF Challenge #23: Gratitude (make something utilises the tutorials, patterns and research that so many of the historical costuming community make available for free) I was in a bit of a quandary.  I’ve got a list of tutorials and patterns that I want to use that is a mile long, and kilometres of fabric and lace that have been gifted to me by generous people, but every one of these tutorials and patterns was would be a very involved project.  Stupidly I’d scheduled the ‘Generosity’ challenge right at the end of the university semester, and I was up to my neck in marking.

What to do!?!

I had a browse through the HSF photo albums and finished projects for inspiration, and was reminded again of the Hooverette dress that Jen did for the Robes & Robings challenge.  It’s simple, it’s sweet, I’m madly in love with it, and I want one!  Also, Jen did a bunch of awesome research on Hooverette and wrap dresses from the 20s-40s, making reproducing one easy.

After looking at all the different types of Hooverettes, I was particularly drawn to the early-mid ’30s styles with shawl collars and little puff sleeves, such as this one, and this one.  I don’t think I’ve worn little tiny puff sleeves on anything since I was about 5, but every once in a while my inner Anne gets her way!

I had some 1930s inspired quilting fabric in stash, and I actually own a late ’20s wrap dress pattern:

Excella E3244 late 1920s wrap dress

Excella E3244 late 1920s wrap dress

The pattern simply calls it a ‘wrap around frock’ and it’s a bit early for the look I’m going for, but I used it as a pattern base, and drafted my own slim 1930s skirt and a shawl collar, and borrowed puff sleeves from another 1930s pattern.

Things started out easily enough, and then I decided to get complicated and have a contrasting collar, and the white for my collar and cuffs and sash was too white, so I tea-dyed:

Tea Dyeing thedreamstress.com

The middle fabric is dyed, the outer two are not – I just wanted to cut the brightness of the white the tiniest bit.

As it turns out, that was the beginning of my problems – I forgot to dye the sash pieces, and then couldn’t get them to match, and then cut the sleeve cuffs wrong, and had to re-cut them out of un-dyed fabric.  In the end, my sash, cuffs and collar were all different dye jobs!

Then there were sewing headaches with getting the wrap of the shawl collar to sit right,but in the end, I persevered, and I’m extremely pleased with the overall result:

1930s inspired 'Hooverette' wrap dress thedreamstress.com
(OK, so I wish the collar was wider and more crazy-30s, but I’ll get that right next time)

The pattern has cunning little tucks at the waist to give it shape:

1930s inspired 'Hooverette' wrap dress thedreamstress.com

I edged the collar, and cuffs in tiny red ric-rac to give them definition.

1930s inspired 'Hooverette' wrap dress thedreamstress.com

It’s very subtle, but provides just the right contrast and pop to the dress.

1930s inspired 'Hooverette' wrap dress thedreamstress.com

Or at least I think so!

1930s inspired 'Hooverette' wrap dress thedreamstress.com

I repeated the ric-rac on the pocket and added white piping to keep it from blending into the dress:

1930s inspired 'Hooverette' wrap dress thedreamstress.com

I couldn’t do it on the waist ties though, as they would have been too stiff.

1930s inspired 'Hooverette' wrap dress thedreamstress.com

The proof of the pudding, is, of course, in the wearing, and let me tell you, this wears well!

I’ve already worn it to do a last bit of university work, to hang out the laundry, wash dishes, make dinner, and tidy around the house, as well as to teach a sewing class.

It was a fantastically warm day in Wellingon: almost too warm, and brilliantly sunny.  In between doing housework and errands I stopped by Madame O’s house for a photoshoot.  Like many people in earthquake-wary Wellington, she’s having her chimney removed, so when I arrived she was literally shoveling out dirt from a hole in the floor where the fireplace had been, but she climbed out to have a cup of tea and take photos of me.

We sat in her pocket handkerchief back garden and I posed with the roses and lemons and old-fashioned grapes:

1930s inspired 'Hooverette' wrap dress thedreamstress.com

1930s inspired 'Hooverette' wrap dress thedreamstress.com

1930s inspired 'Hooverette' wrap dress thedreamstress.com

We weren’t the only ones enjoying the sun.  Frogelina was loving the weather.  I was posing and Madame O was snapping away and then I noticed Miss Frogelina hanging out and watching the show.

1930s inspired 'Hooverette' wrap dress thedreamstress.com

1930s inspired 'Hooverette' wrap dress thedreamstress.com

I’m in love with the dress as a whole, but I’m particularly in love with the pocket.  It’s big enough for my car keys and a coin/card purse and a lip gloss.

1930s inspired 'Hooverette' wrap dress thedreamstress.com
Or a lemon.  Lemons are good too!

1930s inspired 'Hooverette' wrap dress thedreamstress.com

The Challenge:  #23: Generosity & Gratitude

Fabric:  2m reproduction 1930s print quilting cotton ($4 per metre on sale), 1/3 metre white lawn for the collar, cuffs & sash ($5 per metre)

Pattern:  My own, mushed together from various vintage patterns and with a bit of drafting (hmmm…this sounds really familiar).

Year:  ca. 1934

Notions:  Cotton thread, vintage ric-rac, vintage bias hem tape, all inherited.

How historically accurate is it?  While the print is accurate, quilting/craft cotton is not an accurate weight or hand for the 1930s (which is why all those reproduction prints are so annoying – perfect pattern, not at all period fabric!), so the dress doesn’t wear or hang as a period original would.  My construction is all period perfect though.  So 70%.

Hours to complete:  5 or 6.  I spent way too much time fussing with the collar.

First worn:  All day Wednesday to be a teacher and seamstress and housewife and friend.    

Total cost:  $9.50

And special thanks goes to: Jen, for the inspiration and research, and Madame O, for taking time out of her busy day to do a photoshoot for me.

1930s inspired 'Hooverette' wrap dress thedreamstress.com