Latest Posts

Tutorial: How to turn a straw or paper fedora into a 1920s style cloche

A lot of you commented on the hat I wore to Art Deco Weekend, and I promised to do a tutorial on how to make your own ’20s style cloche from a modern straw fedora.

How to turn a modern fedora into a '20s style cloche

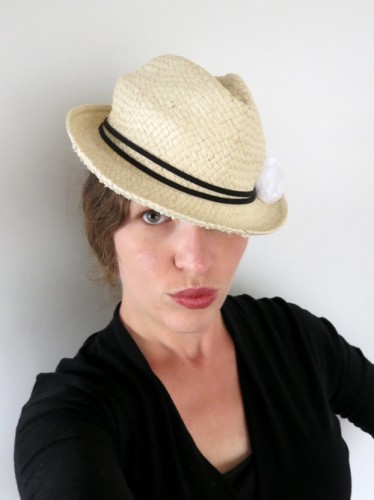
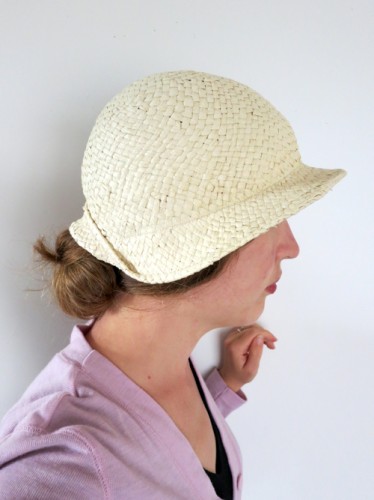
In this tutorial we’ll go from this modern straw fedora (yes, that is me trying to do duckface.  It feels obligatory with a hat like that):

Modern straw fedora

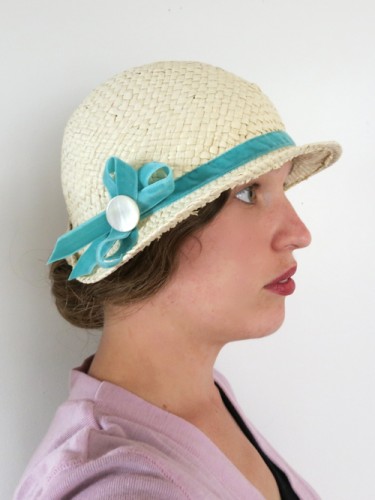
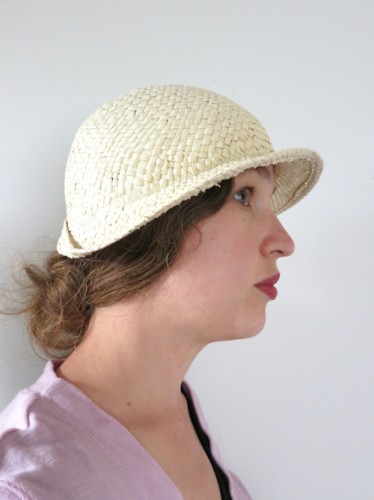
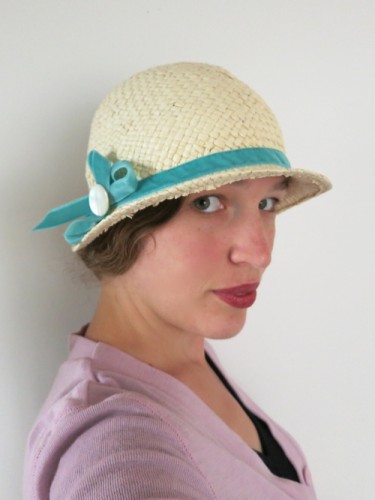
To this plausibly ’20s or early 1930s summer cloche:

Modern straw fedora reshaped as '20s style cloche

You’ll need:

– A modern woven (not shaped and sewn) soft straw or paper fedora just big enough for you to pull down to eyebrow level.  It must be paper or soft straw: synthetic hats and very hard/crisp straw won’t reshape properly.
– Needle and thread or a sewing machine
– Hot water
– Hat elastic (any narrow elastic will do) or wire (not needed if your hat has a wired brim)
– Ribbon, fabric, feathers etc. for trimming.
– A hair dryer, dehumidifier or sunny day also help, but aren’t necessary!

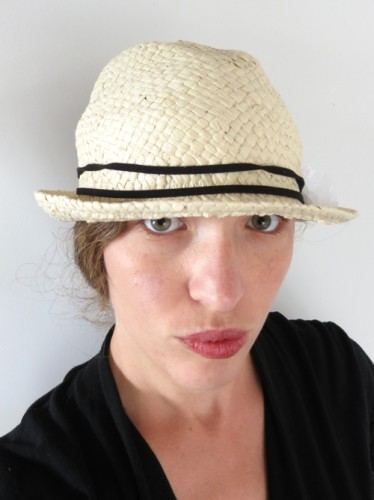
First, I’ve mentioned sizing in the list of what you’ll need.  It is important to check the size of your hat.  It needs to be big enough to pull snuggly down to your eyebrow level without being so tight that it will give you a headache.  It can’t be so big that it is loose on your head when you pull it down like this.  Mine looks like this when I pull it down (yes, more duckface.  I think my technique needs work):

Modern straw fedora pulled down on my head

Start by removing all of the modern trims and ribbons:

Hat without all the ribbons or trims removed

Now, run hot tap water into the centre crown of your hat.  Try not to get the brim too wet:

Wetting the crown of the hat

Put the damp hat on your head (wrap your head in cling wrap if you don’t want to get your hair wet) and use your hands to smooth and reshape it to your head:

Reshaping the dampened paper fedora

Keep smoothing until you have worked out all the bumps and creases, and the hat is very snug to your head:

Reshaping the dampened paper fedora

Now you need to dry the hat.  You can go sit in the sun, use a hair-dryer, or sit over a dehumidifier (that’s what I do) or you can just take a lot longer and walk around.  When it is mostly dry you can carefully take it off your head and let it sit in the sun or by a dehumidifier on its own.

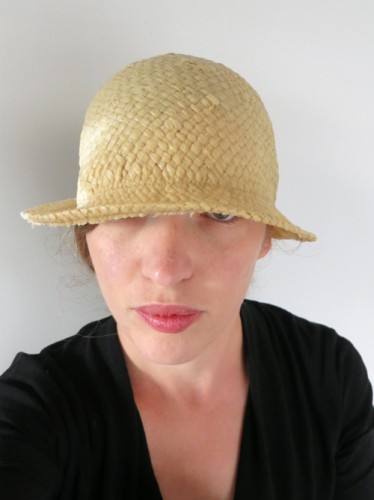
When it is completely dry (I wait overnight) you’re ready to finish reshaping it, and trim it:

The completely dry and reshaped hat

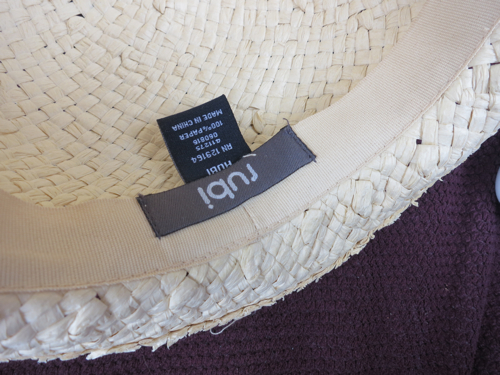
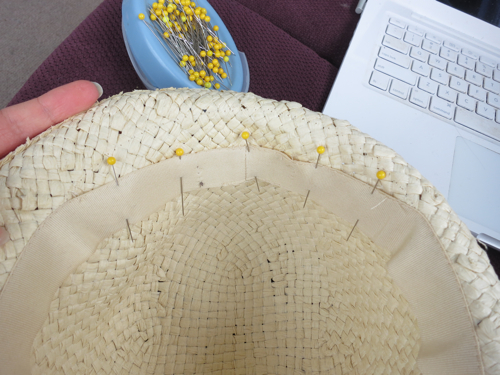
When you put the hat on you’ll probably find that it sits too low on the neck, distorting the silhouette and scratching the back of your neck.  To fix this, and to emphasise the proper ’20s cloche shape, we need to move the hatband up at the back slightly.  This is also a good excuse to unpick and discard all the original labels, since they rather ruin the ’20s feel!

The hatband with labels

Unpick the centre back of your hat band for about 3″ on either side of the centre back, and move it up 1″ into the crown of the hat.  Pin it, easing and distributing any extra width in the crown.  Sew the new band placement by hand or machine.

The moved up and pinned in hat band

Now we’re going to fold up a teeny bit at the very back of the hat.  This will help pull in the brim of the hat around the face to create the ’20s cloche look, and will also enable people with long hair to wear the cloche over a very low bun, as I do.

Fold up a crescent of hat brim at the back of the hat, trying to make it curve up and down as quickly as possible (so you want a deep C shape, rather than a shallow ( shape).  Pin and sew this fold down.

The centre back brim of the cloche folded up and pinned down

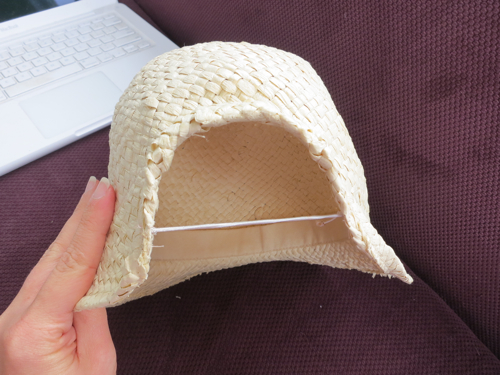
Here is the sewn-down back fold:

Sewn down back fold

And here is what it looks like on me:
The cloche with sewn down back fold

At this point the hat still doesn’t hug the sides of my face as much as I want it to, so I’m going to force it to curve around my face.  If your hat already has a wired brim, you can just mold the brim into shape, but mine doesn’t so I’m going to shape the curve by sewing a piece of hat elastic from one side of the back fold up curve to the other:

Hat elastic sewn across the curve of theback fold up

This piece of elastic tucks under my bun when I wear the hat, helping to hold it snugly on my head:

Hat held snugly on by hat elastic

If you don’t have a pre-wired brim, and don’t like the hat elastic, you could also wire that portion of the brim yourself, by sliding a piece of wire into the edge of the brim, or binding the brim with bias tape over a piece of wire.

Now that your hat is completely shaped, it’s time to trim it!

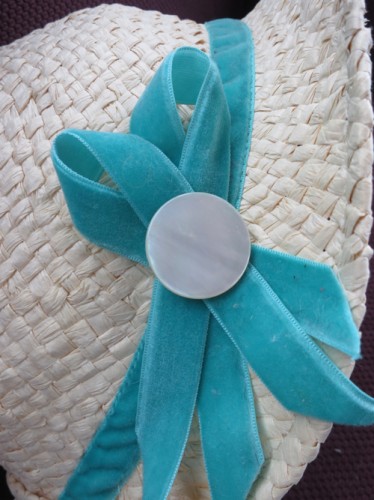
I’m making this hat to match my Sherbert Seersucker dress, so I’m using the same lagoon blue velvet ribbon that I made the belt out of.  I also have one of the buttons that went on the dress, and a couple yellow striped buttons.

Hat and potential hat trims: ribbon and buttons

First I use a steam iron to curve and shape my ribbon so that it will curve and sit nicely on the curve of the hat.  I pinned the ribbon in place, and sewed it down on my machine, though hand sewing works just as well.

Do check that the hat sits nicely on your head when you have the ribboned pinned on, before you sew it, as you don’t want the ribbon to be too tight.

With the main ribbon sewed on, I needed to figure out the rest of the trim.  I decided on two loops of velvet ribbon placed off to one side: quick and easy, with interesting shape and just enough movement.  The matching aqua button didn’t look right, and neither did the yellow stripes.  Then I thought of the mother-of-pearl belt buckle, and rummaged in my shell buttons to find a large circular ones.  Success!

Two loops of velvet ribbon

And here is the finished hat:

The trimmed cloche hat

Now, fingers crossed for one last fine autumn day when I can wear the complete outfit!  Today is cold, rainy, and windy, and I’m in two layers of wool.  Sigh.

Good luck in making your own cloche, and do come back and tell me about it!

Geraldine to Queenstown in autumn

This week has been frustrating, particularly the last few days.

It’s been one of those weeks when you start making dinner, reach into the cupboard for potatoes, and find that the potatoes you bought only a week ago have gone from looking fine and fresh to being rotten potato soup which has seeped throughout your entire cupboard and gotten all over everything.

I just sighed, took a deep breath, and remembered last week.

Last Saturday I drove from Geraldine to Queenstown in the South Island of New Zealand.  For once I had the luxury of a car to myself, and enough time to stop whenever I felt like it to photograph the scenery.

Geraldine to Queenstown

The South Island is often said to have the best scenery in New Zealand, a country noted for its remarkably beautiful scenery, and autumn is a particularly fine time in the South Island.  Wellington doesn’t have enough deciduous trees to make autumn anything but damp and unpleasant, but down south the poplars were turning golden yellow in long rows, sycamores were beginning to fade from green to dun, willows drooped pale ochre, and the occasional maple was a splash of red.

Roadside fields near Geraldine, Canturbury, New Zealand

Around Geraldine, the land is bucolic, pastoral, farmland, and flat.  Plowed fields stretch to the horizon, broken only by stands of trees trimmed into rectangular windbreaks.  Huge circular irrigators turn slowly in the fields, trying to keep the crops alive in the nationwide drought we have had this summer.

Shed and fields near Geraldine, Canterbury, New Zealand

As I head inland past Fairlie, into the MacKenzie district the landscape changes.  Flat gives way to gently rolling foothills, flat pastureland to sheep and cows and the occasional pine forest.

The foothills of the Southern Alps

Deeper into MacKenzie, the green fades to overall dun, the lush pastures give way to sparse hills, too rough for cows, but perfect for the merino sheep that give New Zealand such beautiful wool.

Lupines, Mackenzie District, New Zealand

In the Burkes Pass end of summer lupines fringe the road in shades of lavender and pink and the sky stretches in purest azure to the distant Southern Alps, the backbone of the South Island.

Road stretching away, Mackenzie District, South Island, New Zealand

The gold hills cradle lakes of impossible blue with exclamation points of craggy mountains at their far end and names like Tekapo and Pukaki.  Further on, mirror-like ponds reflect brilliant vermillion rose hips, and families of swans and ducks.

Ponds and rose-hips near Twizel, South Island New Zealand

Every piece of ground reveals an autumn surprise: one last flower, bell-like grass sheaves, or a fall puffball.

Puffball mushroom, Twizel, South Island, New Zealand

Past Twizel you leave Mackenzie District and the Canterbury, and head into West Otago, the land of craggy mountains, icy rivers, and frigid lakes.

Pond near Twizel, South Island, New Zealand

The land is wild, the road deserted, the air crisp and full of the promise of mountains and approaching winter.

Skies and road, Omarama, South Island, New Zealand

I drive through Omarama, ‘Place of Light’, a commentary on the crystal blue dome of sky that stretches above it, and climb high into the Lindis Pass, stopping to look back at the hills, green and gold and dun and indigo, and the winding road I’ve driven.

Lindis Pass, South Island, New Zealand

Then the road plunges onward, through narrow ravines edged with sheer rock cliffs.  The road is spotted with signs that warn of falling rock, and fines for stopping.  There is relative civilization and tranquility at Cromwell, where orchards grow stone fruit and pip fruit, and the town commemorates these orchards with enormous fruit sculptures.

After Cromwell the drive becomes trickier, and the narrow winding road skirts sheer gullies that rise steeply on one side and drop away on the other.  Far below brilliant turquoise rivers plunge in froths of whitewater over sharp rocks, hurrying to join the lake a Queenstown.

Turquoise rivers, South Island, New Zealand

I am in no hurry, and stop to enjoy the turning leaves, and the hardy adventurers who flock to Queenstown to test their nerves on bungy jumps and whitewater rafting, and paddleboarding in ice cold rivers.

River boarding near Queenstown, South Island, New Zealand

Finally, like the river, I move on, to Queenstown and the blue lake there, in the shadow of the truly remarkable Remarkables.

The Remarkables, Queenstown, New Zealand

I hope you enjoyed the drive.

A fan of fans

One of the (many) things I collect are vintage fans.  I love looking at them and thinking of the parties they attended, the smiles they hid, and the dancers they cooled.

The Historical Sew FortnightlyAccessorise‘ challenge seems like the perfect opportunity to show you two of my favourite fans from my fan collection.

It also gives me the excuse to (very, very belatedly) show you some of the gorgeous images of a model in my robe a la francaise holding one of the fans  that Mandi Lynn of A La Mode Photography took for the Radio New Zealand photoshoot (remember the out-takes?).  The photoshoot images were so fabulous that I thought “I’ll save them for something special” and then before I knew it a year and a half had passed.  Sorry!

18th century Dreamstress photoshoot by Mandi Lynn at A La Mode Photography

Isn’t she gorgeous?  Isn’t the fan gorgeous?  Aren’t the photos gorgeous!?!

18th century Dreamstress photoshoot by Mandi Lynn at A La Mode Photography

The first fan is a brise fan made of paper thin bone or ivory sticks carved with lacy patterns and joined together with a satin ribbon.  It’s very similar to the sandalwood (or sandalwood scented) fans that you can still buy in Chinatowns in its design and construction.

18th century Dreamstress photoshoot by Mandi Lynn at A La Mode Photography

It probably dates from the early 20th century, and is robust enough to be held and used, though I wouldn’t use it for anything more energetic than a studio photoshoot.  It’s clearly a bit of an anachronism to pair with an 18th century gown, but the delicate colours and shape worked well with the robe a la francaise aesthetically.

18th century Dreamstress photoshoot by Mandi Lynn at A La Mode Photography

This fan was given to me by the darling and fabulous Emily of Ever So Scrumptious (also the genius behind my blog design) who already had a similar fan and thought I would get more use out of it than she would.  Have I mentioned before that I have the best friends ever?

18th century Dreamstress photoshoot by Mandi Lynn at A La Mode Photography

The second fan I want to show you was a gift from Mr D for our wedding anniversary.

Late 19th/early 20th century Rococo revival fan

Mr D is a genius when it comes to anniversary gifts.  He says “Darling, instead of bumbling around in a store and trying to find something that you’d like and probably getting it wrong, I’d like to have an experience and spend time with you.  Why don’t we go to your favourite antique store and you can pick out something and that way we’ll have an afternoon together and you get something you want?”  And we do this.  And he even sort of enjoys the antique stores – looking at the weirder things, and getting excited about the sports memorabilia.  How clever is he?

Late 19th/early 20th century Rococo revival fan

The antique store dated this fan to the late 19th century, but sometimes I think it could be as recent as the 1930s, and that era of Rococo revival.  I may like fans, but I’m actually terrible at dating most of mine!  They just aren’t textile-y enough.

Late 19th/early 20th century Rococo revival fan

The fan is certainly a direct take on 18th century fans, with a central painting of a Rococo beauty and her besotted swain in shades of pink and green on the black paper background.

Late 19th/early 20th century Rococo revival fan

The fan is further embellished with delicate baskets, and tiny sewn-on sequins

Late 19th/early 20th century Rococo revival fan

The painted paper is backed in black silk gauze, now very fragile and torn.

Late 19th/early 20th century Rococo revival fan  
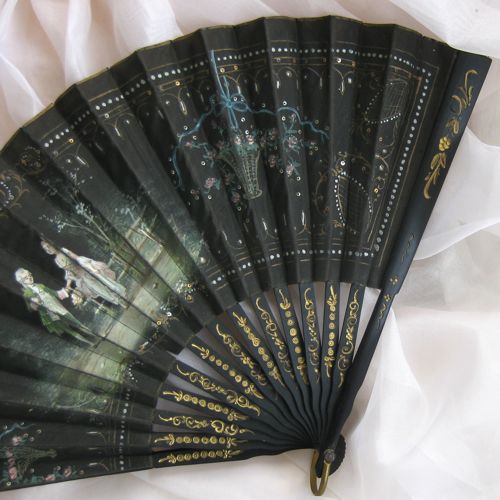
The sticks are quite simple wooden sticks, painted black with gilt gold trim.  It’s not impossible to find modern fans with similar sticks.
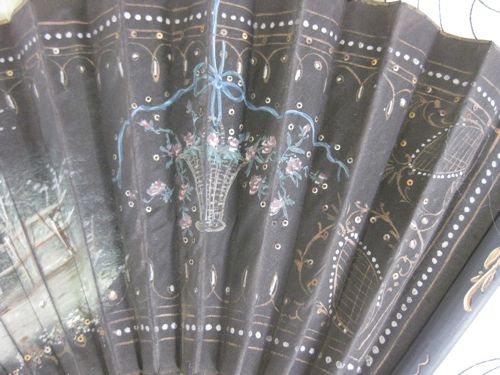
Late 19th/early 20th century Rococo revival fan

Late 19th/early 20th century Rococo revival fan

Aren’t the both just gorgeous?  I wish modern things were half as pretty!