

Here is a little sewing tutorial to make your costuming easier. Cord gathering is a method for gathering huge amounts of fabric without pleating it. It is also fantastically easy, especially compared to modern ‘pulled thread’ gathering, so is wonderful for any project where you want to gather a huge amount of fabric.
I’ve seen a similar technique used on one 1900s petticoat, but have no other evidence to suggest this is a historically correct technique for any other timeperiod – I simply use it as an awesome timesaving hack for non-historically accurate costuming.
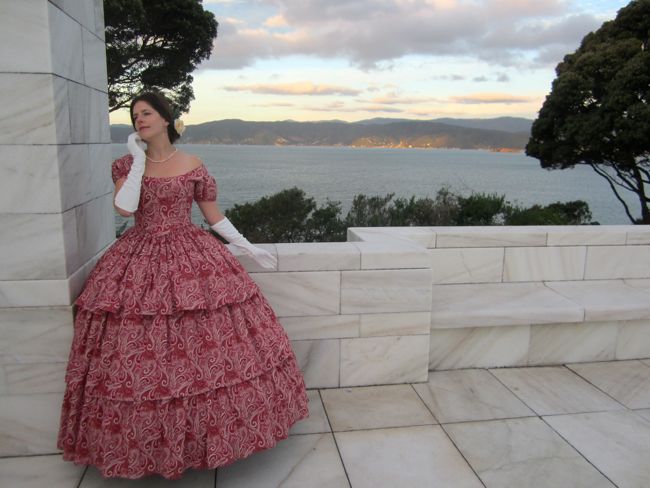
I used it for the ruffles at the bottom of my hoopskirt petticoat, and for the tiers of ruffles on the 1850s raspberry paisley dress.

Note: for this tutorial height goes up and down in relation to the body, and width goes around the body, so all descriptions are given in height x width
You will need:
- a piece of narrow cord 6″ longer than you want the finished gathered width to be. You can using piping cord, or the cheap stuff you buy at the hardware store, but be sure it is cotton or hemp or another natural fibre. You can also use strong thread, but it’s much easier to do this technique if your thread/cord is thick enough that you can feel the ridge of it through your folded-over fabric to be.
- Your length of fabric for gathering, hemmed on one edge, and at least 1″ higher than you want the finished length to be. The width will depend on how gathered you want the fabric to be. 2-4x as long is standard for ruffles, but if you are gathering in the waistband of a huge 186s skirt, you will be gathering as much as 6-8x the finished width.
For example, for my hoopskirt petticoat my cord lengths were both 166″ long, because my petticoat is 160 wide, and my un-gathered ruffle pieces were 320″ long (2x as long as the hem) and 5″ high, hemmed.
For my tiered skirt, my three cord lengths were each 188″ long, the width of the skirt (182″) + 6″, but the ruffle lengths were 200″, 220″, and 240″, respectively, because Arnold’s pattern calls for the tiers to be more ruffled as they go down the skirt.
The Sewing Tutorial:
Step 1:
On the wrong side of the fabric, fold over the extra 1″ or so of fabric on the un-hemmed height edge. Measure the fabric to make sure it is exactly the height you want , and press and pin (if necessary) the fold. The cord will slip into the fold that you have just created.
Step 2:
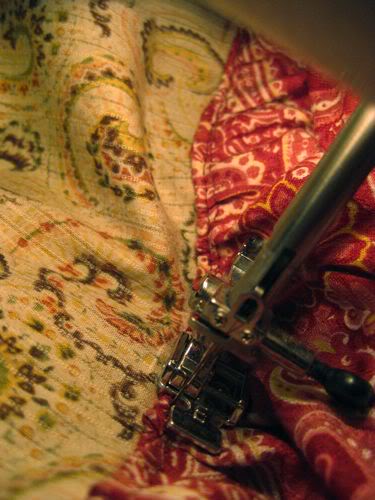
Tie a knot at one end of your cord length. Lay the cord in the fold/channel you have created in your fabric (depending on the length of the fabric, cord, you may need to pin it in, or may only be able to insert part of it and will need to continue to lay the cord in the channel as you go). Using your piping foot or invisible zipper foot, stitch slightly to left of the cord, sealing the cord in the crease of the fabric.
Be careful not to sew the cord at any point! If you do you will be unable to pull and gather it!
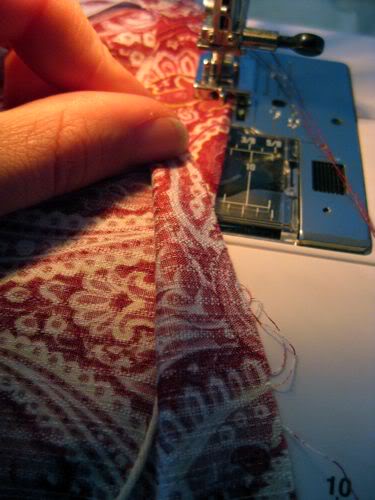
The cord in the channel
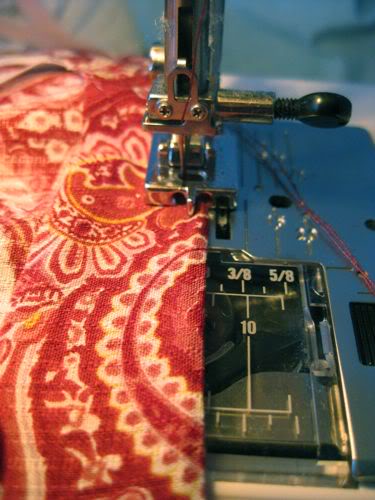
Sewing just the left of the cord.
You don’t want your channel to be too tight as that will make it hard for you to pull and gather.
Step 3:
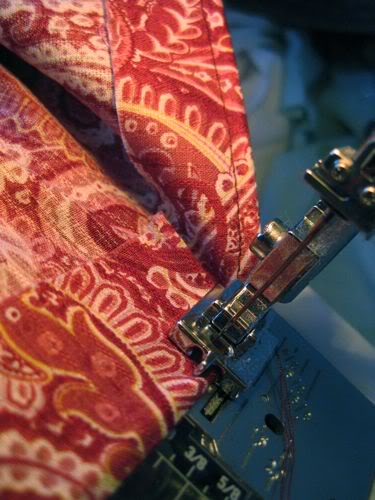
As you sew, stop every once in a while and tug on the cord, to gather the fabric behind the needle on to the cord. The more fabric you are gathering on to the cord, the more often you will need to pull the cord forward and gather the sewn fabric.
Gathered fabric behind the needle, pulling the cord in front of the needle.

Pulling and gathering.
Step 4:
Gather as you sew until all the fabric is sewn and gathered on to the cord. Measure and adjust the gathers to make sure the fabric is exactly as wide as you need it to be, and then tie off the cord to secure both ends of the gathers.
Step 5:
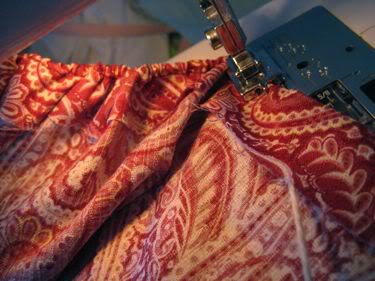
Sew both ends of the gathered ruffle/fabric together, if needed, and then pin your gathered fabric to your waistband/skirt/petticoat etc., and sew it down. I find that the cords don’t create much additional bulk, so they can be left in the finished project, and the ironed top edge is tidy enough to be visible on the outside of a garment (which is not the case with pulled thread gathering)
Sewing my gathered tier to my 1850s paisley skirt base.
Here is what the finished result looks like:
Easy peasy! And no chance of your gathering threads breaking, and so much easier on your fingers and wrists for pulling and gathering!
Hope you enjoyed this sewing tutorial!
For another way to gather huge amounts of fabric with cord, check out my other sewing tutorial on how to do zig-zag cord gathering:

Better than the long-stitch gathering method for large amounts of fabric, and a solution to the problem of the bunch-y raw edge that results from the zig-zag over cord approach to gathering. Brilliant.
Awesome! Thank you for the information, I’m making some costumes for next Christmas and this will make the final product look much better!
I think this could be the solution to all my gathering problems – thank you so much!
I used this technique as I was sewing gathers on a petticoat by hand, so managing to have a long enough thread to gather was impossible. lol!
I only heard about the cord-and-zig-zag-stitch method yesterday, so I googled it to make sure I understood it. I found this instead and it worked so well!
I was in a hurry and couldn’t find any natural cord, so the one I used ended up being some elasticized cord I found in my ribbon box. It worked out fine and I just pulled it out after I’d attached the gathered material to the waistband. Thanks for the great tutorial!
And this has been bookmarked. I wish I found this last year :/
Thank you sooooo much for this tutorial! I was afraid the hoop skirt petticoat would take ages to gather it – and this method has saved me all this time!