
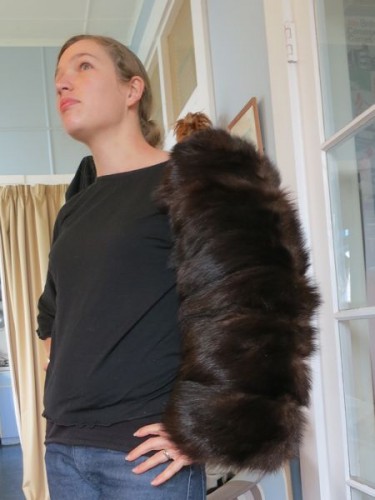
Once I’d figure out a design for an 18th century fur muff that seemed historically plausible (clearly it wasn’t going to be perfectly accurate, as I was using a repurposed 1940s fox fur sleeve as my base) it was time to sew.
To start out, I had to deconstruct the sleeve I was making the muff from. I had assumed, based on the striped effect of the sleeve, that it was formed of fairly wide strips of fur, and the join of the strips formed each stripe. Pulling apart the sleeve at one stripe would be very easy.
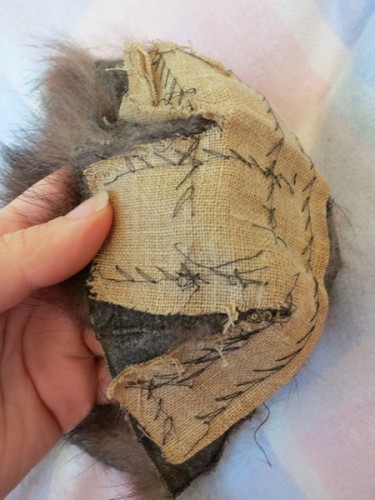
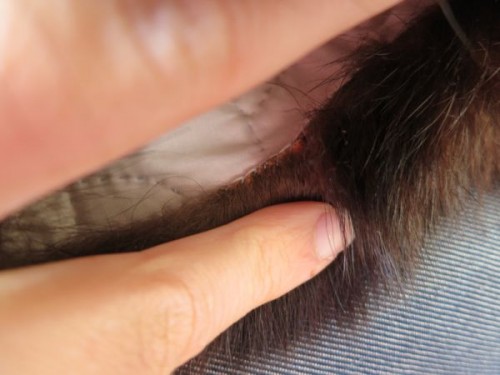
Then I investigated the inside of the sleeve.

Wowzers. It’s not large strips at all – it’s a patchwork of little-bitty pieces of fur! Can you imagine sewing that!?! The work put into constructing this sleeve, and piecing all those minute pieces of fur, just floors me!
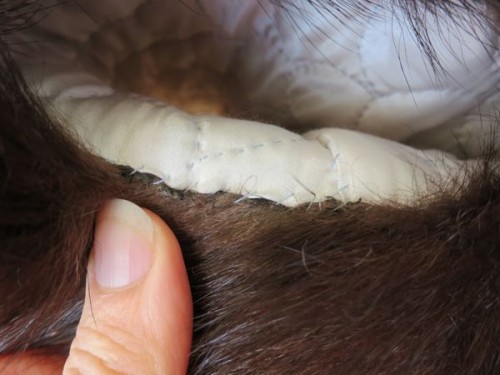
This is the upper half, after I detatched the portion that I needed. Look at all those little pieces!
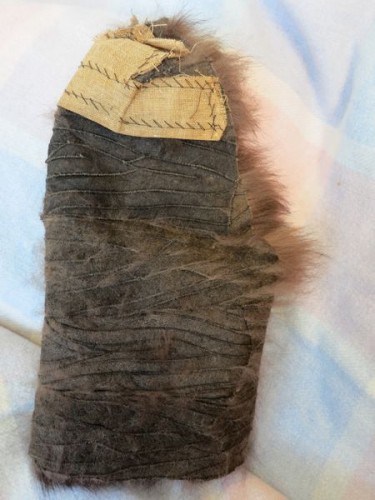
The sleeve head is shaped and supported by a fabric stiffener. I’ll use a similar sewn-in interfacing on the lower part of the sleeve to help my muff retain its nice round shape.
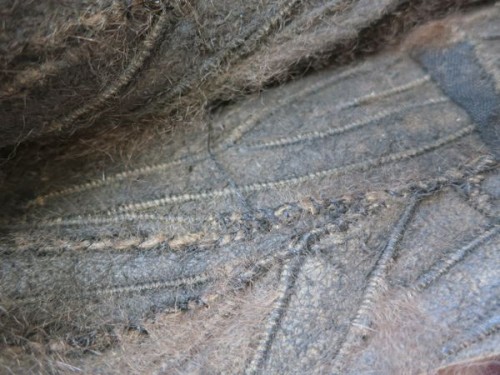
Since I had to work with a crazy patchwork of fur, with seams running all over the place, rather than the straight seams I had anticipated, things got a lot trickier. First I unpicked the bottom half of the sleeve along a series of pieces that roughly followed the line I wanted.
This turned out to be a little short in places, so I carefully cut a bit extra in a straight line (teeny, tiny super-sharp scissors are fabulous for cutting fur btw, allowing you to get in and cut only the skin, without cutting any fur). Then I re-sewed the extra piece back on to the seams I had unpicked with linen thread. My sewing is so messy compared to the original seams!
Once I finally had a tube of fur from the bottom of the sleeve that was 13″ long, with a nice even top, I needed to figure out the lining.
I’d originally planned on lining the muff in white silk satin, with layers of batting between the fur outer and the silk inner. However, when I played with this option, the layers of batting and the lining were too unstable. How was I to keep them in place?
Then, researching mid-18th century clothing, I had a brainstorm. There are a number of examples of garments made from re-fashioned quilted petticoats. What would you do with any extra pieces of quilted fabric? Line a muff? It’s stretching the bounds of plausible, but not entirely beyond the bounds of possibility.
Quilting my lining would have two advantages: one, it would keep the batting and lining firmly where I wanted it to be, and two, it would give me a chance to trial the type of quilting I would do on a full quilted petticoat.
So tempting…
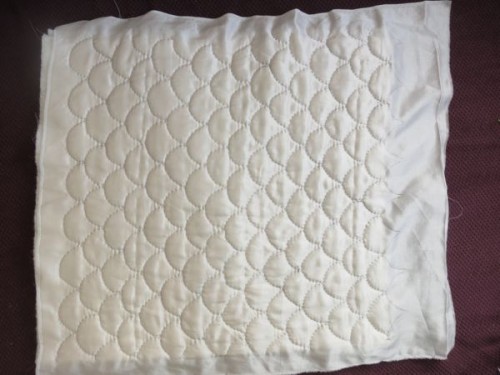
And then, I had the final brainstorm. I could quilt my lining in a scale pattern. It would be a ‘Fur & Scales’ muff!
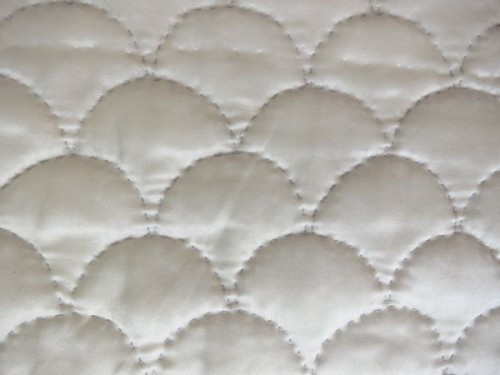
The quilting, done in blue silk thread on white silk satin over two layers of wool batting, actually went very quickly. A full quilted petticoat is definitely a possibility.
The only thing that gave me any problem was that I started my scale pattern in the middle of the 13″ x 24″ piece of fabric. Drawing and sewing scales up – super easy. Drawing them down? Not nearly as easy! My pattern gets a lot less tidy as it goes downwards. At least now I know to start my petticoat pattern at the hem and draw upwards.
Once I had finished my quilting, I rolled the quilted fabric into a tube, folded under one raw edge, matched the quilted scales as best as possible (not very well I’m afraid), and whip-stitched the join down.
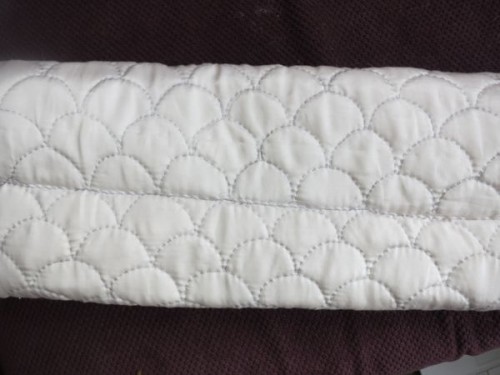
My whip-stitched join:

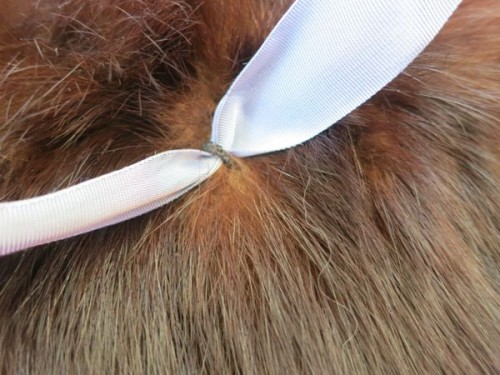
With my lining constructed, I had one last thing I needed to do before I sewed the lining to the fur. I loved the look of the later 18th century muffs with bows sewn into the fur:
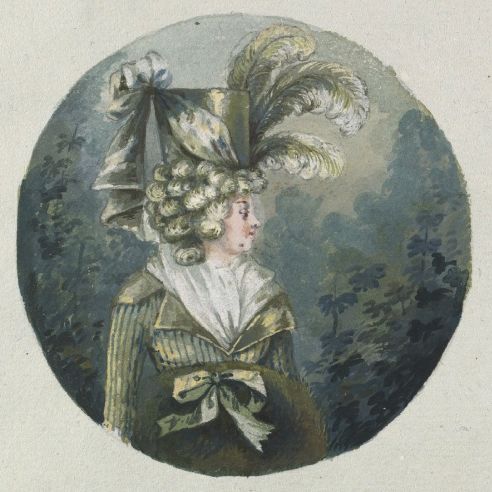
Costume Sketches, Anonymous, French, 18th century, Possibly connected to Antoine Caire-Morand (French, Brian̤on 1747 Р1825 Turin), 1785-1790, MFA Boston
However, I didn’t want to make the muff un-usable for a different decade, nor was I willing to commit my muff to one distinctive colour scheme. Also, a ribbon bow would soon get soiled and crushed. Sure, I could baste one on and take it off and replace it, but I had a better idea.
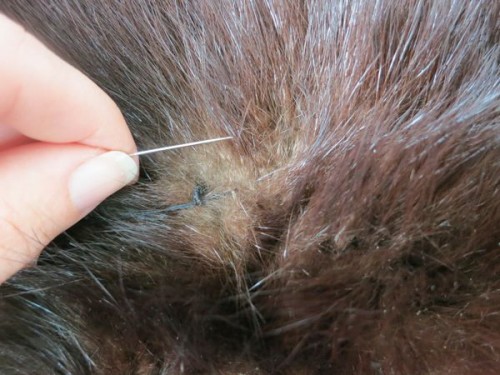
Using heavy linen thread, I worked a loop into the fur on the muff. It disturbed the fall of the fur slightly, but it’s quite subtle, and now I can slip any colour of ribbon I want through it, tie it in a bow, and replace it for a different outfit or if it gets crushed and dirty.
With the loop sorted, I was ready to put the whole muff together. I turned the quilted satin tube inside out, slid it into the fur tube, folded one edge of silk satin under, and whipstitched the fold to the cut edge of the fur.
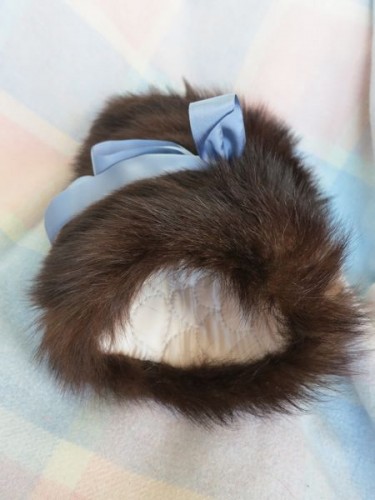
Once the fur and lining were firmly sewn together I tugged the lining past the other end of the tube, making the fur at the sewn end double back on itself slightly, forming a lovely fur brim to the muff.
Since I had the turned and finished fur hem of the sleeve end to work with on the other side, I didn’t need to worry about how to form a fur hem on that side. I just turned my lining under, tucked the raw edges in, and whipstitched the lining to the turned end of the fur.
Ta da! Done muff!
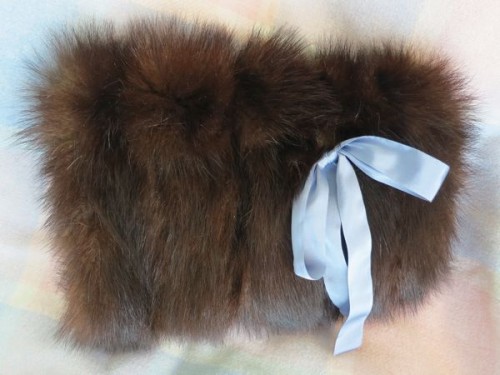
Isn’t it pretty? I’m so pleased with it and proud of myself! And look how beautiful the lining looks:
I’m hoping to do a photoshoot this weekend with my muff, and the other thing I am making for Flora & Fauna (Oooh…), but that will depend on the weather, and if I can get someone to be the photographer, and I also promised Mr D I would do something fun with him (and in his books historical photoshoots don’t count, as they are ‘me’ time, not ‘us’ time!).
Also, since we are on the topic of quilted petticoats, boy do I have an exciting post to write…
Oh my, those strips! It’s like the mouse furcoat from the Czech fairytale film, “Princezna se zlatou hvÄ›zdou”. (It’s similar to that story about a princess in a donkey skin, whatever that’s called.) sewed together from a thousand or so mouse furs… well, it was really plush, but still sewed together!
And what a clever, clever idea (clever ideas), and what a pretty quilting pattern.
I used to love that fairytale (or the different variants of it – my favourite was the one with a coat made from the skins of all the birds and beasts in the world, which is pretty awful once you think of it in retrospect!)), and then I read Robin McKinley’s version. It’s the only one of her books I don’t like, though it is beautifully written.
old fur coats are often like that on the inside, but tis a beautiful bit of fur. and that quilted lining will keep your hands extra toasty on a cold day
Yes, I’m hoping it does keep me nice and toasty!
Oh that is funny, about your scales and fur combo! That is definitely fun! A couple of years ago I gathered my supplies for a quilted petticoat but I’ve yet to start because of other sewing needs that pop up. Looking forward to your project on that. I’d like to do mine for the HSF but I know I’d never finish it in time.
Laurie
Thank you! I love the scale/fan pattern in quilting, and thought it was just too perfect to pass up on for this project.
I need to finish the Hawaiian baby quilt that I am working on at the moment (it’s only taken me 4 years!) and then my next big quilting project will be a petticoat. It’s definitely going to be a background project – something to work on in between other, saner, projects.
Oh I’ve always wanted to do a Hawaiian quilt. Another item for my to-do list!
Laurie
Hawaiian quilts are the only quilts I make – I’ve been making little ones since I was a child. One day I’ll have time and space to make a full-sized bed quilt!
The tiny strips are from a process known as “letting out”-it allows the manufacturer to make a narrower, longer pelt out of a shorter, wider one. It’s not the only way of prepping a pelt before making a garment, but it’s a very common way. Not something you would have cause to learn growing up in Hawaii, I reckon! 🙂
No, I certainly didn’t wear a lot of fur or learn a lot about it growing up in Hawaii! I was aware that fur had to be pieced, as clearly a chinchilla or fox is not big enough to make a full coat. I’m a little confused now between what you and Lynne are saying about how the fur is pieced and sewn, but if I ever need to do any serious work with fur, or research in to it, I’m sure I will figure it out!
The quilting is just perfect! I hadn’t thought of a scale pattern, but it works so well – gives the wee bit of puffiness needed. The lining looks great, and your loop to allow for big bows is an excellent idea! You now have a muff that will play in a whole range of periods.
I once watched a woman sewing possum skins for use in various ways – the ones I was watching were going to be ‘socks’ – sock-shaped skins for wearing inside boots, including gumboots. Bliss. There she was, sewing all these lines on the backs of the skins. Those are not individual pieces of fur in the sleeve – they are whole skins or parts of skins with reinforcing stitching! Hope that makes you feel better – not made by martyred furriers! Anywhere there seemed to be a soft bit, she sewed a line. She had a special machine, of course. A very old one, too. For those of you who know New Zealand, this was at Glenorchy, one of the really beautiful places on this earth.
She did slit the soft bit before she sewed, by the way, so this will mean the seams will show separate bits of fur.
And the best thing for cutting fur is a craft knife. The real furriers have scalpel-like knives for this. You have to avoid cutting the fluffy bit.
Fascinating. I wondered, as the fur matches so well, but there are definitely cuts beneath the stitching, so as soon as you pull the stitching out, the fur falls to pieces.
I’ve tried cutting fur in the past with a craft knife, following instructions in books on how to work with fur, and the results were never fabulous, and it was always such an enormous amount of work. So I tried something different this time, and I was so impressed. My teeny-tiny thread snips are very sharp, and they slid right down below all the fluffy bits, and just cut the leather. I did it over a piece of white paper, and there wasn’t a single strand of fur fluff on the paper when I was done cutting around the sleeve – which is more than I can say for my attempts with a craft knife!
I was just talking to a friend today about how there are sometimes different ways to accomplish a task, and which one is better depends on the circumstance and the person – it doesn’t have to be an either/or. It may not work for all fur, but for me, the scissors were fantastic.
And a million, million thanks for the sleeve! And you can also take credit for the quilting as a piece of a quilted petticoat idea, even if you didn’t realise 😉
You are very, very welcome! And I thought maybe that was what was going on with the quilting. 🙂
I’ve never seen the inside of a real fur item before, I always wondered how they made coats out of such small animals so that it looked like one big pelt. It makes sense now that I’ve seen them all joined up, it looks seamless on the outside. Thanks.
You’re welcome! See what Lynne says about it not being tiny pieces of fur though.
I have half a dozen minks that belonged to the mother of a friend of mine. They are old but in excellent condition. I am hoping to make a muff out of them. But I am thinking of laying them on top of a beautiful brocade or velvet. However, I love what you did here and it will encourage me to keep my eye out for old coats at thrift/consignment and antique shops, etc…Very nice job on yours. When I get mine done I hope it looks as nice. I love the idea for the ribbon loop as well. Nicely done!
What gorgeous scales! And what a startling number of little seams.
It is a fabulous muff and I really like that clever bow loop idea. It could be useful for all sorts of garments.
How much of the Sasquatch sleeve did it use up?
kuerschner-innung.deHi,
very nice idea! Love it! 🙂
But I have to correct Kathryn´s answer – this is not “let out” fur, these are the sewn-together scraps and leftovers. They are usually from the side, the belly and the legs area. The other rest of the fur (meaning the back and the back-side) is used when sewing a “higher” quality coat together.
When a fur is “let out”, the leather side is cut to exactly parallel strips (width varies depending on wanted optic), it looks then like this: http://images4.dhd.de/71556159.jpg. Here is a very good drawing of how to (in german, sorry): http://www.kuerschner-innung.de/files/auslassen.jpg
There you see, that there is a lot of “leftover” fur. This is then used for this kind of sewn-together fur. A lot of work!
Here you can see, how a cutting tool for furriers looks: http://upload.wikimedia.org/wikipedia/commons/d/d2/Messer2.jpg
So the best tool for a not-furrier is either a scalpell, or a razor blade. Always cut on the leather side, never the fur side!
Sew together then either by hand (use a leather needle) or by machine. You can use a normal sewing machine, but it is not so good.
Lay fur together with fur sides together, edge to egde, and with the back part of a teasing comb, “comb” the fur in between the edges that no hairs are visible. Sew by hand, using whipstitch or any similar stitch which allows the fur to “move” when laying it flat. When you want to sew by machine, put the pieces side to side, fur-side down. Sew with a zig-zag stitch. Done! 🙂
When the fur is flattened, you can comb it (carefully, especially after sewing it´s usually flattened), or add a little bit of moisture/water and then shake it. In this case, be careful, as this is an old fox and probably already a little wore down and fragile.
Have fun! 🙂
Hi,
could you remove the first link (kuerschner-innung.de) just before my initial hello? I have no idea where this came from.. sorry!
And then, you can remove this post.
Thanx a lot!
Best regards,
Caro 🙂
Unfortunately that first link is a formatting thing that WordPress does – it puts any link that you put in a post at the front of the post. So I can’t remove it without removing your link.
Ok, thanx for the info! And hope that my two cents are helpful for you. 🙂
Regards,
Caro 🙂
[…] la construction je me suis basee sur le manchon de The Dreamstress, que l’on voit ici ou là , mais comme ce manchon servira lors de sorties costumes, pour plus de pratique, j’ai choisi […]
[WORDPRESS HASHCASH] The comment’s server IP (192.0.82.117) doesn’t match the comment’s URL host IP (192.0.80.250) and so is spam.
i have a quick question, did you happen to cut the fur down to 13”x24”?? i saw that, that was the size of the center piece of fabric. so far your DYI is the best one i’ve come across, since i plan on using real rabbit pelts.
The fur was the sleeve of an old coat, so I didn’t cut it down per se. It’s definitely bigger than the lining, as I wanted the outer to sort of wrap around the edges to the inside, and there are layers of padding between the two, so the lining is much smaller. If I cut a fur outer I’d probably cut it at 16×26, to account for turning and padding space.