I’m doing this a bit backwards as clearly you know that the tea gown is done (albeit done in a sort of “sew in haste, unpick at leisure”). However I did take photos and notes as I sewed, and as I haven’t found many other tea-gown recreations done by other historical costumers, and as I did quite a bit of research, I thought it might be helpful if I posted about my process.
So, a tea gown!
We already know exactly what a tea gown is. That was the starting point for my research. In order to make one, I needed to know exactly what I was making. That out of the way, I needed to design my own tea gown.
I knew what I wanted in a tea gown:
- ca. 1900, really the height of the tea gown fashion
- over-robe, open front effect
- Watteau pleats & 18th century inspiration
- A mix of fabrics and textures
After assembling a pinterest board of research and inspiration, I went with three main pieces of inspiration:
First my primary inspiration frock:

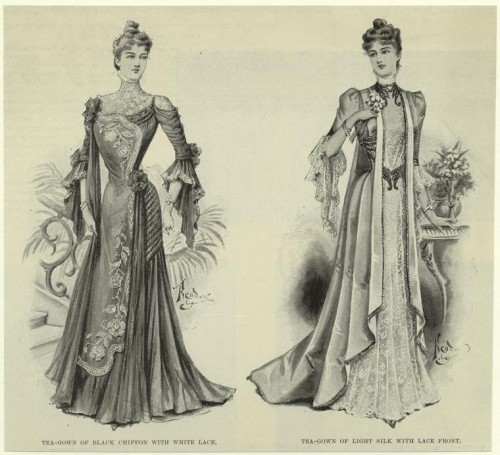
Tea-gown of light silk with lace front (on the right). (1899) via the NYPL digital gallery
I love the lace contrasted with the satin, the elbow length sleeves and lace cuffs, the pleating at the front and going round the side of the skirt, and the suggestion of a Watteau back. I also love the fabulous things going round the neck and waist, but suspect they are more the sort of thing that was a flight of fashion-drawing fancy than a real effect. They are do-able, but improbable.
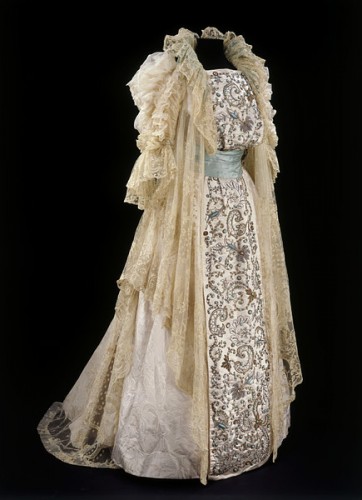
I like to take inspiration from both fashion sketches and extent garments when recreating historical fashions. It lets me see both the possibility of design and imagination and the desired aesthetic and effect in the fashion plate, and the reality of the ideal in the extent garment. For my extent tea gown I mainly looked at this Rouff gown from the V&A:

Tea gown with front panel of Indian embroidery, ca. 1900, House of Rouff (designer), collection of the V&A
It has the same gorgeous contrast of satin and lace that you see in the first design sketch. I love the colours: ivory and turquoise and gold and blond lace. I also love the lower neckline, it’s just a bit more modern easy than the high neckline. I also like how clearly you can see the pigeon breast, and the simple sash. I’ll be borrowing all those elements.
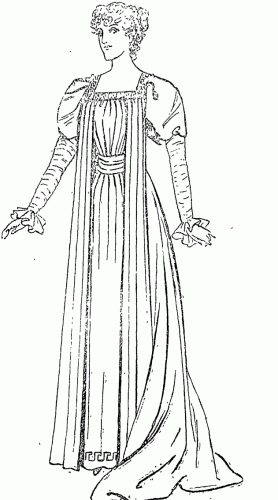
And finally, for a little additional inspiration, a fashion sketch from 1900. This has the same lower neckline as the V&A gown, and the simpler sash. I also love the greek key motifs (though I won’t be using them on mine, but still, greek keys are always good!), and that the sketch comes from a NZ newspaper (though it was almost certainly done by an international artist, and just included in a syndication deal). It’s good to give my tea-gown a Kiwi link!
So my gown will look very much like the first design, but with a lower neck, a slight pigeon breast, and a simpler sash.
Next I’ll tell about how the thing actually gets put together, and how I began draping it.


Oh, cool. I’d like to see some photos of the draping process. I don’t do a lot of draping because I’m not very confident with it, and I’m always interested to see how other people do it.
Really looking forward to keeping up with your progress with this as I’m currently (as a Costume for Performance student) working on my first Edwardian piece – the bodice of a walking dress – and am loving the silhouettes of this era.
I’m fascinated by the way these gowns, especially in the sketches, look as if the wearer is seriously corseted – or possibly anorexic. Having the sash or waist detail not going straight round, but curving down a bit would help suggest a small waist, but if the back of the over-robe is as fitted as the sketches suggest under the Watteau pleats, it is still going to be a challenge. What fun! Can’t wait to see the fabrics you have found for it.
Just re-read your blog – of course I’ve seen the fabrics!
Yes, but I have yet to show you them in detail and tell you about them!
That was something that I found very interesting too, as there is a lot of period discussion of tea gowns being worn without corsets. I wondered if that only applied to the loose Mother Hubbard type tea gowns, but having made one I think I have figured out the trick. I’ll be posting about that later.