
The curved front seam and adjustable lacing of the Minette Stays mean they already fit an wide range of cup sizes without major changes to the pattern. We tested them on A to H cups! However, if you want to refine the fit of the stays even more, and change the shape so they have really defined bust cups you can add bust gussets.

Here’s how to do it!
We’ll use an imaginary lady as the measurement model for this tutorial. Let’s call her Guenevera.
How to add bust gussets to the Minette Stays.
You’ll need four measurements:
- Full bust
- Under bust
- Bust point to bust point
- Bust point (nipple) to underbust length
These measurements should be taken while wearing a supportive, but not padded, bra.
Find your full bust and underbust measurements:
Take your full bust measure by wrapping a tape around your back and the fullest part of your bust. The tape should be parallel to the floor. Take a measure that is just tight enough to sit firmly around you without denting in to your bust.
Guenevera’s full bust is 43”/109cm
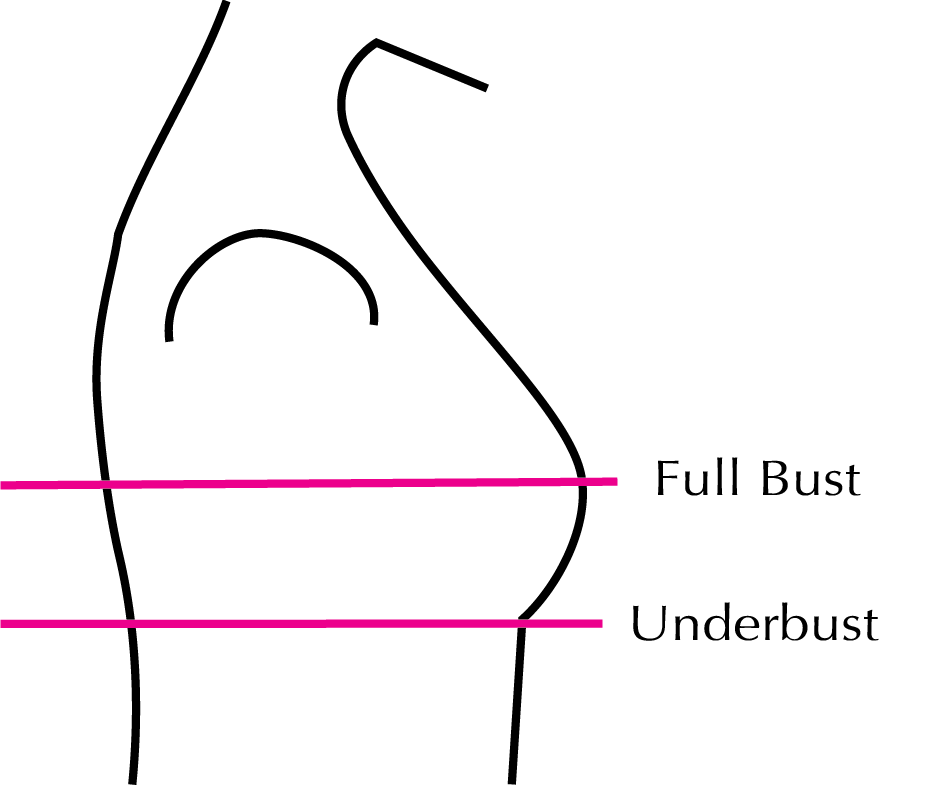
Take your underbust measurement by wrapping your measuring tape around your ribcage just under your bust, keeping it parallel with the floor.
Guenevera’s under bust is 32”/82cm
Now, let’s compare those two measures to the Minette Stays measurements chart:
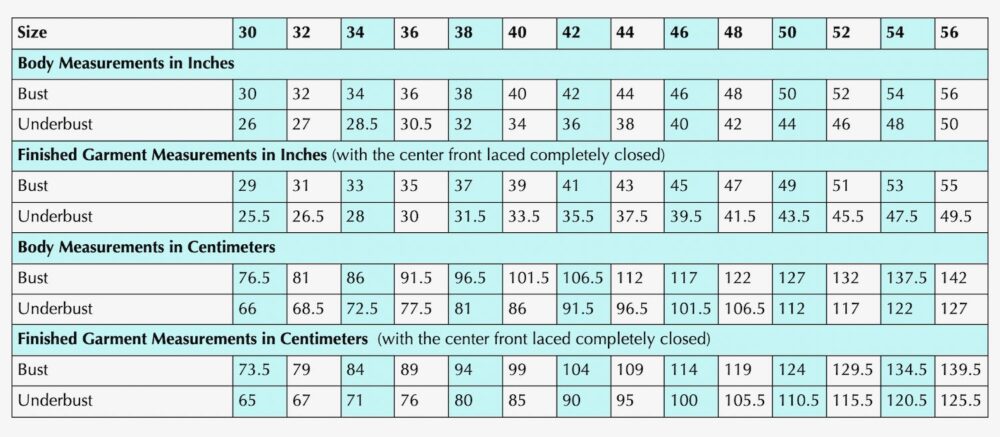
You want the underbust of the Minette Stays to fit snuggly, so choose your size based on your underbust measurement.
Guenevera will be making a Size 38, because she has a 32”/81cm underbust.
Now, subtract the full bust measurement of the Minette Stays size that matches your underbust from your full bust measurement.
For Guenevera:
43 – 38 = 5” OR
109 – 96.5 = 12.5cm
This measurement tells you how much you need to add to the pattern, and thus how big your bust gussets will be.
Each bust gusset will be 1/4” of the total measure + seam allowances wide, because there are 4 bust gussets.
Guenevera’s gussets will each be 1.25”/3.12cm wide at the top.
Keep your number in mind as we move to the next steps.
Find the width between your bust points/apexes:
Your bust point/apex is the sharpest point of your bust bulge (yes, that’s the technical patternmaking term for it!): usually this means your nipple. We need to mark it on the pattern, so you’re going to measure across your chest from point to point:

Guenevera measures 10”/25cm from bust point to bust point.
This measurement will tell you how far in from the center of the pattern to place your bust gussets.
Guenevera’s gussets will point towards a point 5”/12.5cm (half of her bp to bp measure) in from the center front.
Find the length from your bust point to your underbust:
Measure down from a bust apex to your underbust line, curving the tape measure over the fullness of your bust as you measure.

Guenevera measures 4”/10cm from bust point to underbust.
This length will be how long your bust gussets are + 3/8”/1cm for View B.
Guenevera is making View A, so her bust gussets will be 1.25”/3.12cm wide and 4”/10cm long.
Marking the lines where you’ll be inserting bust gussets on your Minette Stays:
Work with Piece A/B in the pattern size that matches your underbust measure.
Starting a gusset length down from the top corner, draw a line out from the center front line at a right angle 1/2 the distance from bust point to bust point (5”//12.5cm for Guenevera) and draw a line
Starting 1/2 the bust point to bust point draw a line down from the neckline seam allowance line the length of your gusset (4”/10cm for Guenevera).
Mark the point where these lines intersect at a right angle (in purple below)

Measure out (horizontally) from the intersection point 1/2”/1.2cm on either side and make two marks.
Measure out from the top of the gusset length line 5/8”/1.5cm on either side and make two marks.
Connect these marks with two lines that angle in towards the intersection point slightly. These lines (shown in blue below) will be your gusset insertion lines.
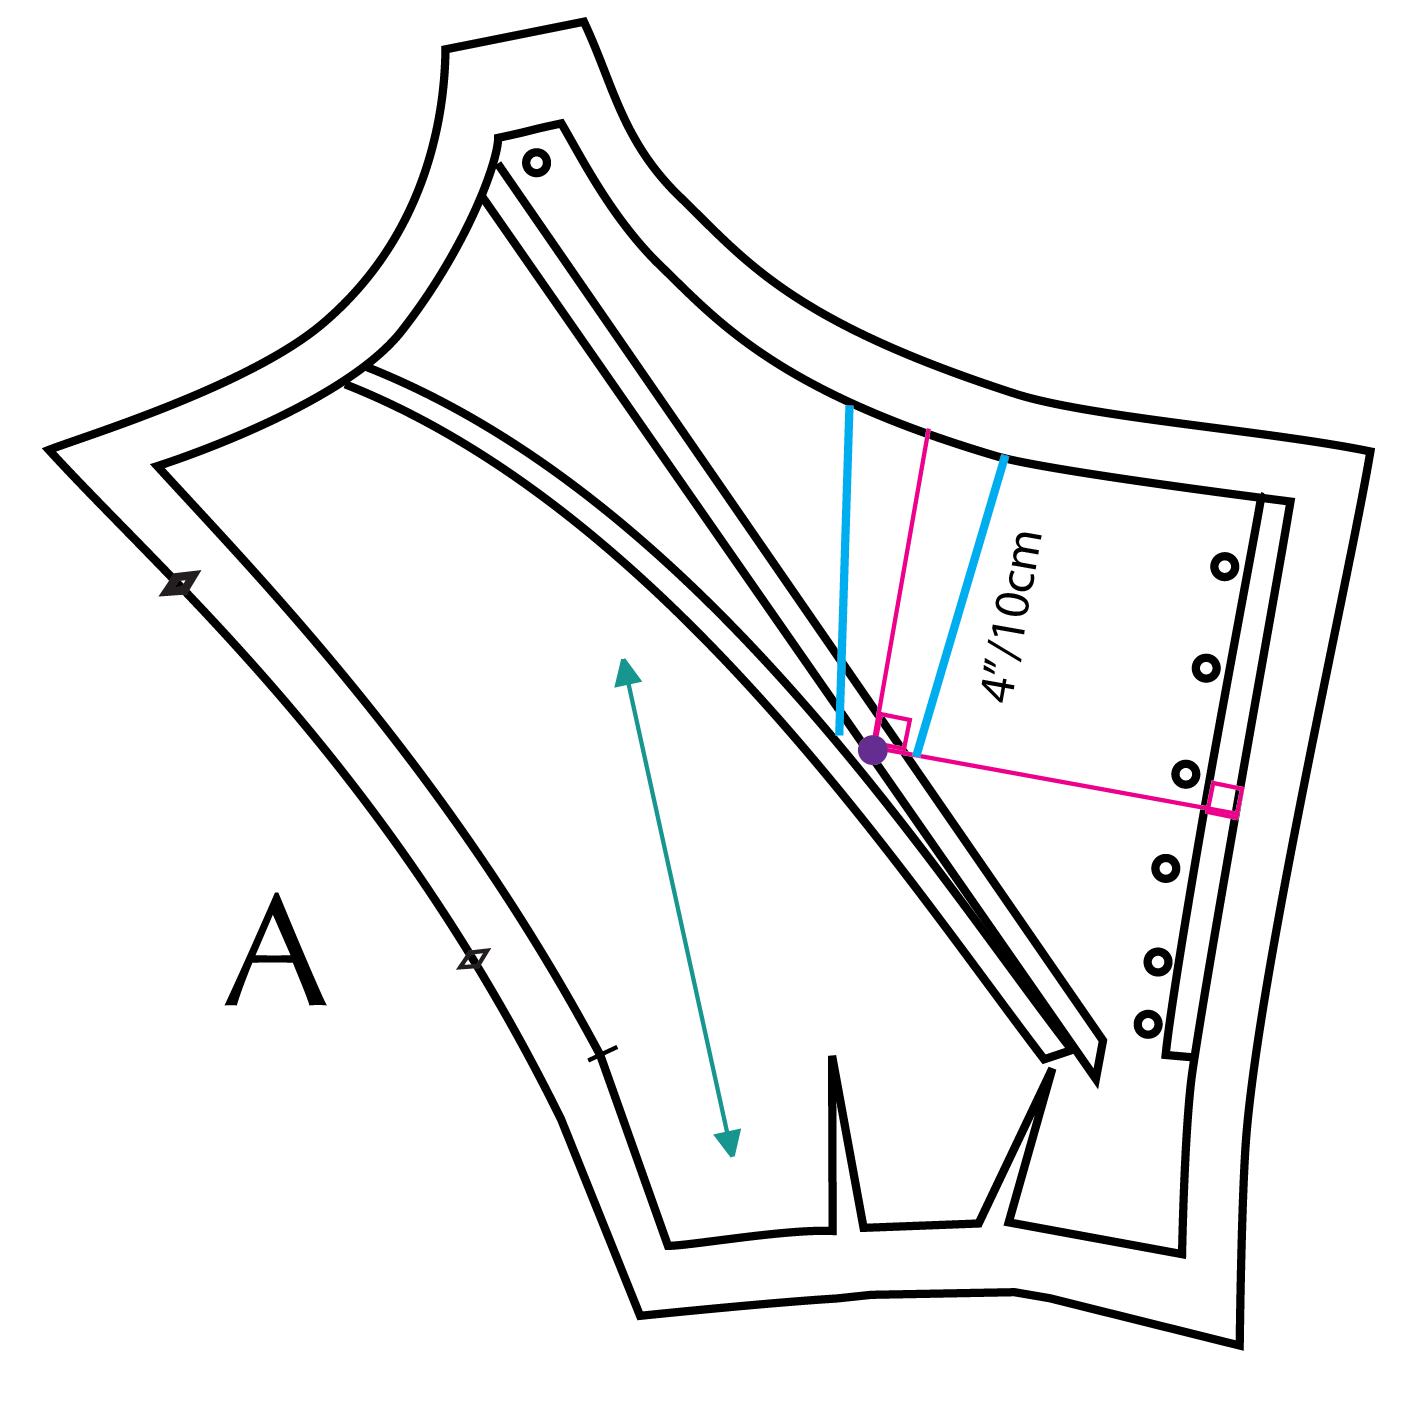
You’ll notice in the image above that the gusset line further away from the center front crosses a bone. If it’s only a little bit you can simply shift the bones towards the side as shown below. The original bone placement is in grey, and the new in black:
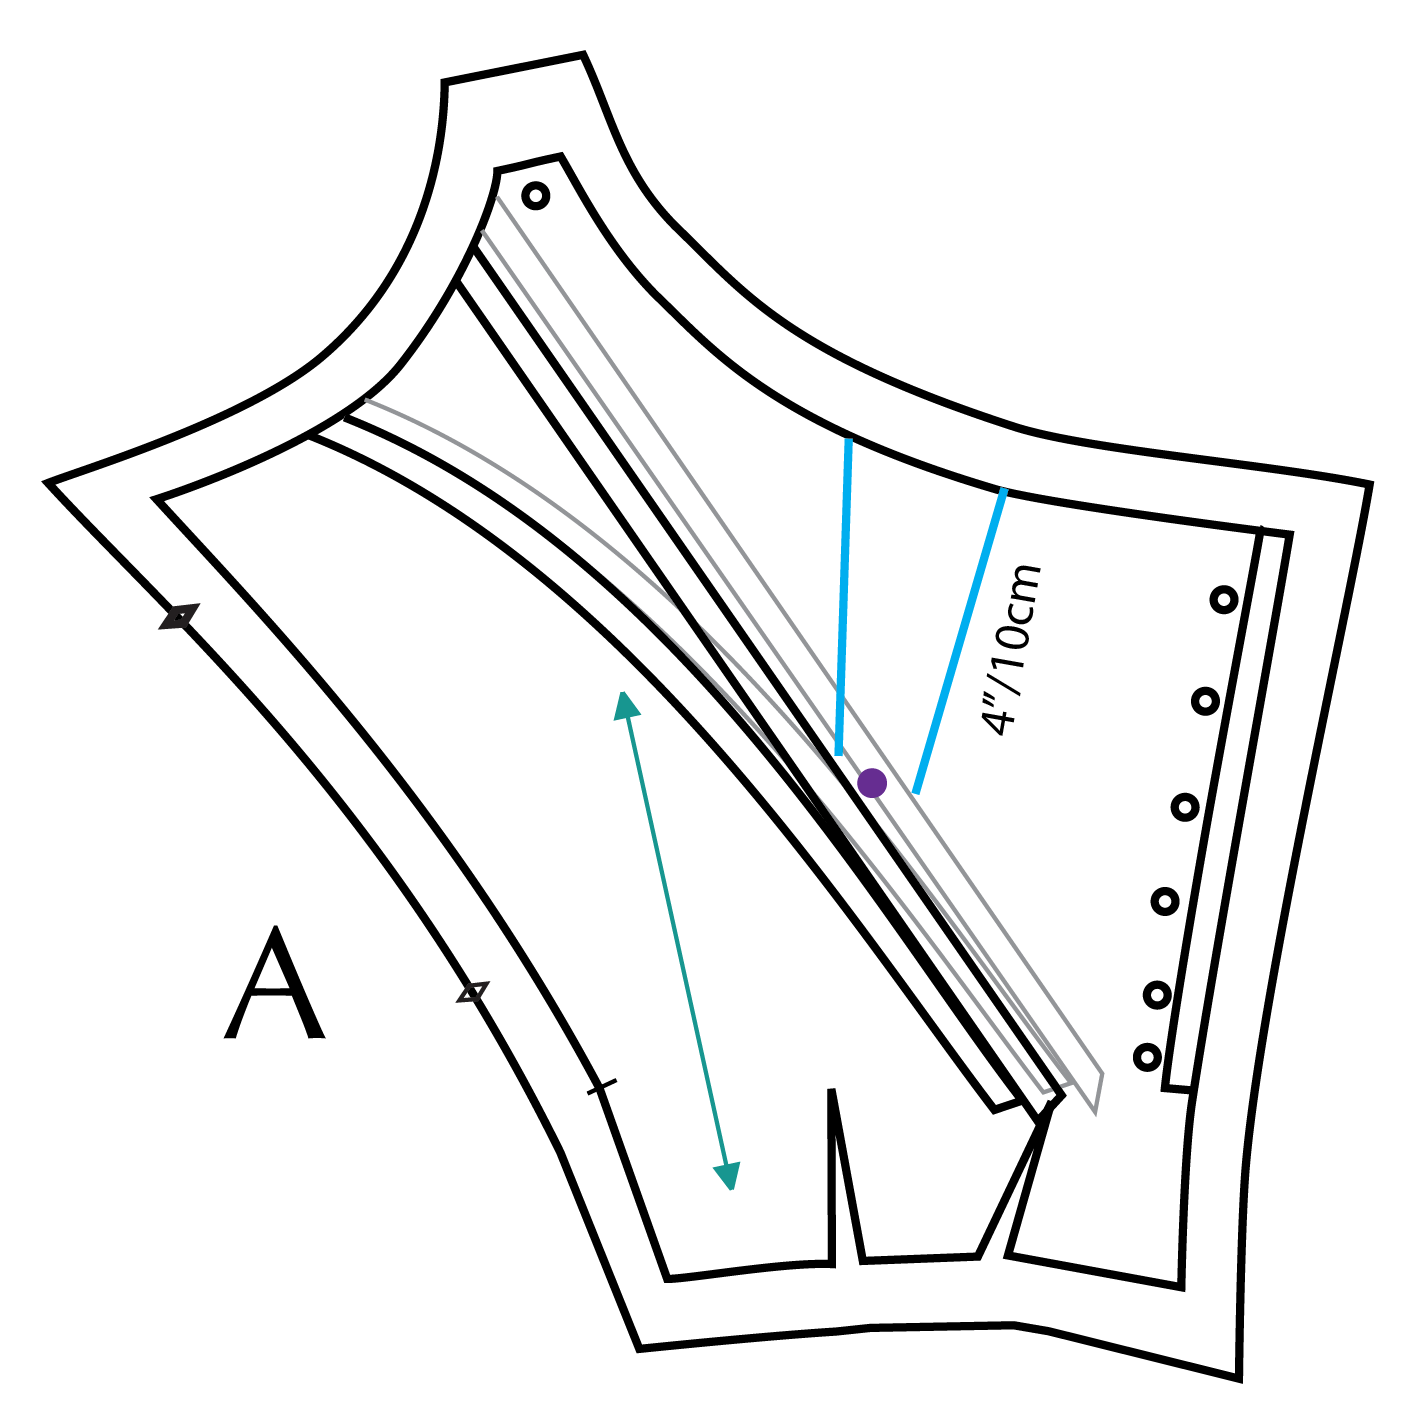
If the lines cross the bones quite a lot (shown here is an example with a 5” long gusset) you can move the bones, angle they downwards, and also shorten the gusset line that is further from the center front.
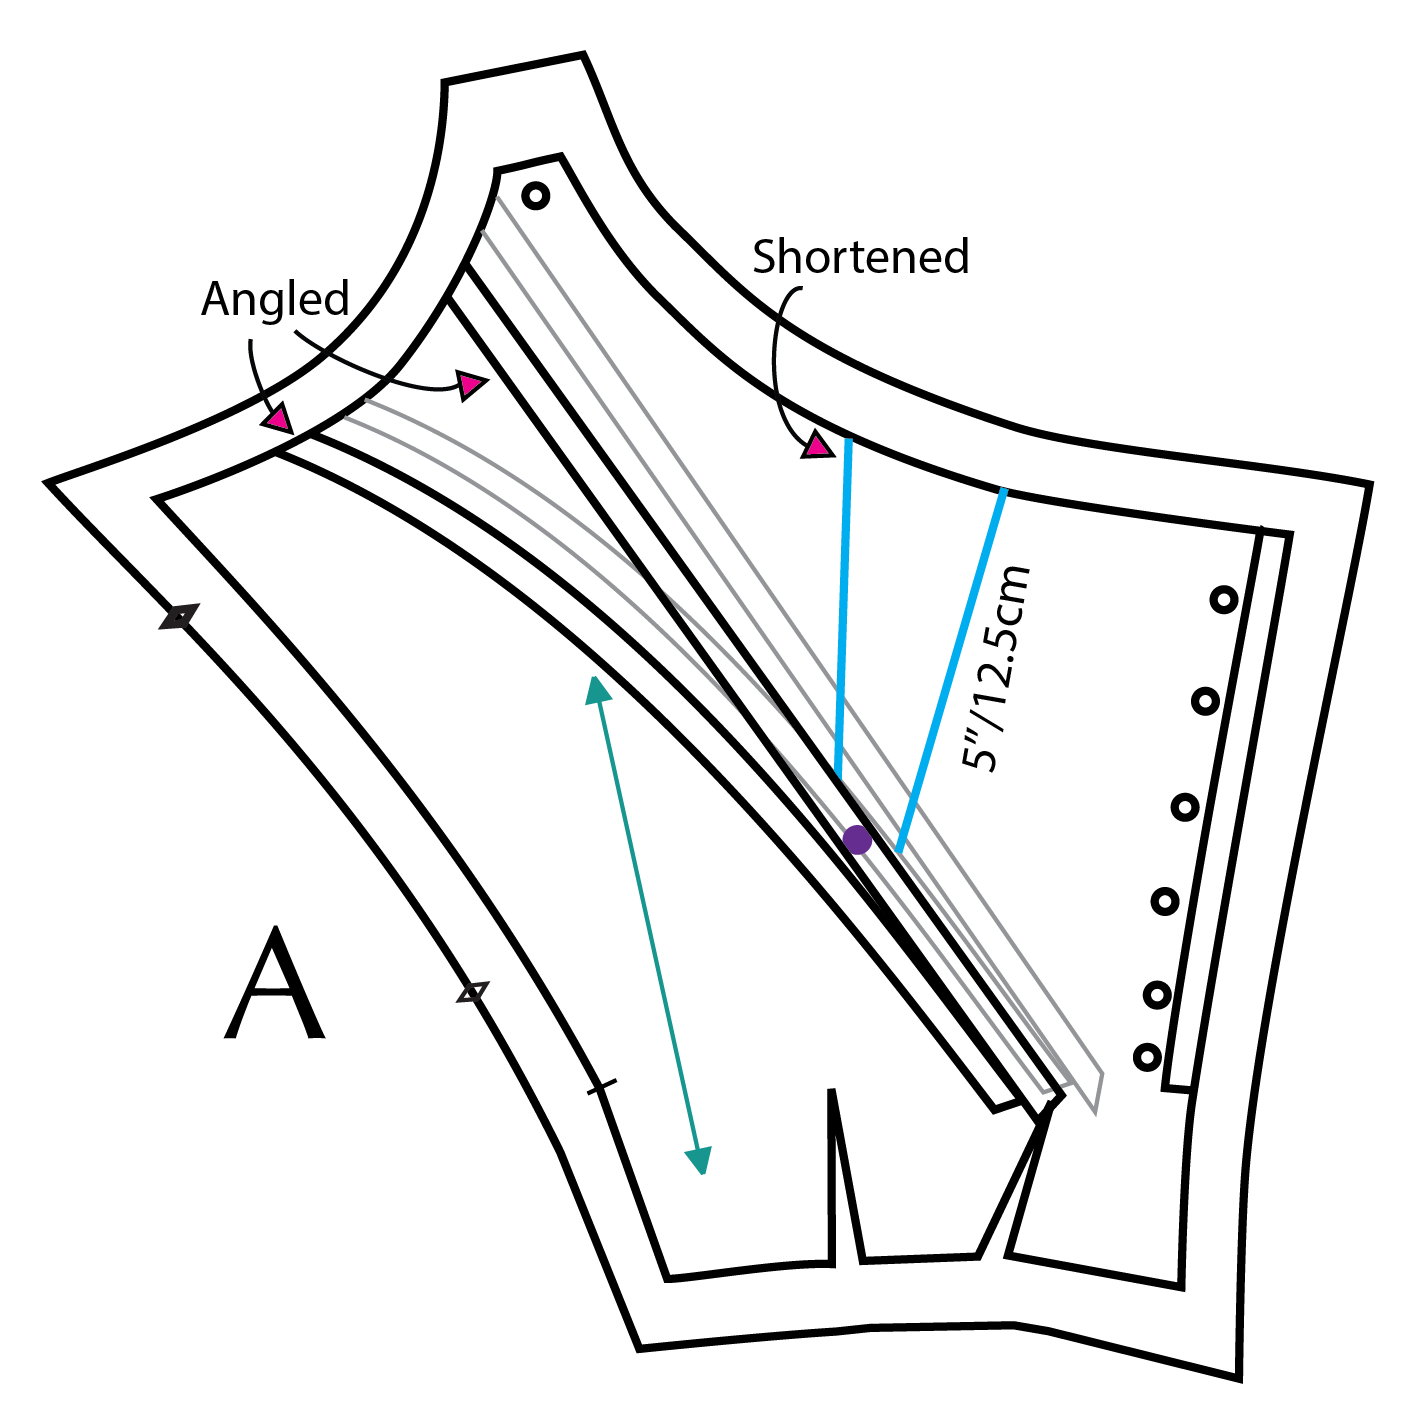
Your physical pattern will end up looking something line this:

To transfer the marks to my cut fabric pattern I slash down the two vertical lines, fold the paper away, and mark the fabric.

OK! That’s the gusset lines marked. Now we can…
Make a bust gusset pattern piece:
Make sure you have your gusset measurement ready. Guenevera’s bust gussets will be 1.25”/3.12cm wide and 4”/10cm long.
Fold a piece of paper at least as wide as 1/2 your bust gusset + 1”/2.5cm.
Mark a horizontal top line. Measure down from that line a seam allowance (5/8”/1.5cm) and make a second horizontal line. This is the top of your gusset.
Measure out on this line 1/2 your gusset width and make a mark (5/8”/1.5cm for Guenevera)
Measure down the fold your gusset length and make a mark (4”/10cm for Guenevera)

Use a French curve to connect the two lines.
Add a 1/2” seam allowance. I have also marked the 1/4” line below, as that is how big the gusset will look on the final garment:

Cut out your gusset pattern piece:
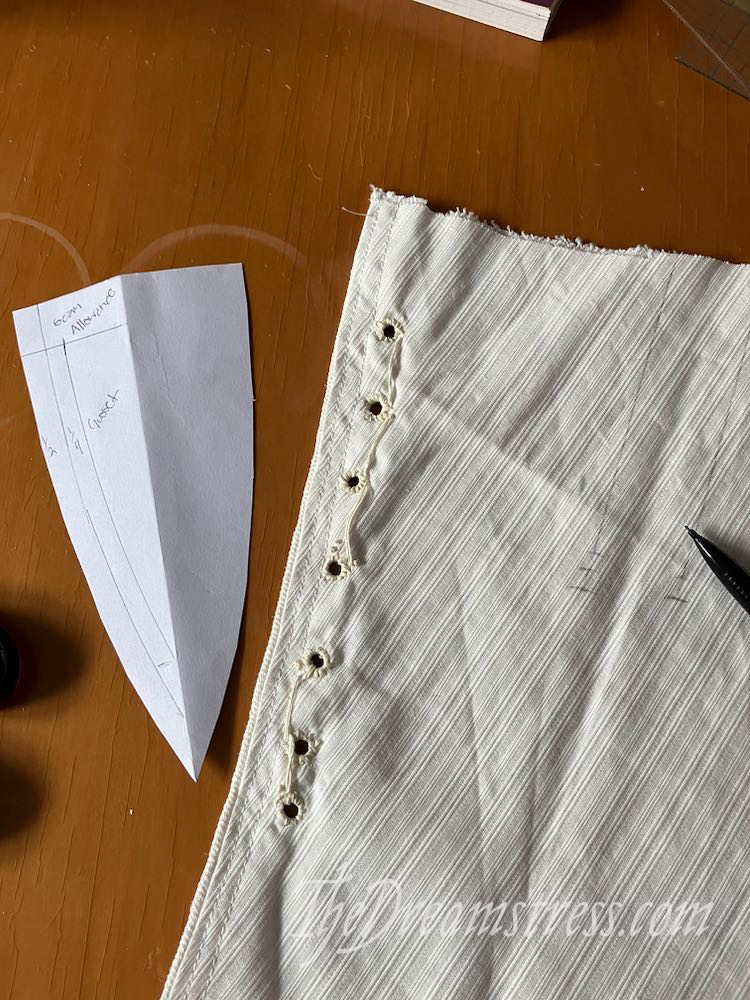
Now cut four of these in your outer fabric, and four in your lining fabric.
Wrong sides facing, sew each pair of outer and lining together with a 1/4” seam allowance to make four gussets.

Inserting gussets into the Minette Stays
Assemble the front piece (A or B) of the Minette Stays. Sew the center front bones and eyelets. Do not sew the angled boning channels. Mark the gusset insertion lines.
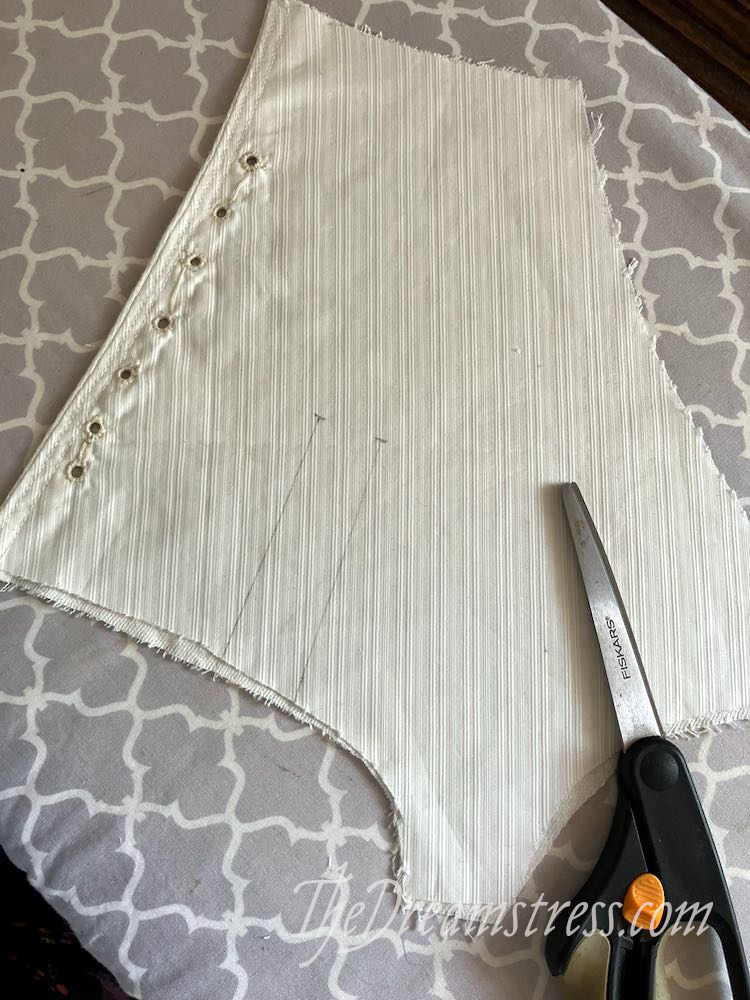
Carefully cut the bust insertion lines through both layers of fabric:

Working with the outer layer only, fold and press in the seam allowances of the gusset lines 1/4” tapering to nothing at the point of the gusset.
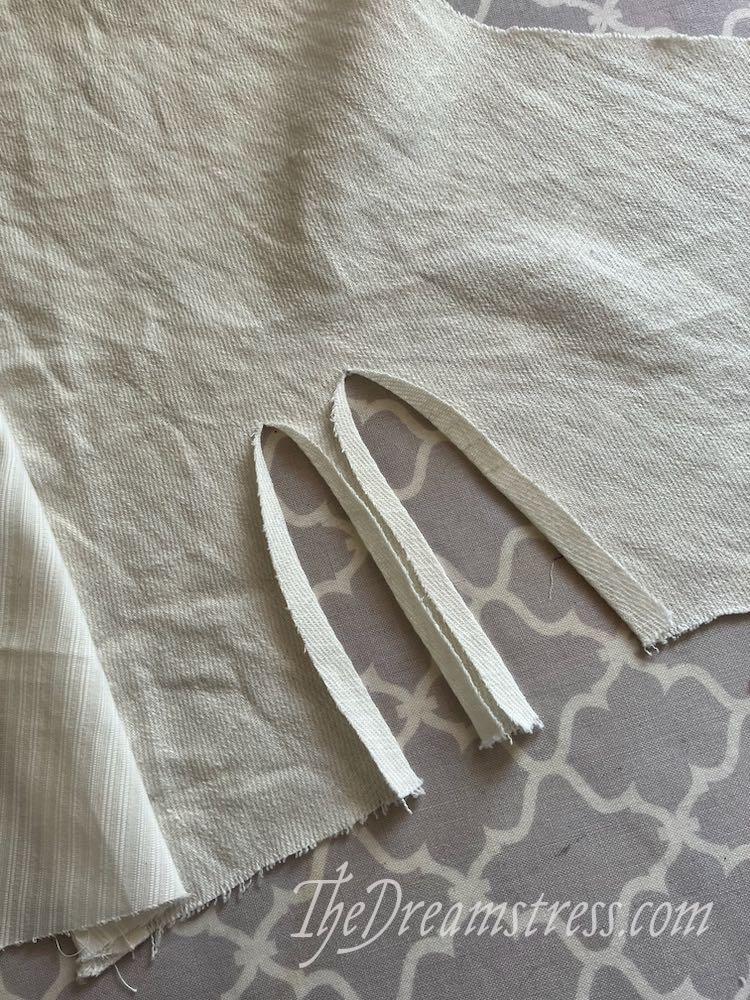
Pin a gusset behind an insertion line, matching the fold of the insertion slit to the stitching 1/4” from the outer edge of the gusset:
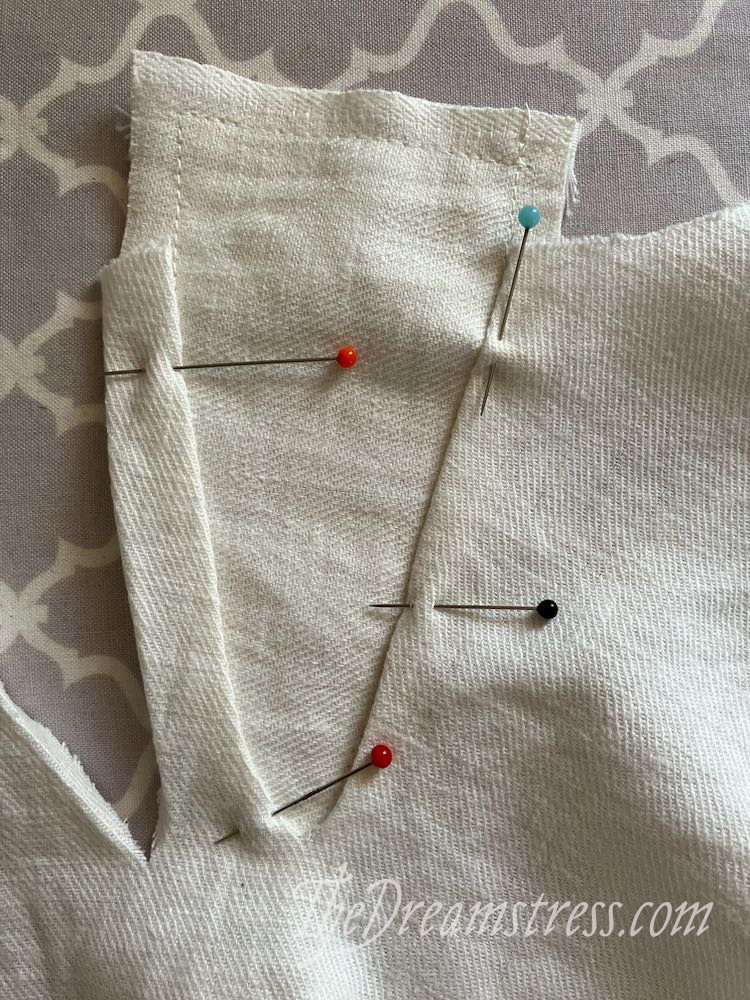
Sew the gusset in place with small whip stitches, working the stitches more tightly as you go around the point of the gusset.
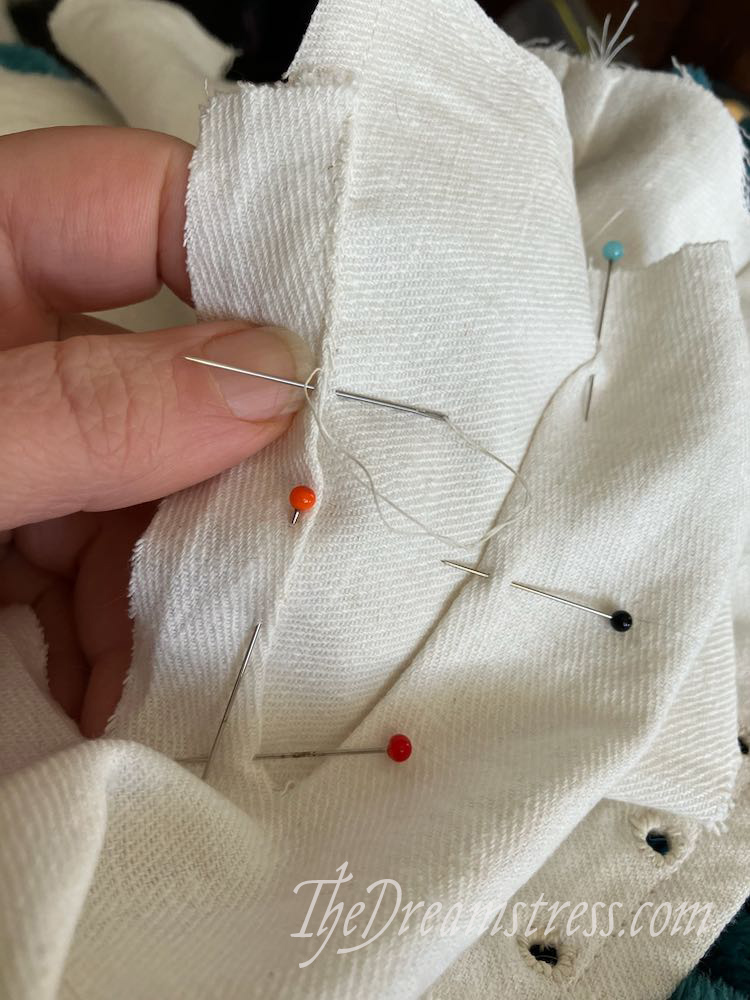
If your fabric is prone to fraying you may need to reinforce the point with even tighter whipstitches, or with buttonhole stitches.
Insert the other gusset in the same way:
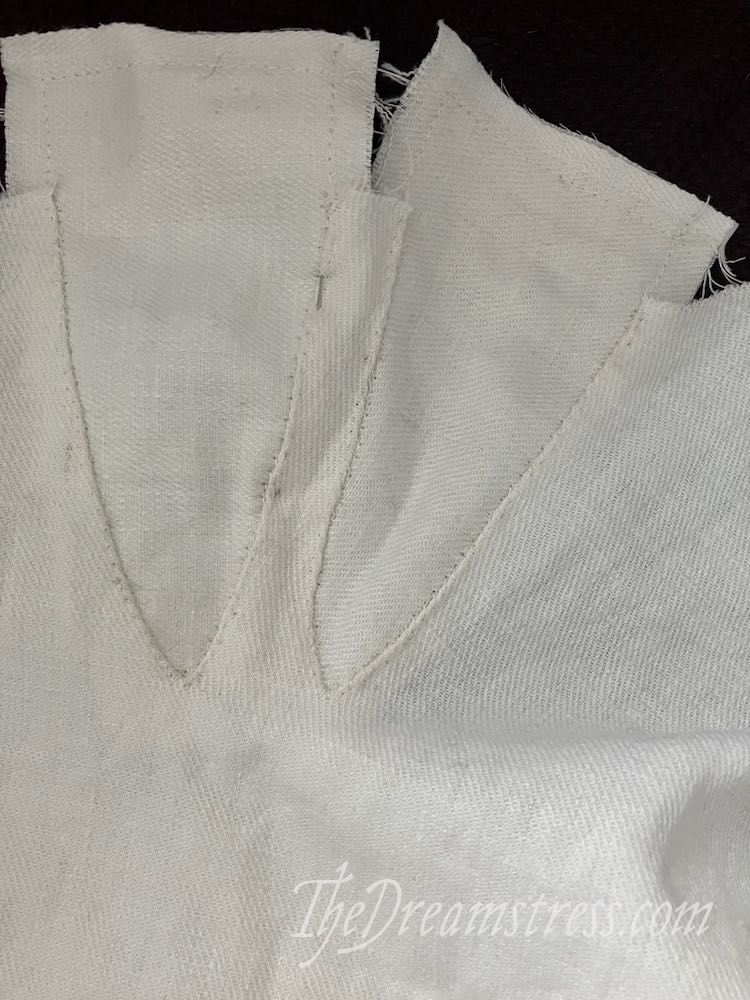
Turn the stays over, and press under the seam allowances of the lining insertion slits 1/4”, just as you did for the outer.
Lay the folded-under slit over the gusset so it just covers the stitching from doing the outer, and sew it in with whipstitches just as you did the outer.

Trim off any overhanging seam allowances when the gussets are fully sewn in:
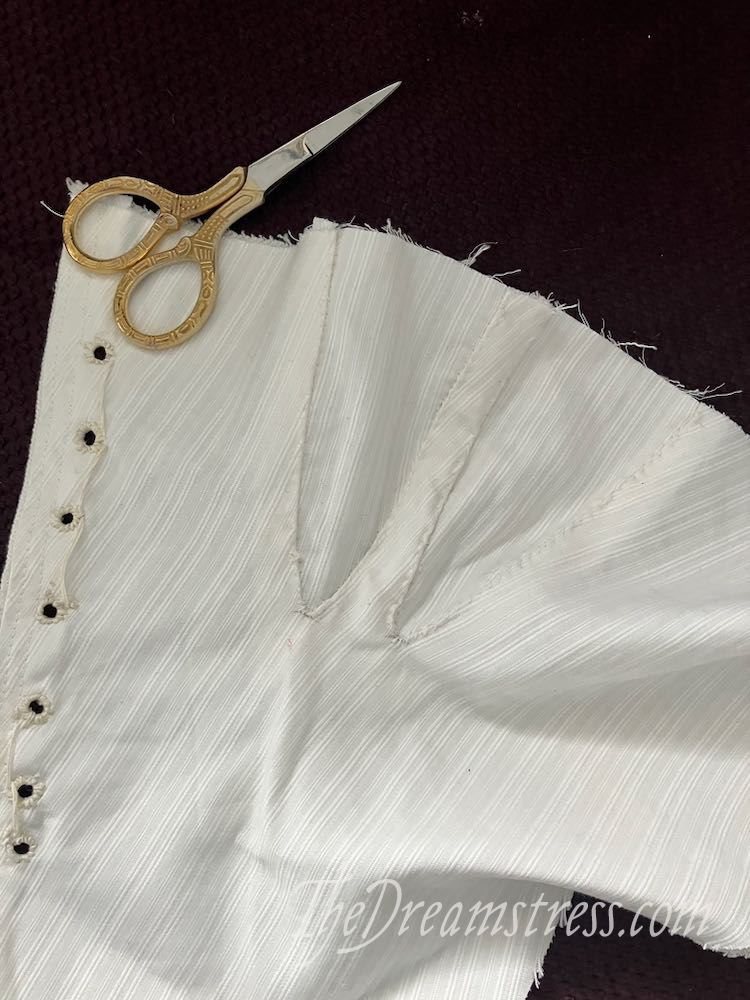
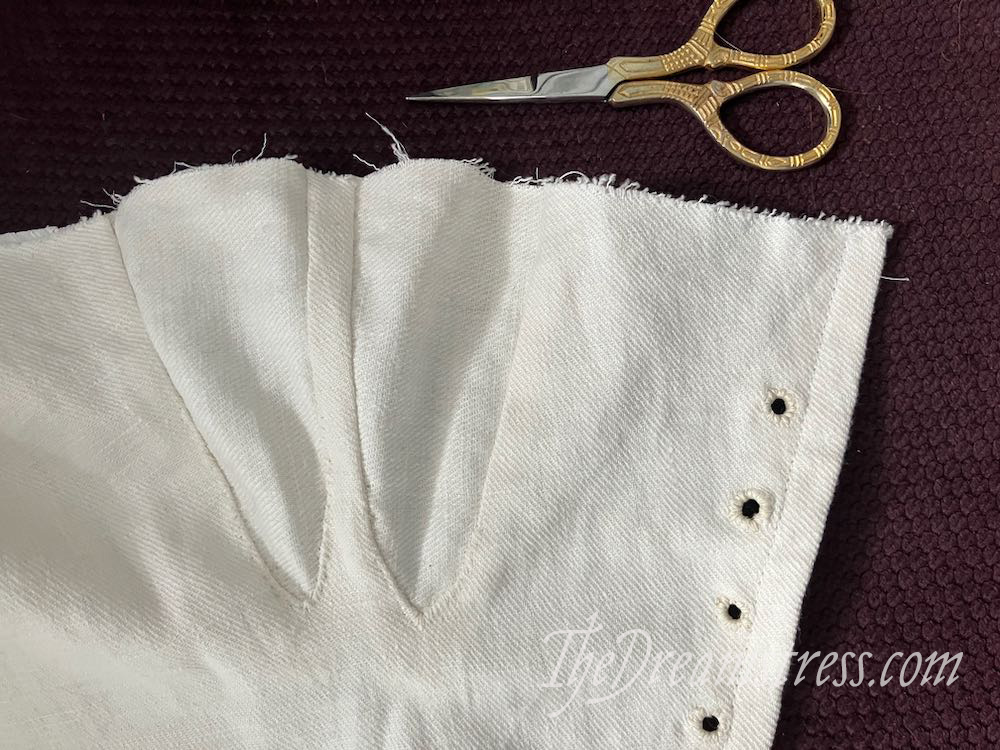
And that’s your gussets inserted! You can now proceed to follow the rest of the pattern instructions to complete the Minette Stays.
Greetings
Could you add a photo of the modification on a dressmaker’s mannequin? That would be helpful to see where the gussets actually fall.
Thank you
I will be photographing the stays on a model with the sample measurements, but our photoshoot has been delayed by an emergency 🙁
Thank you for this tutorial. A set of stays with gussets is exactly what I’ve wanted to make.
I’m sorry to hear of your emergency.