Latest Posts

thedreamstress.com

Five for Friday: What I did in Hawai’i

I went home to Hawai’i to spend the December holidays with my parents. It’s the first time in 14 years I’ve gone back to Hawai’i in December, because I usually try to escape NZ in the Southern Hemisphere winter (June-Sept), not our lovely early summer.

But I had an absolutely wonderful trip, and am so glad I went home. Here’s some of the things I got up to:

1. Eating lots of fruit

My parents have a tropical fruit farm, and grow pretty much every tropical fruit you’ve ever heard of (except durian), and lots you haven’t. And I gorged on as much of them as you can possibly have every day without bad things happening…

Tropical fruit thedreamstress.com

2. Throwing a 9 course Christmas Eve dinner for 11 based on historical recipes

I wanted to do something a bit fun and different for my parent’s big holiday celebration (which ended up being Christmas Eve dinner), and a formal, coursed dinner is definitely a novelty in Hawai’i – even more so if it’s historical!

I melded historical recipes with local ingredients, and we had:

Apertifs: Spiced rosajamaica tea and bread with sauces.

Soupe: Poree Blanche (Medieval white soup with aliums and almond milk), with green onions instead of leeks, and macadamia nut milk instead of almonds

Entree: Torte Salviate (Herbed Egg Tart) (15th Century), with duck eggs and herbs from my parents farm

Salad: Salmagundi (17th century) using ingredients entirely from the farm

Plat Principal: Savory Frumetee (Medieval) made with venison stock, and Venison with Sauce Verte. All the historical mentions of frumentee I could find describe it being served with venison, and the feral deer on Moloka’i are out of control at the moment, so everyone has a freezer full of it. Sauce verde is parsley and verjuice with spices – the perfect tart accompaniment to the heavy, sweet, spiced flavours so popular in Medieval mains.

Amuse Boche: Midshipman’s Butter (18th Century). What’s Midshipman’s Butter? Avocado! An Englishman in the Caribbean in the 18th century described avocado served as a salad, and avocado on toast.

Sweets: Ices (Regency): Mango lassi and guanabana (soursop) ices with pecan cookies. The ices were vegan: coconut and frozen fruit, and the best ice cream I’ve ever made. Perfect texture, divine flavour.

Dessert: Baklava (14th century), and dried fruit in rosewater syrup (Medieval) over macadamia pulp. One of the family friends was Turkish, and baklava and fruits in syrup are documented back to at least the 14th century, so she made them. Traditionally the fruit would be served over rice pudding, but we used the leftover macadamia nut from the soup. She also gave her baklava a tropical twist with lime and coconut. So delicious!

Digestifs: Fruitcake and turkish coffee or tea. My parents-in-law taught me how to make the family fruitcake recipe (sans alcohol, because I’m a Baha’i), and I hauled all 4 kilos of it to Hawai’i in my suitcase. Customs had no problem with it, but it sure put a strain on my luggage allowance. And it was delicious – especially with properly made Turkish coffee. Or so I’m told: I’m not a coffee drinker.

It took some help from a couple of family friends, but I pulled it off, and I’m so proud of myself!

And I forgot to take a single photo…

So here’s some of the fruitcake prep, and leftover ice cream.

Tropical fruit thedreamstress.com
thedreamstress.com

3. Finally having a palm tree for a Christmas tree

Hawai’i isn’t exactly standard spruce and pine Christmas tree territory. The usual local tree is the Norfolk Pine.

I’ve always secretly hankered for a palm tree for a Christmas tree: if you’re in Hawai’i you might as well lean in to it!

But palm trees aren’t actually suitable trees – they are either too big and heavy, or too weak when they are small enough. However, in the last few years a new type of palm has begun sprouting up everywhere in the woods around my parents house. It was probably planted by someone as an ornamental, and is now being spread by birds.

As we came up to Christmas we were at a loss for a tree. The one Norfolk pine on the farm was looking very scraggly indeed, and we weren’t able to source another. I finally suggested just making a really big flower arrangement and hanging a few ornaments on it. As I was collecting ferns for my flower arrangement I saw one of these palm trees. A pair of loppers, some PVC pip in a bucket, and a bit of jiggling later, and I’d managed a palm tree Christmas tree!

You couldn’t hang anything heavy on it, but it was perfect for my Mum’s antique glass ornaments and her Victorian ‘diaper Santa’.

thedreamstress.com
thedreamstress.com
thedreamstress.com
thedreamstress.com
thedreamstress.com
thedreamstress.com

4. Enjoying some family history

My Dad went back to the US mainland to visit his family this year, and collected a bunch of family photographs, many of which I’d never seen before. I loved getting a glimpse into the childhood of his parents and grandparents.

Family history thedreamstress.com

I learned that his mother was a clotheshorse (which I’d always suspected – I inherited most of her fabric stash and some of her wardrobe), and was also a huge fan of trousers all the way back in the 30s!

Family history thedreamstress.com

5. Visiting the Hawai’i National Baha’i Center

The Hawai’i-NZ flight leaves early in the morning, which means you have to fly over from an outer island and spend the night in Honolulu to catch your flight. This is usually annoying and expensive, but this time it was wonderful, because I got to stay with friends and visit the National Baha’i Center of Hawai’i.

I haven’t been to it since I was a teenager, and it’s a beautiful space, and was full of a gorgeous art exhibition. It was a very special end to a wonderful visit.

The National Baha'i Center of Hawaii, thedreamstress.com
Dress, ca. 1805, American, silk, Brooklyn Museum Costume Collection at The Metropolitan Museum of Art, Gift of Charles Blaney, 1926, 2009.300.2314

Rate the Dress: Empire Era Details

As neither patterned fabric nor bold contrast were exactly popular last week, this week I’ve picked something completely different: a monochrome Empire era dress that would be boring, except for subtle details that set it apart.

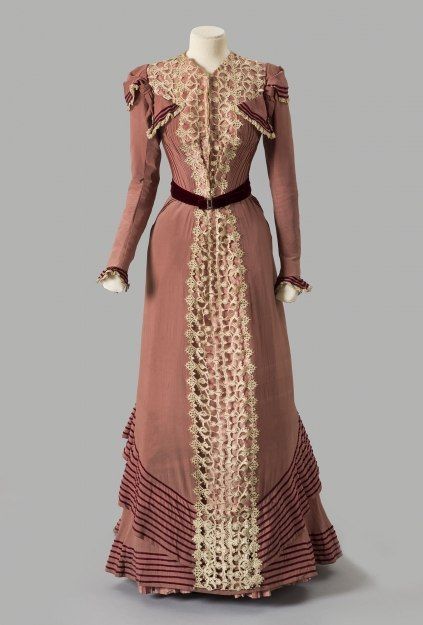
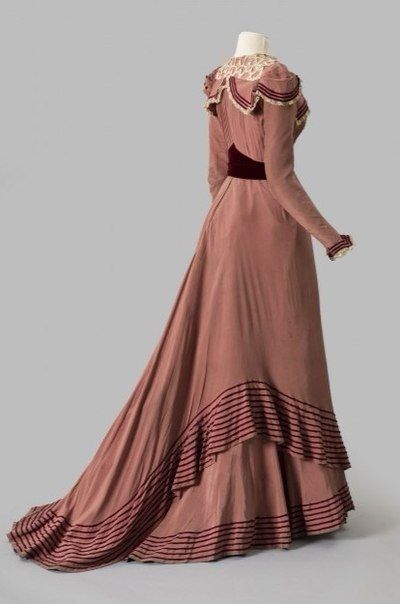
Last Week: an 1890s day dress with all the trimmings

Whatever you saw in last week’s Rorschart test of a dress, it certainly gave you something to talk about. It’s the first Rate the Dress in quite a while to break 50+ comments! Some of you thought it was way, way too much (Lynne said her eyes felt they needed a lie down after looking at it). Others loved how bold it was, how unafraid to really embrace the trends of the time. And some of you were weirded out by the ground fabric, particularly in combination with the strong red velvet.

However you felt about it, you felt about it strongly. I don’t think we’ve ever had quite so many 2s and 10s all on the same Rate the Dress!

The Total: 6 out of 10

If you goal in this dress was to be admired by all, you wouldn’t succeed. But if your goal was to be memorable and talked about, well, sartorial mission accomplished!

This week:  an Empire era dress with subtle hues and subtle ruffles.

After last week’s dress, I thought I’d better show something restful and muted. And you can’t really get any more muted than this pale mouse grey silk frock, or any simpler than a Regency sheath. But this dress isn’t quite as simple as it looks: it has a number of secrets.

Dress, ca. 1805, American, silk, Brooklyn Museum Costume Collection at The Metropolitan Museum of Art, Gift of Charles Blaney, 1926, 2009.300.2314

First, the colour. It’s possible that the grey-brown hue is very close to the dresses original colour: just a tiny bit faded with time. But the shade of the dress is also one that a number of the more unstable dye colours fade to.

Dress, ca. 1805, American, silk, Brooklyn Museum Costume Collection at The Metropolitan Museum of Art, Gift of Charles Blaney, 1926, 2009.300.2314

Certain black dyes (like the ones used to quickly dye Queen Victoria’s ‘Privy Council’ mourning dress when she inherited the throne three decades later) can fade to this colour, as will some purples, some richer browns, and some blues. So this dress may not have been quite as subtle in its original incarnation.

Dress, ca. 1805, American, silk, Brooklyn Museum Costume Collection at The Metropolitan Museum of Art, Gift of Charles Blaney, 1926, 2009.300.2314

Nor is it quite a boring, bog-standard high-waisted, classically inspired Empire Era dress: it has a few details that set it apart, like the squared off train.

Dress, ca. 1805, American, silk, Brooklyn Museum Costume Collection at The Metropolitan Museum of Art, Gift of Charles Blaney, 1926, 2009.300.2314

And the tiny ruffled details that tie together the oversleeves (the dress can almost certainly be worn with short short sleeves as well as with the long undersleeves), the bodice detailing, and the slits of the apron front.

Dress, ca. 1805, American, silk, Brooklyn Museum Costume Collection at The Metropolitan Museum of Art, Gift of Charles Blaney, 1926, 2009.300.2314

You can just see the ruffled detail of the apron-front slits here:

Dress, ca. 1805, American, silk, Brooklyn Museum Costume Collection at The Metropolitan Museum of Art, Gift of Charles Blaney, 1926, 2009.300.2314

What do you think?

Do you like the pairing of the single darker colour (whatever it was) with the fashionable Empire silhouette, and the small details?

Rate the Dress on a Scale of 1 to 10

A reminder about rating — feel free to be critical if you don’t like a thing, but make sure that your comments aren’t actually insulting to those who do like a garment.  Phrase criticism as your opinion, rather than a flat fact. Our different tastes are what make Rate the Dress so interesting.  It’s no fun when a comment implies that anyone who doesn’t agree with it, or who would wear a garment, is totally lacking in taste. 

(as usual, nothing more complicated than a .5.  I also hugely appreciate it if you only do one rating, and set it on a line at the very end of your comment

Making your own fitted sheets thedreamstress.com

Re-make & re-use: how to turn old flat sheets into fitted sheets

Has anyone else noticed that you just can’t buy good quality cotton sheets anymore?

Sheets I bought when I first moved to NZ 15 years ago are still going strong, but anything I’ve bought in the last five years (when we upgraded our bed size) lasts less than three years, even when it’s the same brand.

Making your own fitted sheets  thedreamstress.com
(seriously! This isn’t cool!)

And that’s an issue. Cotton (even organic) is not great for the environment, and the best way to lower its impact is to get as much use as possible out of anything cotton that you buy. Three years for sheets = not good.

To get a little more use out of the extremely disappointing sheets I’ve purchased in the last 5 years, I’ve been recycling the sheets that have worn out.

I turn the fabric around the edges of worn out fitted sheets into pillowcases, and do the same with flat sheets that are very thin, or where there are tears in the middle.

If there is enough robust fabric left in a flat sheet, I turn it into a fitted sheet. This is also a great thing to do with vintage flat sheets, which last forever, and come often come in smaller sizes (holdovers of the days when adult couples slept in single beds – who uses a king single today!).

It’s kind of weird, but I get a lot of satisfaction out of being able to ‘make’ my own sheets: remaking a thing to be useful, keeping it out of the waste system for as long as possible, giving it its best possible life.

I shared some snippets of the process on instagram, and people asked me to show how I do it.

So here’s how to make a fitted sheet from a flat sheet!

Making your own fitted sheets  thedreamstress.com

Measurements:

First, measure your mattress top: you need to know the:

  • length
  • width
  • depth
  • circumference (length + width x 2)

Materials: Version A

This version is made with one long length of fabric that covers the mattress top and both ends, and narrow pieces that cover the sides of the mattress.

You’re going to need:

  • An old sheet/piece of an old sheet as long as the top of your mattress + 2x the depth of the mattress + 8″/20cm + 1″/3cm (for seam allowance) and as wide as your mattress + 1″/3cm (for seam allowance)
  • Scraps of old sheets/fabric enough to make 2 lengths as long as your mattress + 1″/3cm (for seam allowance) and as deep as your mattress + 4″/10cm
  • Elastic about 1/2″/1.2cm wide x the circumference of your mattress minus 20%
Making your own fitted sheets  thedreamstress.com

Version A Top Assembly:

You’ll be sewing the big top piece to the narrow side pieces, turning the corner at the short ends, to form the top and bottom of the fitted sheet.

Making your own fitted sheets  thedreamstress.com

Start by sewing a short end of one Piece B to the long side of Piece A. 1/2″/1.5cm* from the end of the short side of Piece B, sink your needle, and turn the corner of Piece B.

Making your own fitted sheets thedreamstress.com

Continue sewing the long edge of Piece B to the long edge of Piece A. 1/2″/1.5cm* before you reach the long end of Piece B, sink your needle, and turn the corner of Piece B so that you can sew down the second short end, forming two corners on either end of your sheet.

Making your own fitted sheets  thedreamstress.com

Repeat the same steps to join the second Piece B to the other long edge of Piece A, so you have your assembled sheet which fits neatly over the mattress.

Finish all your seams as desired.

Materials: Version B

This version is made with one moderately long length of fabric that covers the mattress top, two long narrow pieces that cover the sides of the mattress, and two short narrow pieces that cover the ends of the mattress

You’re going to need:

  • An old sheet/piece of an old sheet as long as the top of your mattress + 8″/20cm + 1″/3cm (for seam allowance) and as wide as your mattress + 1″/3cm (for seam allowance)
  • Scraps of old sheets/fabric enough to make 2 lengths as long as your mattress + 1″/3cm (for seam allowance) and as deep as your mattress + 4″/10cm
  • Scraps of old sheets/fabric enough to make 2 lengths as wide as your mattress + 1″/3cm (for seam allowance) and as deep as your mattress + 4″/10cm
  • Elastic about 1/2″/1.2cm wide x the circumference of your mattress minus 25%
Sheet Tutorial Version B thedreamstress.com

Version B Top Assembly:

Sew Pieces B to Piece A like so:

Sheet Tutorial Version B thedreamstress.com

Then assemble the rest of the sheet top exactly as with Version A.

Finish all the seams as desired.

Elastic:

Making your own fitted sheets  thedreamstress.com

I was super lucky to find an entire roll of suitable elastic at an op shop for only $5.

I don’t measure my elastic as I apply it to my sheet: simply stretch and sew. However, if you really want to measure. a 25% reduction in elastic compared to the circumference should be a good amount.

If you’re doing an exact measure, mark quarters & eights in your elastic, and quarters & eighths in your sheet circumference. Match the quarters and eights before you sew, and then stretch between them as you sew.

Making your own fitted sheets  thedreamstress.com

If you’re doing what I do, and stretch as you sew, just stretch a moderate amount as you sew around the sheet.

Match the elastic to the WRONG side of the sheet, sew it on, and then fold the elastic in toward the wrong side of the sheet, to cover the elastic and form a neat edge visible from the outside, and then sew again.

Making your own fitted sheets  thedreamstress.com

Ta da! You are done!

Making your own fitted sheets  thedreamstress.com

Hopefully I’ll get a few more years use out of these sheets. And then they can get used again, as toiles, and then cleaning clothes. Re-use, re-use, re-use!

May I sleep on them as peacefully as Felicity….

Felicity the sewing cat thedreamstress.com

*yep, I know they aren’t the same, but I did the imperial measures for this tutorial with a 1/2″ seam allowance, and the metric with 1.5cm.