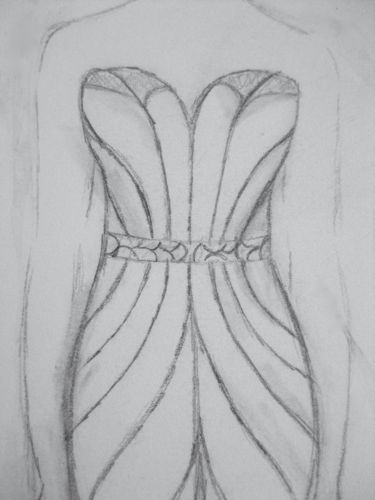
You will have noticed that Carolyn’s dress has lots and lots of curving lines, and consequently, will need lots and lots of pattern pieces.
This is how I drafted the bodice pattern:
Working on Isabelle, I used classic pinch draping (rather than my slightly unorthodox cut draping method) to fit a length of fabric to the bodice, and to get a rough idea of the lines needed.
All of those extra seams were a pain to drape, but they do give wonderful shaping over the bust and around the waist.
With the front half of the bodice draped, I cut away all the extra fabric, and suddenly you could really see the shape of the bodice emerge.
With the front done, I did a similar drape for the back, but neglected to photograph it.
For both front and back, I marked all of the seam lines with pencil, took the drape off Isabelle, and cut out all of the pattern pieces (being careful to number them and mark tops and bottoms, as there is so much potential for confusion with this garment!)
Using my cut out pieces as patterns, I marked, added seam allowance, and cut out another set of bodice pieces which I sewed together and laid out to check if the side seams matched (they didn’t), and if the lines flowed correctly:
I made some adjustments so that the side seams would meet properly, and so that the lines fanned out from the centre front evenly and beautifully.
Then I cut out the pattern pieces along the new lines I had marked, and made a whole new set of pattern pieces:
The triangular piece with its point chopped off is where the lacing will go up the centre back.
You can faintly see where I have labelled the pieces 1 through 7. The back pieces are labelled B1 through B5. 24 different bits of fabric in the bodice alone!
With all my pattern pieces as they should be (more or less), I cut out yet another set of toile fabric and sewed it up. My blue spotty fabric got a good workout with this dress!
Luckily, Carolyn is very close to me in size, so I was able to try it on myself for an initial fitting.
Ta da! It works (more or less). There was some funny bunchy-ness going on under the ribs that I had to fix, and the waistline needed proper marking, but basically the pattern was sound.
Now I could start on the skirt, and then I could cut out proper toile fabric and send it to Carolyn for its first real fitting.
I think I figured out that I actually cut out and made up (in some form or another) the entire bodice 9 times before the first actual, made for the bride, toile got sent to Carolyn!


It’s amazing. I’d beg you to make me one, too, but I’d rather beg you to teach me to drape like that… 🙂 Can’t wait to see how this comes out.
The patience of the woman!!!!
That’s really amazing! I wished I could drape as well, but I can only draw patterns by stupid rules, and the never fit ):
It’s just practice – plenty of my early ones didn’t work, so don’t loose hope! A good dressform does help.