
The Ngaio Blouse pattern comes with separate pattern pieces for Small (A-B), Medium (C-DD/E) & Large (F+) cup sizes. This means it works for people with high and full bust differences from 2″-4″.
If your high-full bust difference is more than 4″ (or you just find it a big snug across the bust), here’s how to do a Full Bust Adjustment (FBA) on the Ngaio Blouse.

First, because I’m a massive nerd, and love explaining why things need to happen, rather than just telling people they do, here’s all the why’s behind FBAs and the Ngaio blouse.
Why you might need an FBA
The way I have you calculate cup size in the Ngaio Blouse pattern is to measure the difference between your full bust measure, and your high bust measure:

The bigger the difference between your high bust and your full bust, the bigger your cup size.
It’s a simple but effective system, but does have some drawbacks, because it’s only two measurements.
I discuss this system, why it’s used, why it works, but why it is also an imperfect system in ‘The Ngaio Blouse: the difference in cup size, illustrated’.

You’ll probably want an FBA if you have more than a 4” difference between your high bust and full bust.
You may also want an FBA if you have less than a 4″ difference, but have a longer measure from your shoulder to underbust than the shoulder to underbust measure of Piece A of the pattern.
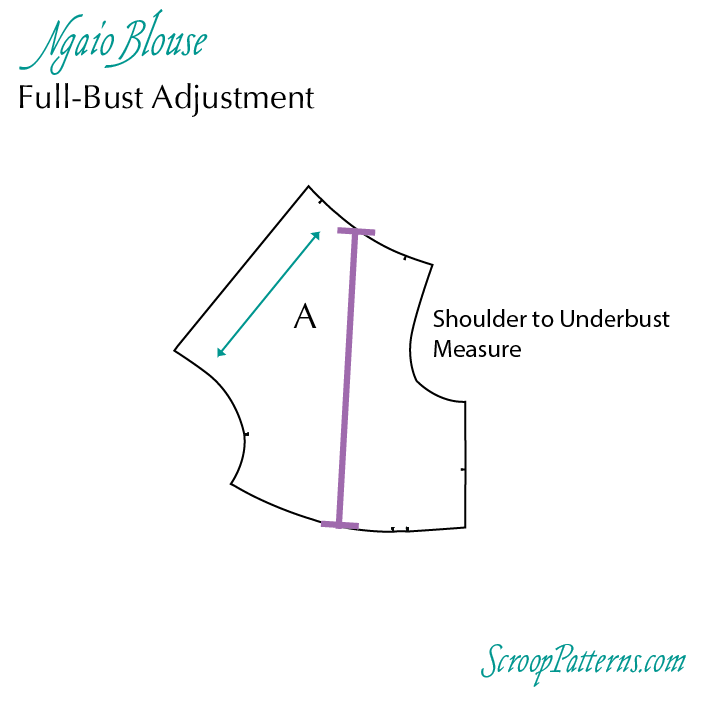
You might have a longer measure at this point due to bust shape, even if your high bust to full bust is less than 4”.
If your measure is longer than this measure, the pattern won’t sit under your bust: it will sit partway up your bust. If you don’t want that, you might want to do an FBA.
And finally, you just might want an FBA if the largest cup size of the Ngaio feels snug in the bust, even if you technically fit the measures: sometimes the combination of the way you are shaped means the measures say one thing, but the way a garment fits and feels says another.
Understanding Fullness: How an FBA Works
In patterns darts, or dart equivalent gathers and seamlines, are used to take a garment at the narrow parts of a body, and let it out over the wide parts of a body. The bigger the angle of the dart opening (or the more little darts you have that add up to one big dart angle), the bigger the bulge (yep, that’s really the term they use in pattern manipulation!) the pattern can accomodate.
A standard FBA turns a small dart into a large one, to accomodate a bigger bust bulge.
But what if there’s no dart? Then you have to figure out where the dart would have been: where the taking in and releasing of fullness is coming from.
In the Ngaio Blouse the fullness comes from two places: the centre front gathers, and the curved underbust seam.
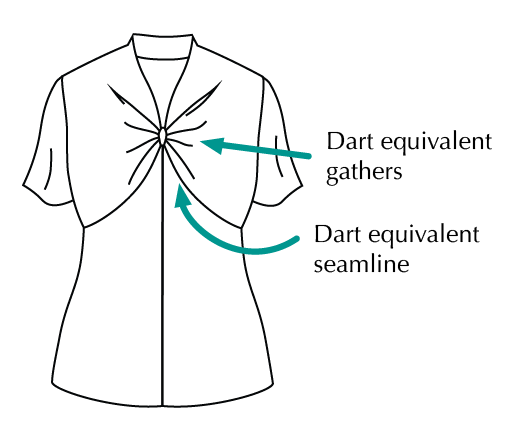
Most of the fullness comes from the gathers. Gathers are really just invisible darts: the negative space of the dart turned into gathering. More gathers at the neck = more fabric releasing to accomodate a fuller bust.
However, there’s only so much gathering you can squish into that point before it gets bulky, so if you want to do a large FBA on the Ngaio Blouse, you also have to start adjusting the curved underbust seam.
So, let’s do it!
How to do an FBA on the Ngaio Blouse
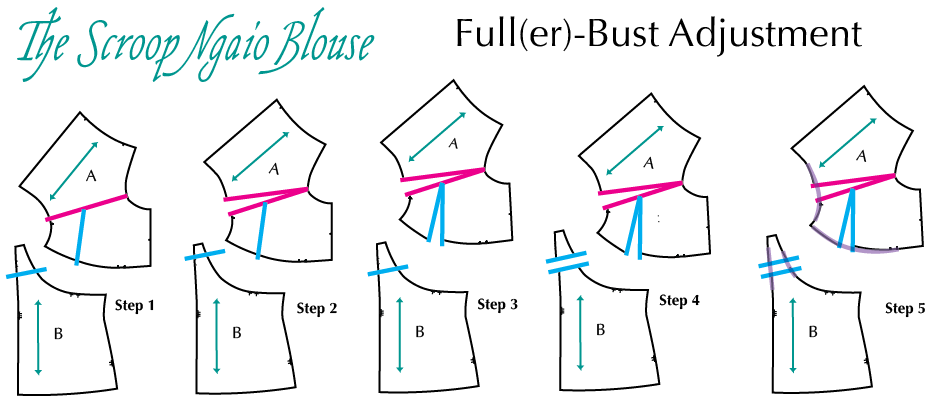
For the FBA on the Ngaio blouse we’re going to be working with two pattern pieces: A & B. I recommend working with the Large bust piece, but any of the sizes will do: you’ll just end up with different numbers when you do the math in Step 2.
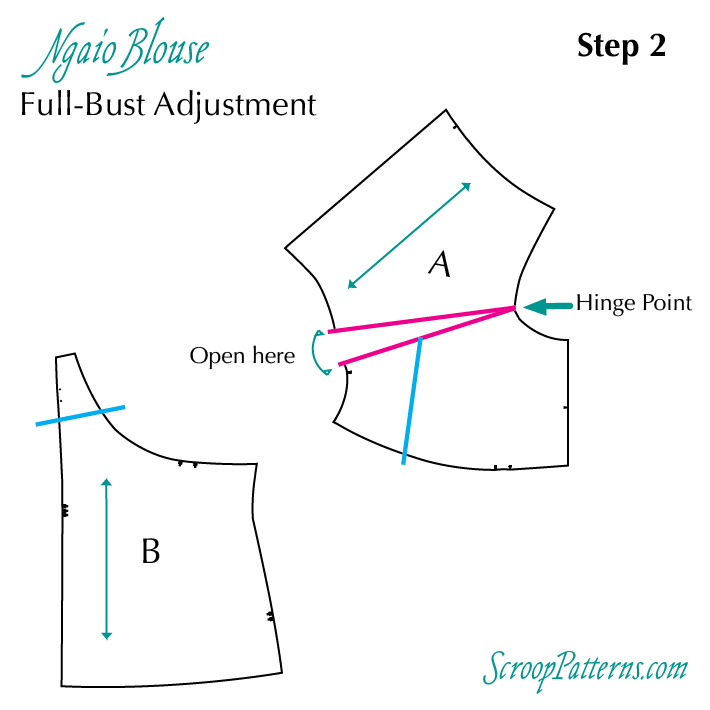
Step 1:
Mark two lines on A and one on B.
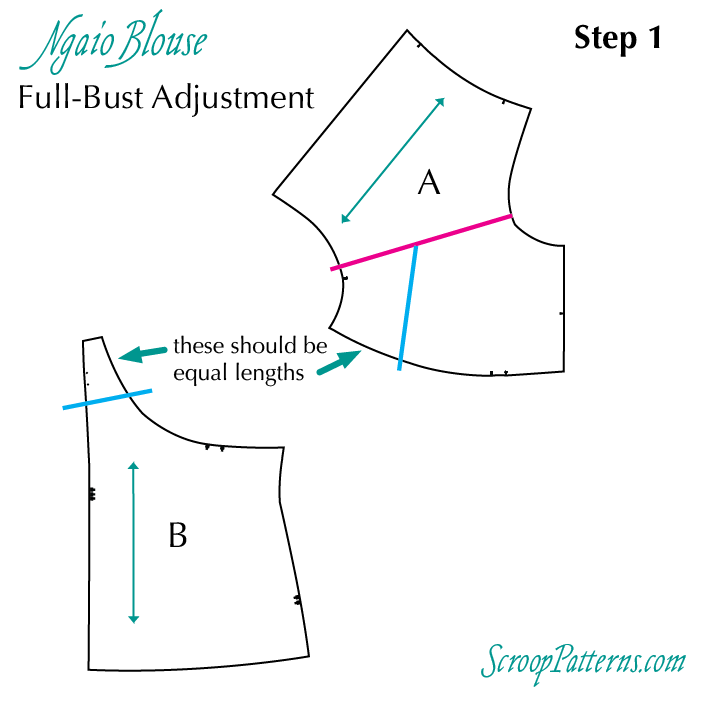
A.1 (in pink) should go from 1/3 of the way up the center front curve of A, to 1/3 of the way up the armhole. This line will be adding to the gathers.
A.2 (in blue) should go from 1/3-1/2 way along A.1, down to 1/4 to 1/3 along the bottom curved edge. Both points should be closer to the centre front than to the side seam.
B (in blue) should go across the top of the point of B, an equal length from the top of the point as A.2 is from the center front.
The blue lines will be adding to the underbust curve, and giving you more shoulder to bust length in the pattern, as well as more space around the width of the bust.
Exciting mathematical interlude
Maths.
Sorry, there’s no getting away from it in patternmaking and pattern adjusting: you’re going to have to do maths in order to figure out how much you’ll need to adjust the pattern pieces.
I’m doing all these maths in imperial, because inches divide into quarters, which can be helpful in patternmaking. You can do it in metric too.
Measure your high bust and full bust. Example: HB = 40” FB = 46”
Subtract your high bust from your full bust. 46” – 40” = 6”
Now subtract 4″ (if using the Large A) or 3” (if using the Medium A) or 2” (if using the Small A) from this number. I’m using Large A, so 6” – 4” = 2”
The number you are left with is the amount you need to add to the pattern to accomodate your bust. In this case: just 2”
Divide this # by 2 (because we’re working with 1/2 the pattern – so we only need 1/2 a measure). 2 divided by 2 = 1
Now divide this number by 2 again (for the two places we’ll be adjusting) 1 divided by 2 = .5 / 1/2”
This number is your Final (or fabulous, that works too) Adjustment Number (FAN), and it’s what you’ll be adding to the pattern at every place you adjust it.
Step 2
Got your final number? Hurrah!
Slash your pattern open along the pink line, just to, but not through, the armhole line.
Using your tiny paper hinge, open the pattern the up the FAN measure.
Tape another piece of paper under the opening, to hold it in place while you keep making more adjustments.
Step 3
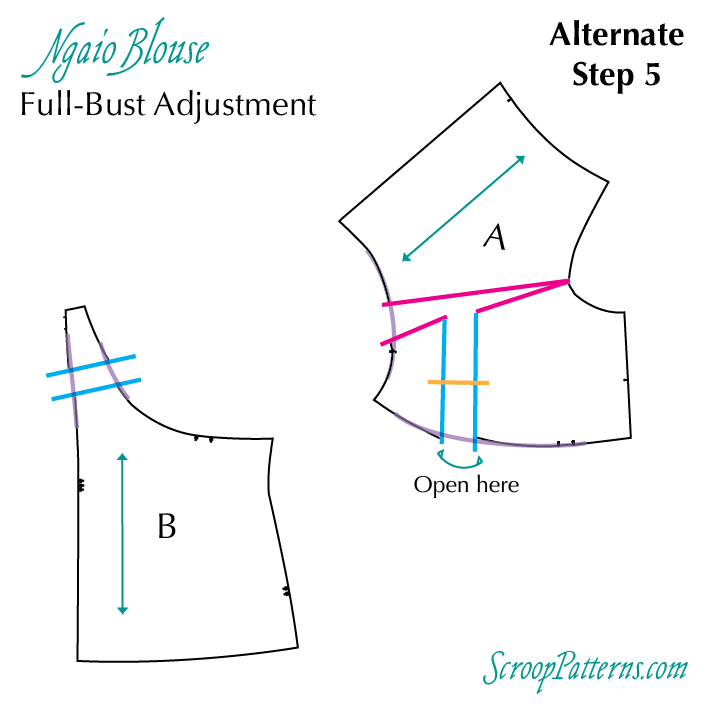
There’s two options for Step 3, based on the shape of your bust, and what you want to achieve.
If your FAN was quite small (under 1/2″) you probably want to slash and spread your A.2 line like so, with the opening matching your FAN measure:
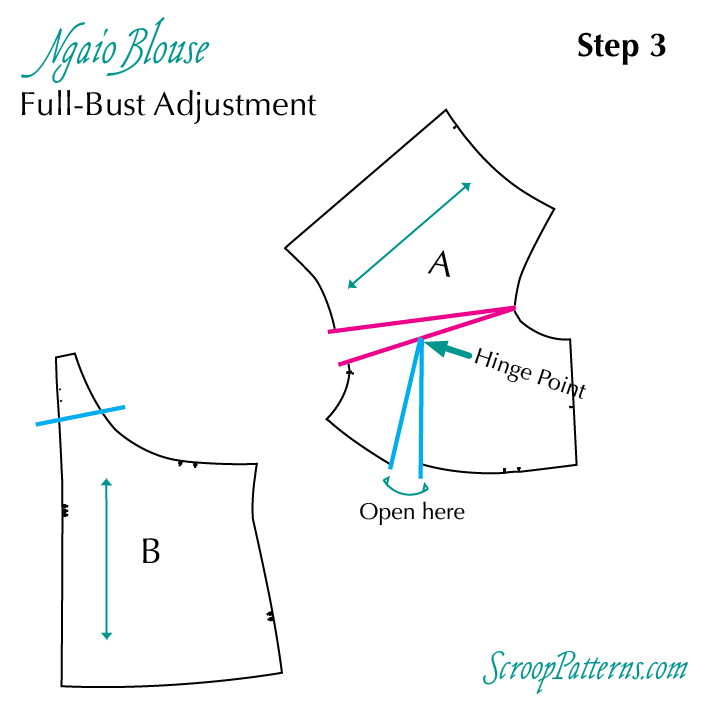
If your FAN is 1/2″ or over, you probably want to open your A.2. line up like so, with equal amounts opened at top and bottom:
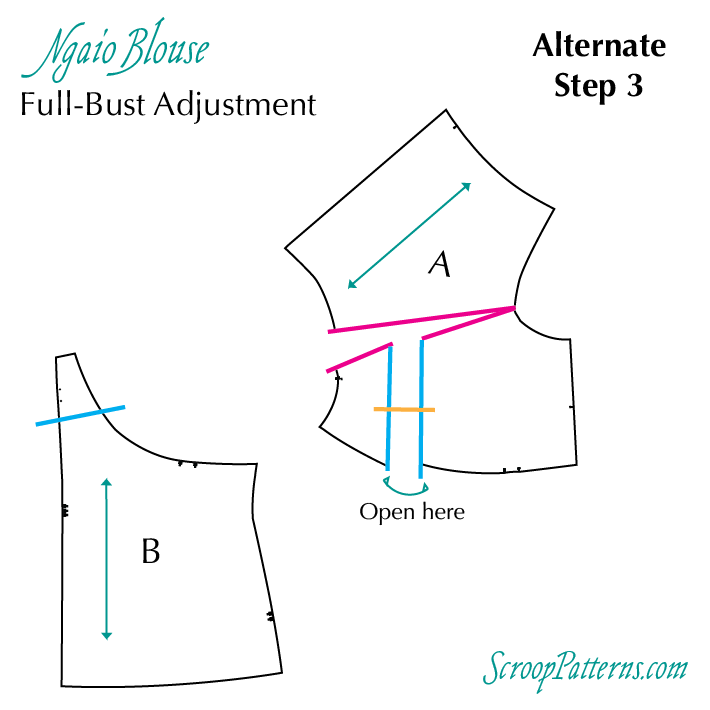
TIP: draw a line perpendicular to A.2 (shown in orange) before you slash it open, to ensure that you keep the opening equal and balanced as you open it.
Unsure about which to do in Step 3? Something halfway between the two (partly open at the top) also works. I show this in Step 4.
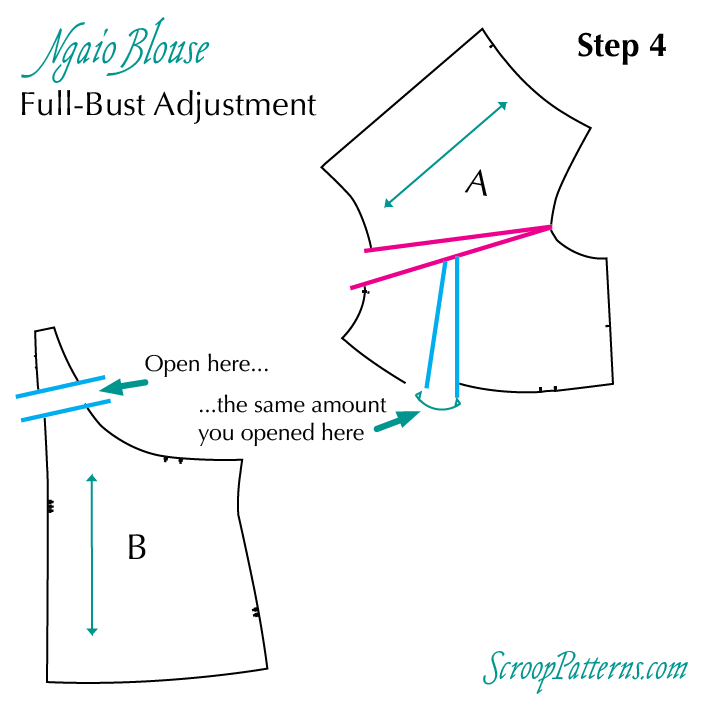
Step 4
Now we’re moving on to Piece B. Slash and spread the blue line on Piece B the same amount you opened the bottom of the blue line on Piece A (aka, your FAN).
Step 5
Almost there!
Tape paper behind all your gaps to keep them tidy and stabilised, and then use a french curve to re-draw all your lines.
If in doubt about where to re-draw the curves, try to add to the pattern pieces, rather than taking away.
Here’s what they look like with a closed-at-the-tip A.2:
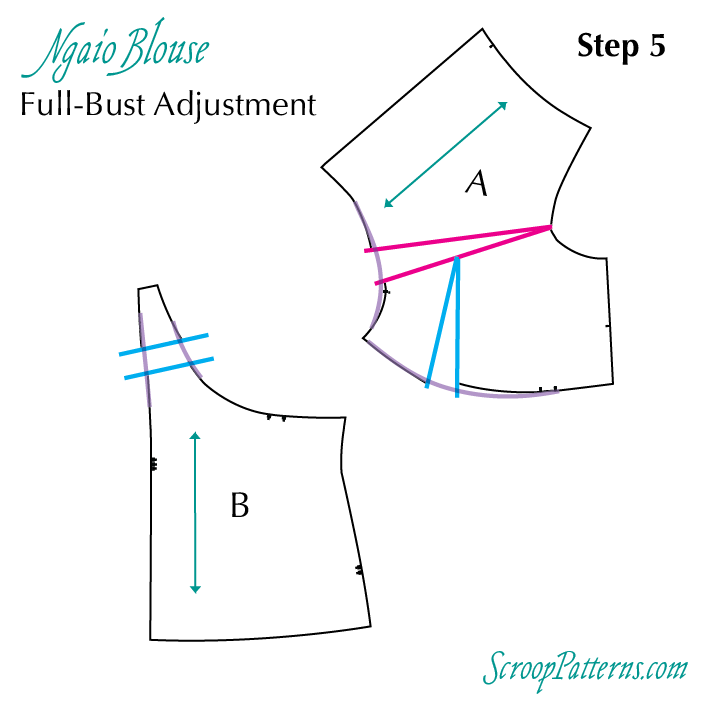
And a parallel-opened A.2:
The End! (or, the beginning?)
And that’s how to do an FBA on the Ngaio Blouse!
Here’s the big thing though: bodies are amazing and unique, and not at all one-size-fits-all. This tutorial is a tool that you can customise to make it perfect for you (just like everything in sewing!). So if you really get into making Ngaio blouses, and using this tutorial, I’d recommend playing with it. Try opening the pink line more than the blue, or vice versa.
Happy sewing!

Everything about this post is neat. I love how you work to make all bodies feel beautiful. I love the engineering. I love the positive and accessible tone. I love the customization. Neat, neat neat stuff.
I really, really, really appreciate your explanation of why the FBA calculation method is imperfect. Despite having a 3″ difference I’ve found out I need at least 1/2″ more of an FBA. I had a feeling the usual FBA recommendation needed to come with a caveat, but I had never seen one. This blog post and the second one linked have just confirmed a few thoughts I’ve had about bust fitting and given me some new ways to move forward with fitting my bust. Thank you!
You’re most welcome! Yeah, bodies are amazing and come in an infinite variety of shapes and arrangements – two measures is never going to be a failsafe system for getting a good fit – especially not for something as complicated as the bust-shoulder-arm-upper-and-middle-back-and-front fit!
Fantastic! I adore this blouse, but I’ve shied away from making it because I am full busted AND long in the torso – from shoulder-to-bust and also from bust-to-waist – so The Ladies need the bust apex and dart adjusted, but I couldn’t figure out how to make that happen on the Ngaio blouse.
Problem solved! Thank you! #ThisPatternWillBeMine
Yay! Glad to hear this helped! â¤ï¸