All posts filed under: Tutorial

Ngaio Blouse FBA Scroop Patterns

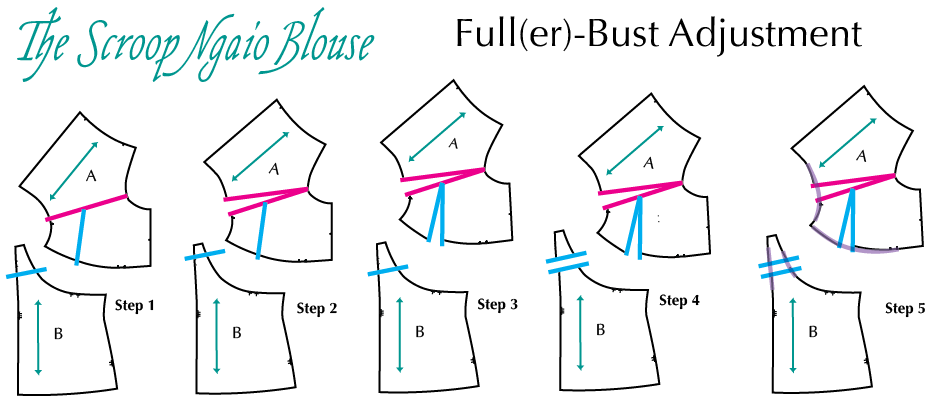
Doing a Full Bust Adjustment (FBA) on the Ngaio Blouse

The Ngaio Blouse pattern comes with separate pattern pieces for Small (A-B), Medium (C-DD/E) & Large (F+) cup sizes.  This means it works for people with high and full bust differences from 2″-4″. If your high-full bust difference is more than 4″ (or you just find it a big snug across the bust), here’s how to do a Full Bust Adjustment (FBA) on the Ngaio Blouse. First, because I’m a massive nerd, and love explaining why things need to happen, rather than just telling people they do, here’s all the why’s behind FBAs and the Ngaio blouse. Why you might need an FBA The way I have you calculate cup size in the Ngaio Blouse pattern is to measure the difference between your full bust measure, and your high bust measure: The bigger the difference between your high bust and your full bust, the bigger your cup size. It’s a simple but effective system, but does have some drawbacks, because it’s only two measurements. I discuss this system, why it’s used, why it works, but …

The Otari Hoodie Sew Along Part 7, Bands, thedreamstress.com

The Otari Hoodie Sew-Along #7: Hem & Sleeve Bands

We’re more than halfway along in the Otari Hoodie Sew-Along!  Today’s post covers adding the hem and sleeve bands, and then it’s on to zips. Buy the Otari Hoodie Pattern Here In the previous Otari Hoodie Sew Along posts I covered: #1 Choosing fabric #2 Pattern alterations to get the perfect fit, & cutting out #3 Sewing Preparation: interfacing & choosing stitches   #4  View A Pockets #5 View B Pockets — including a hack to add binding to them #6 Sleeves & Side Seams   For this part of the Sew Along I’m going to be using images taken when making the original sample Otari Hoodies for the pattern launch. The numbering of the instructions in this post corresponds to the numbering of the pattern’s  instructions. The Hem Band 15. Fold your hem band wrong sides together, lengthwise, so it forms a long narrow band, and press. 16. Right sides together, matching notches and front edges, pin/clip and sew your hem band to the bottom edge of the hoodie. Tip>>> You’ll need to stretch …

The Otari Hoodie Sew-Along #6: Sleeves & Body

The Otari Hoodie Sew-Along continues.  Today’s post is the fun part, where you sew the sleeves to the body, and it starts to look like an actually garment! If you want to join in you’re not to late to catch up with the Sew-Along Buy the Otari Hoodie Pattern Here In the previous Otari Hoodie Sew Along posts I covered: #1 Choosing fabric #2 Pattern alterations to get the perfect fit, & cutting out #3 Sewing Preparation: interfacing & choosing stitches   #4  View A Pockets #5 View B Pockets – including a hack to add binding to them Sleeves: For this part of the Sew Along I’m going to be using images taken when making the original sample Otari Hoodies for the pattern launch. The numbering of the instructions in this post corresponds to the numbering of the pattern’s  instructions. 12.  Right sides together, sew Front A to Back B at shoulders.  As with many of the steps in the Otari Hoodie, you can use an overlocker (like I am), or a sewing machine …