This week’s Rate the Dress goes from bold, bright stripes, to soft, subtle stripes.
Last Week: a early-mid teens dress in bold stripes and bold cut
Last week’s rate the dress wasn’t very popular with some of you. Whether it was the fabrics, the cut, or the fichu-effect lace, almost everyone found something to criticise. Except for Sarah, holding the flag for a perfect 10!
Many of you also criticised the presentation, which isn’t one of the things that we take into account with Rate the Dress. Not every garment is robust enough to be steamed and pressed for presentation, and even when a garment is, a museum can’t always afford the time, money, and expert hours it takes to steam a garment, pad a mannequin, and create proper supports. If museums only shared photos of garments they had the resources to perfectly present, we’d have far fewer garments to admire and research.
The Total: 5.5 out of 10
So extremely high fashion 1913-1914ish was not your thing!
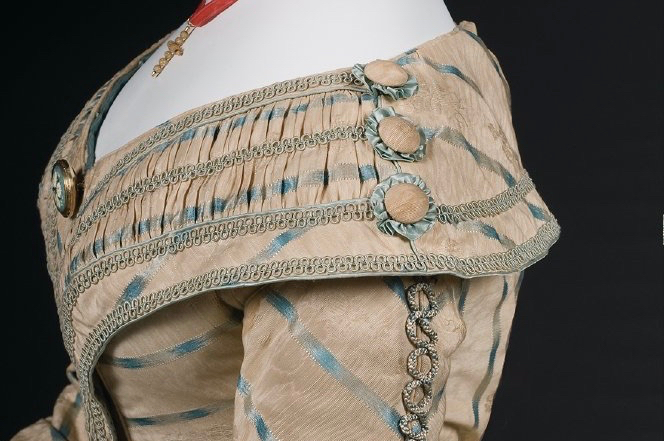
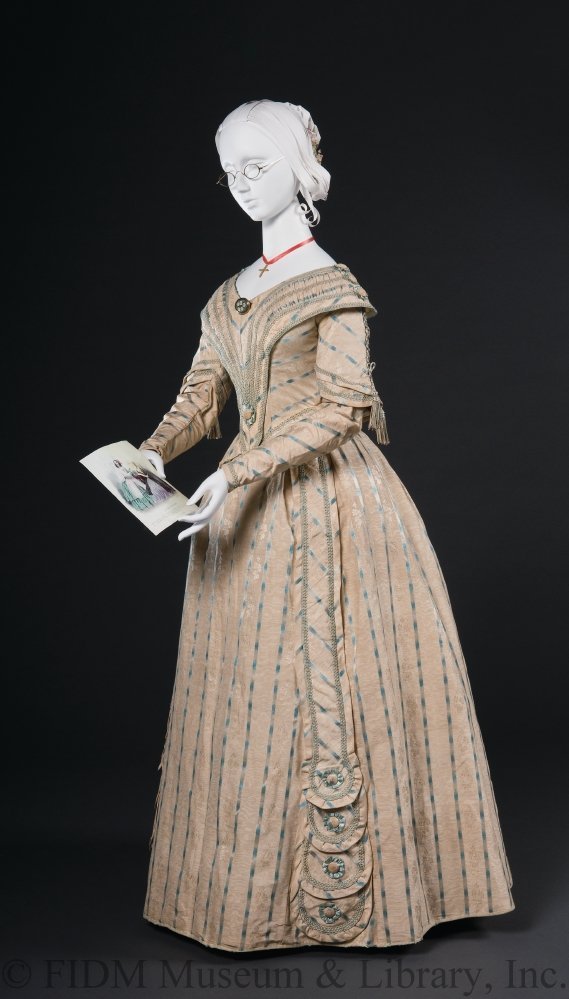
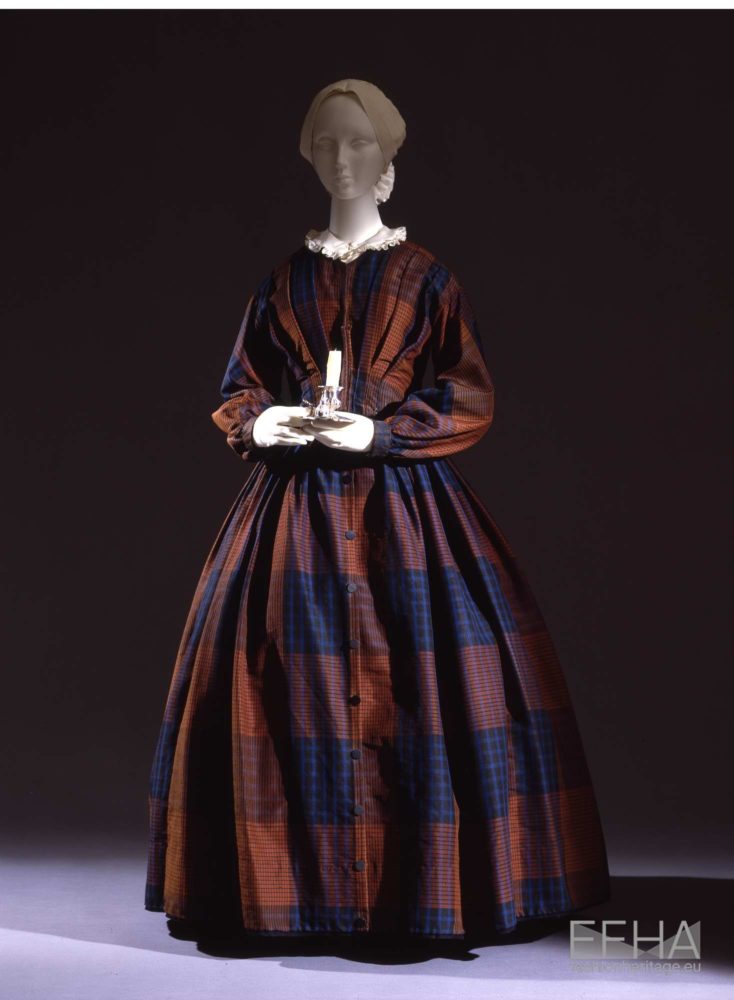
This week: an early 1840s dress with blue stripes
One of my current costuming obsessions is late 1830s/early 1840s dresses with asymmetrical skirt trim. In searching for examples of this very specific style, I came across this dress.
It is not an example of the type: you can just, just see the edges of the matching stripe and circular rosettes decorating the other side around the far curve of the skirt.
Although it’s not the kind of dress I was looking for, it’s a fascinating dress in its own right, and the closer you look at it, the more interesting it is.
The ground fabric is actually moire, with tiny damask flowers. The blue stripes are satin, but with an additional tromp l’oeil trick that pumps up the sheen factor: the are woven from warp dyed threads that slide from pale blue to bright blue, creating the illusion of areas of high shine.
What do you think of this dress which gets more detailed the closer you get to it?
Rate the Dress on a Scale of 1 to 10
A reminder about rating — feel free to be critical if you don’t like a thing, but make sure that your comments aren’t actually insulting to those who do like a garment. Phrase criticism as your opinion, rather than a flat fact. Our different tastes are what make Rate the Dress so interesting. It’s no fun when a comment implies that anyone who doesn’t agree with it, or who would wear a garment, is totally lacking in taste.
(as usual, nothing more complicated than a .5. I also hugely appreciate it if you only do one rating, and set it on a line at the very end of your comment.
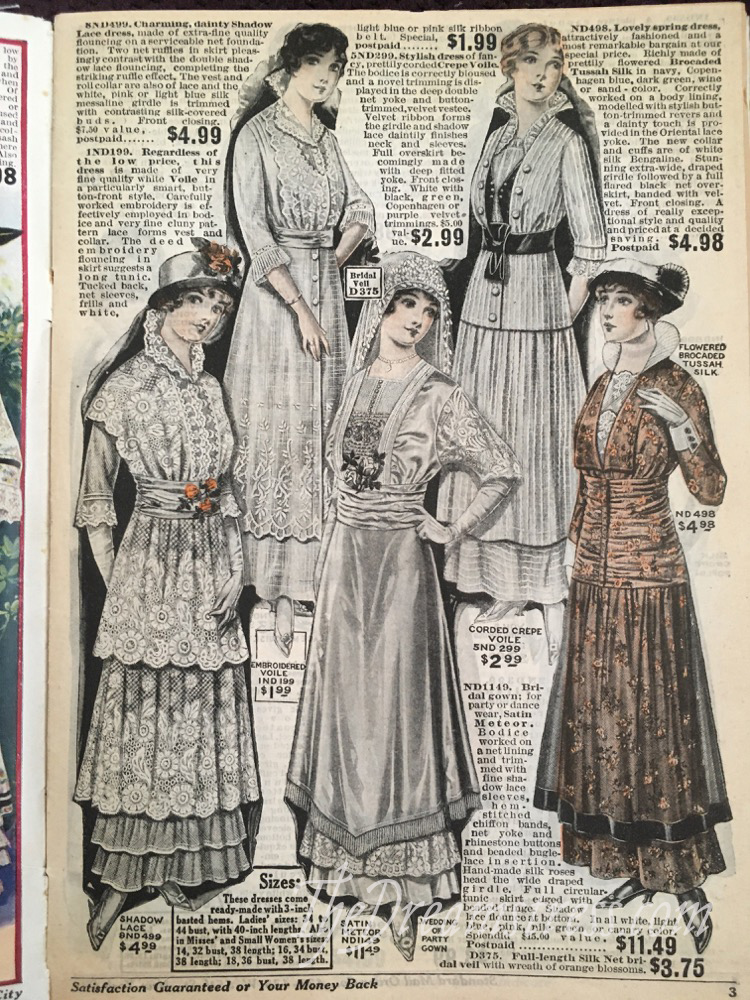
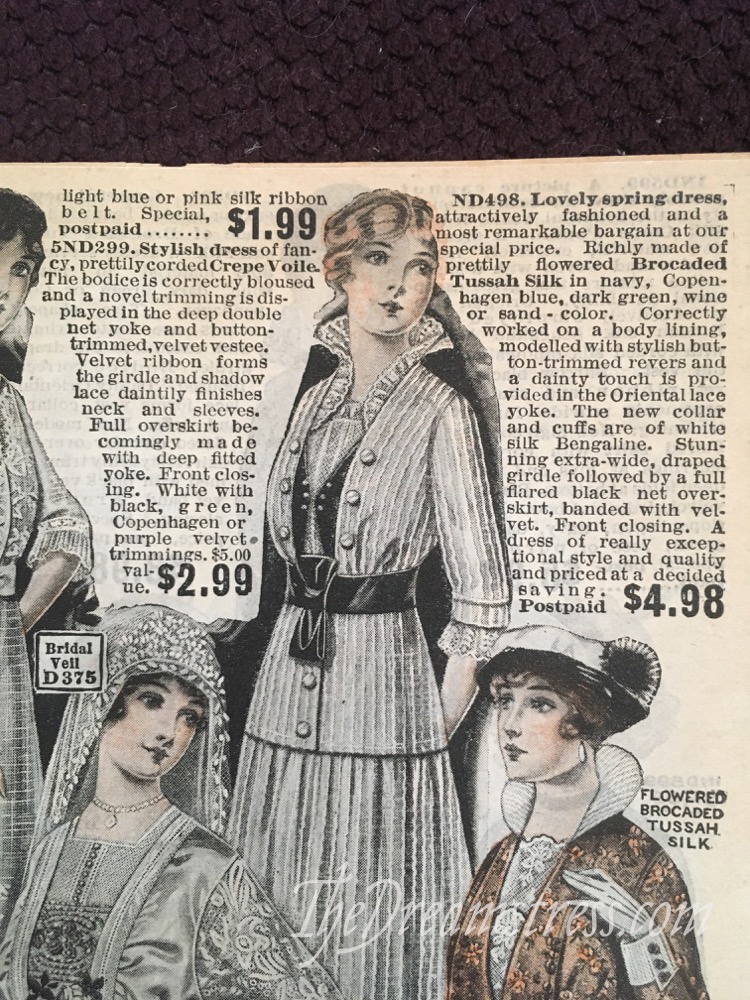
This post didn’t start out as a terminology post! I was going to show you more images from my Spring 1915 Standard Mail order catalogue – and thought I would do some terminology explorations along with it.
I started writing about the dresses and the terms mentioned, and the post got longer, and longer, and longer… So I’ve cut it apart, and will just focus on one term: tussah silk. It’s featured in my least favourite dress on the page: the brown floral number with the ruched midriff.
Tussah silk comes from a variety of silkworms that eat oak leaves, and other leaves high in tannin, rather than mulberry leaves. The tannin in the leaves gives tussah silk its characteristic pale gold colour. The filaments of tussah silk are much thicker and stronger than standard silk, and are oval instead of round. Because the initial threads aren’t as fine, tussah silk cloth has a coarser hand than regular silk, and often has a slightly slub-y effect.
Tussah silkworms are significantly hardier than their delicate mulberry-fed cousins, and can survive much more easily in the wild. Due to the rougher texture of the silk, and the few wild populations of tussah silkworms that are harvested for silk, tussah silk is sometimes called ‘wild silk’, although the vast majority of it comes from farmed silkworms.
In 19th century fashion writing tussah often refers to the specific type of silk, and tussore to the slubbed look of the weave most associated with it: so tussah could be woven not in tussore style, or in tussore style.
To make this even more confusing, tussah silk fabric was sometimes called tussore linen, particularly in the 1870s, because its subtler sheen and slightly rough finish meant it was considered more suitable for the type of informal summer clothes that linen was made out of than the more formal styles of silk. Very annoyingly as a researcher, a rough calico was also sometimes called tussore cloth, as was a linen-cotton blend, and maybe hemp or piña cloth (the references to Indian pine are quite confusing), and linen in the specific golden shade characteristic of tussore silk. Today slubbed linen is also called tussore linen, and while some references are clearly one are the other (this one’s obviously silk, and I’m pretty sure this one’s linen, but maybe not?), many are not, and its impossible to tell if the fabric in question was a linen or a silk.
In the 1860s and 70s tussah was considered a luxury fibre, and was clearly singled out from standard silk. However, it was also an informal fibre: used for summer day wear, and accessories like parasols, and never for evening or formal wear.
After its initial novelty popularity wore off, the use of tussah was confined almost exclusively to sportwear.
This tennis dress is an excellent example of the use of tussah silk for sportswear. Elegant, casual, and supremely expensive, this outfit is the modern equivalent of designer yoga gear: it says without words that you can spend money on clothes to sweat in.
Even when it was out of fashion elsewhere, tussah silk was widely used by the Arts & Crafts movement, the aesthetic dress movement and design houses like Liberty of London.
This dress by Raymond Duncan (brother of Isadora), is a later example of the link between alternative dress movements and tussah silk. It uses the natural golden colour,and slight slubs of tussah silk, to enhance the antique and bohemian aesthetic of his design. Duncan was an almost fanatical proponent of a return to Grecian styles. He believed they were healthier and more attractive than the fashions of the time.
Having been relegated to very informal clothing & fringe fashion for a couple of decades, tussah returned to popularity at the end of the 19th century, as in this fashion article where the author gushes over the shades of tan it comes in, the delicate brocading (like the dress I dislike so much!), and its rescue from ‘homespun’! Another fashion writer compares it to pongee, and gives advice on how to trim it.
Although fashionable again, tussah silk was still primarily used as a linen alternative in the Edwardian era, as in this elegant dust coat.
By the mid-teens, the era of my magazine, tussah silk had by and large lost its outsider status, and was being used for a wider range of garments, though still exclusively for daywear. Thanks to the influence of Poiret, the Ballet Russes etc, anything exotic was in.
Tussah continued to be a popular fabric into the 1920s. It fit in with the fashion for rough and textured fabrics, like roshanara. It had also lost its high price tag: tussah silk appears as a lining in a number of 20s garments that I’ve seen in museum collections, suggesting it was an affordable silk.
Tussah silk should not be confused with silk noil (the rough silk made from the short bits of leftover silk fibres) (looks pointedly at Understanding Textiles on this point), or raw silk (silk with the gum left on).
Some tussah silk is “ethical silk” “non-violent silk” or “Ahimsa silk“, in that the silkworms are not killed to create the silk, but that’s not traditionally part of the tussah silk process, and unless labelled as such tussah silk is unlikely to be “non-violent”.
Very annoyingly, I carefully packed the three pieces of tussah silk I own away at the bottom of a trunk in vacuum sealed bags just today! The next time I have cause to get in the bags I’ll photograph them for this post.
Sources:
Basu, Trailokya Nath. Tant-o-rang: A Book of Textile Technology. 1964
Cant, Jennifer and Fritz, Anne. Consumer Textiles. Melbourne: Oxford University Press. 1988.
Collier, Billie J. and Tortora, Phyllis G.. Understanding Textiles. 6th ed. Sydney: Prentice Hall. 2001.
O’Hara, Georgina, The Encyclopedia of Fashion: From 1840 to the 1980s. London: Thames and Hudson Ltd. 1986
Phipps, Elena. Looking at Textiles: a Guide to Technical Terms. Los Angeles: Getty Museum. 2011
Pickens, Mary Brooks, A Dictionary of Costume and Fashion: Historical and Modern. Mineola New York: Dover Publications. 1985 (originally published as The Fashion Dictionary. New York: Funk & Wagnalls. 1957)
If there was a complaint about last week’s Rate the Dress, it was that it was prim, buttoned up, and while extremely fashionable, also extremely safe. This week I’ve picked a dress that is also extremely fashionable, but definitely a bit wacky. What will you make of it?
Last Week: a ca. 1880 wedding dress
It’s always interesting to do wedding dresses as Rate the Dress options. Do you rate them as a fashionable dress of that era, or as a wedding dress. Should a wedding dress be an excuse for extravagance and ridiculousness, or be conventional, safe and modest in its outlook towards fashion? How the ratings on last week’s dress fell depended partly on how you felt on that front – and then on whether you liked the disparate elements of that dress.
The Total: 7.8 out of 10
Not really the score a bride would hope for!
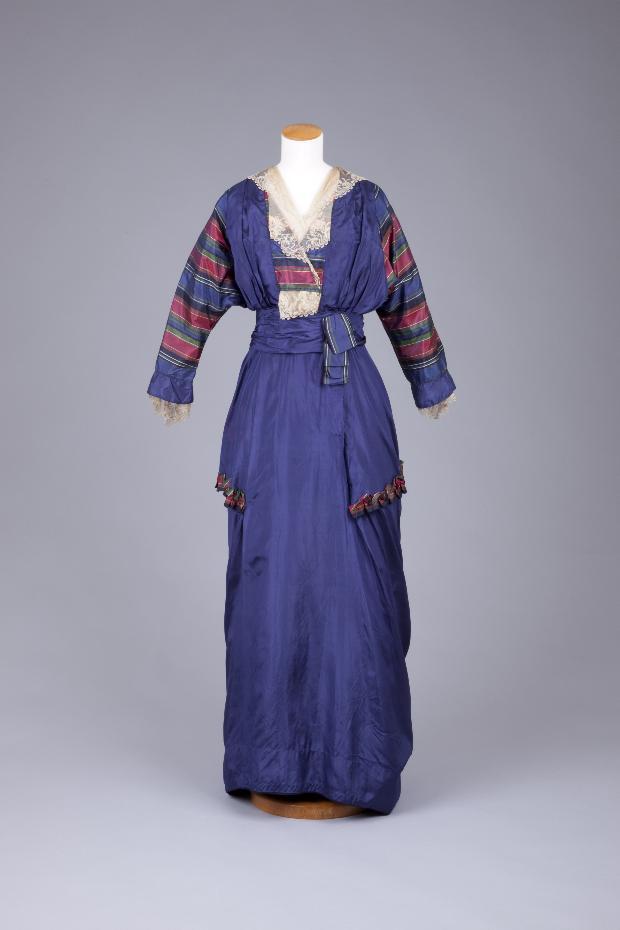
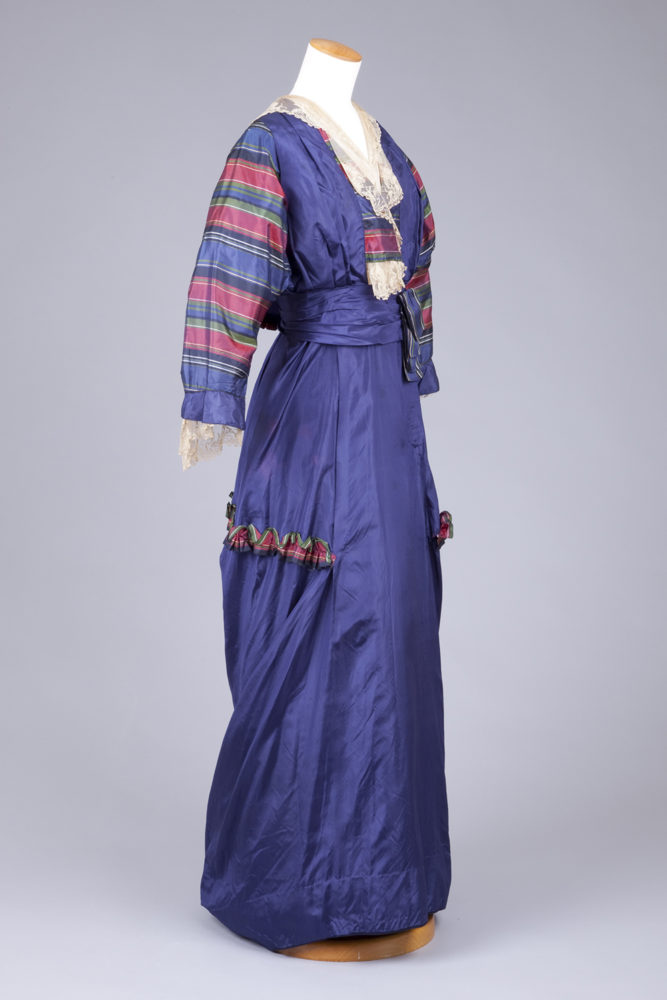
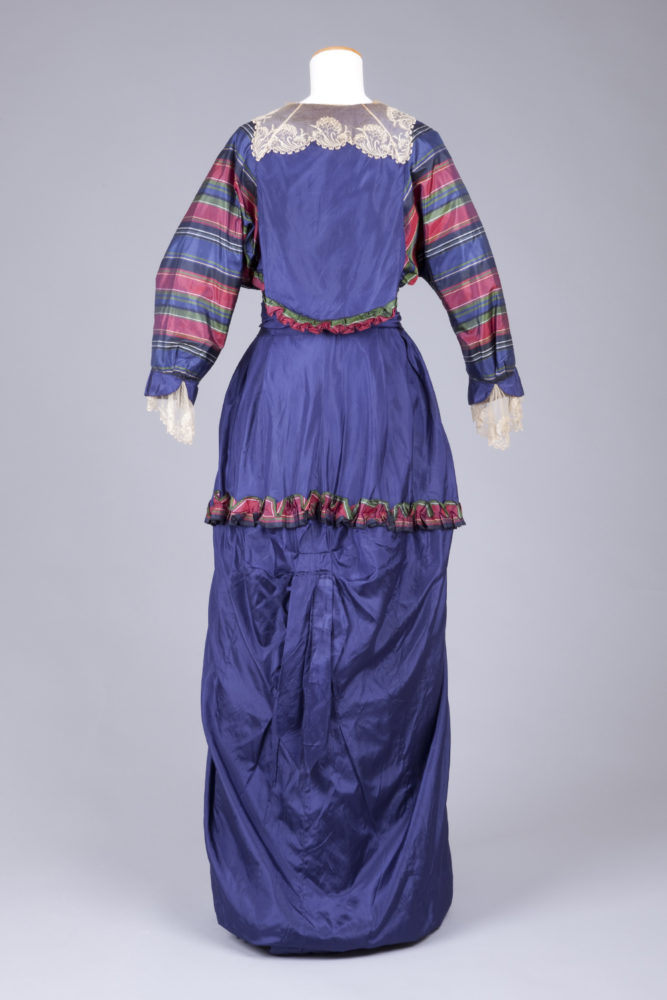
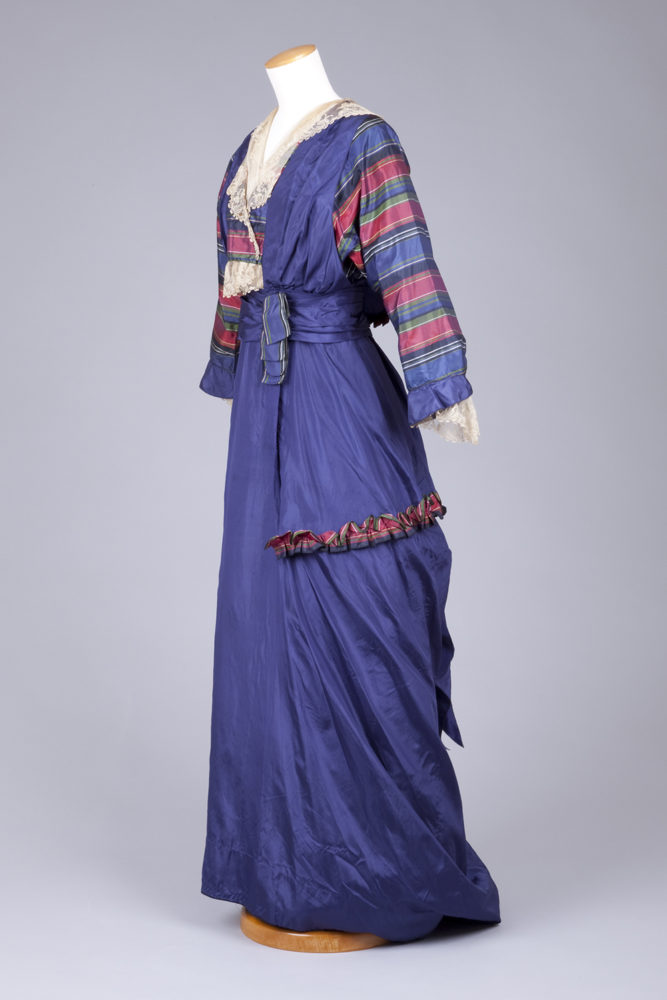
This week: a early-mid teens dress in bold stripes and bold cut
The Goldstein Museum of Design dates this dress to 1915-18, but I think it’s a bit earlier. Stylistically it’s absolutely typical of 1913-14.
The slim skirt is a classic feature of the early teens, and disappears almost overnight at the end of 1914, when the start of WWI made shorter, fuller, easier to walk in skirts more practical. Although the skirt slims down again after 1917, it never returned to the pre-war length.
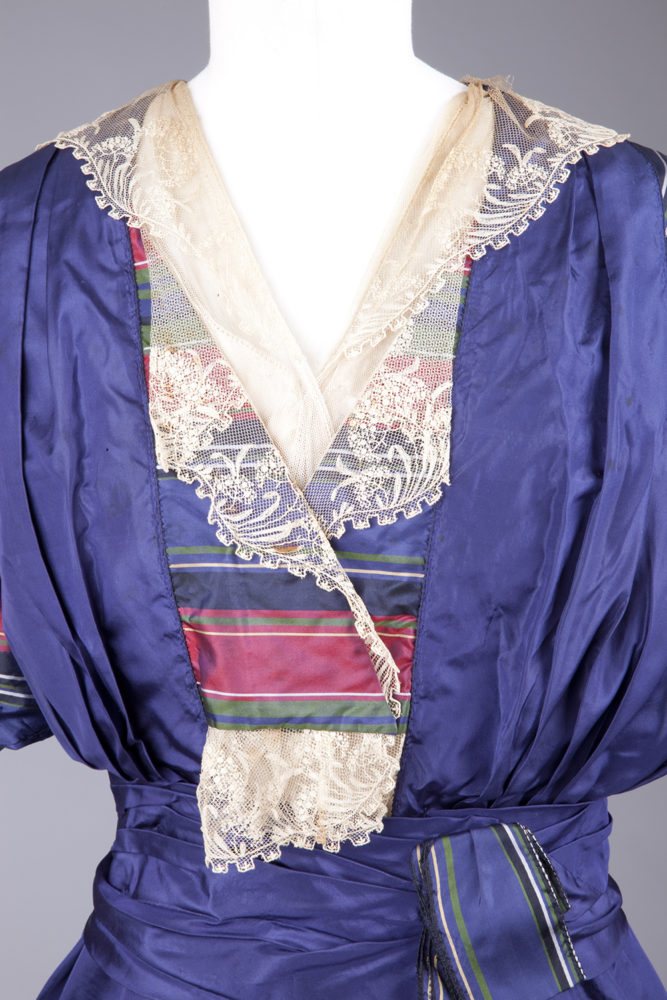
The deep sleeves, with armscyes that go all the way down to the waist, were also extremely fashionable in 1913-14, although you see similar examples as late as 1917. The designer of this dress certainly wanted to ensure that you noticed the sleeves, making them in boldly striped silk which is perfectly coordinated with the main blue of the dress.
Dress, 1915-18 (more likely 1913-14), silk taffeta, Goldstein Museum of Design, CX-00219
The same silk was used to form the faux tunic, and a quirky little ruffle on the back of the bodice. The bold hues are also a classic feature of the pre-WWI years. While the early Edwardian era revelled in half-tones and pastels, designers like Poiret, and influential touring companies like the Ballet Russes, made bright colours and clashing hues fashionable.
Despite the strong colours, the dress isn’t without some classic Edwardian softness. A collar of delicate lace of embroidered tulle with crenelated edgings fills the V-neck (open necks – a daring new innovation in daywear!) and plays peek-a-boo with the striped frontspiece in touch that is both evocative of 18th c fichu, and wittily modern.
What do you think? Wacky? Wonderful? Weird?
Rate the Dress on a Scale of 1 to 10
A reminder about rating — feel free to be critical if you don’t like a thing, but make sure that your comments aren’t actually insulting to those who do like a garment. Phrase criticism as your opinion, rather than a flat fact. Our different tastes are what make Rate the Dress so interesting. It’s no fun when a comment implies that anyone who doesn’t agree with it, or who would wear a garment, is totally lacking in taste.
(as usual, nothing more complicated than a .5. I also hugely appreciate it if you only do one rating, and set it on a line at the very end of your comment