Latest Posts

Dress, French, Silk, 1845-1848, Galleria del Costume di Palazzo Pitti via Europeana.eu

Rate the Dress: 1840s stripes in shades of gold

It’s the weekly interruption of the Otari Hoodie Sew Along for Rate the Dress.  For this week’s frock I’ve picked something in colours that are diametrically opposite to all the teals and blues I’m working on with my Hoodies: an 1840s day dress in warm ochre gold and plum purple satin.

Last week: an early 1910s day dress in grape purple with vermillion  

Nobody likes butt bows.  And, as it turns out, just-below-the-front-knee bows really aren’t that much more popular.  Nor are weird flaps in the back of the dress that look like it didn’t get fastened properly.  But deep grape purple satin (this was at least the 4th RTD we’ve had in very similar fabrics), and 1910s, are almost always winners on Rate the Dress, and even with some discordant elements this was bound to be reasonably popular.

The Total: 8.4 out of 10

Welp, better than the butt-heart wreath and fringe of the week before!

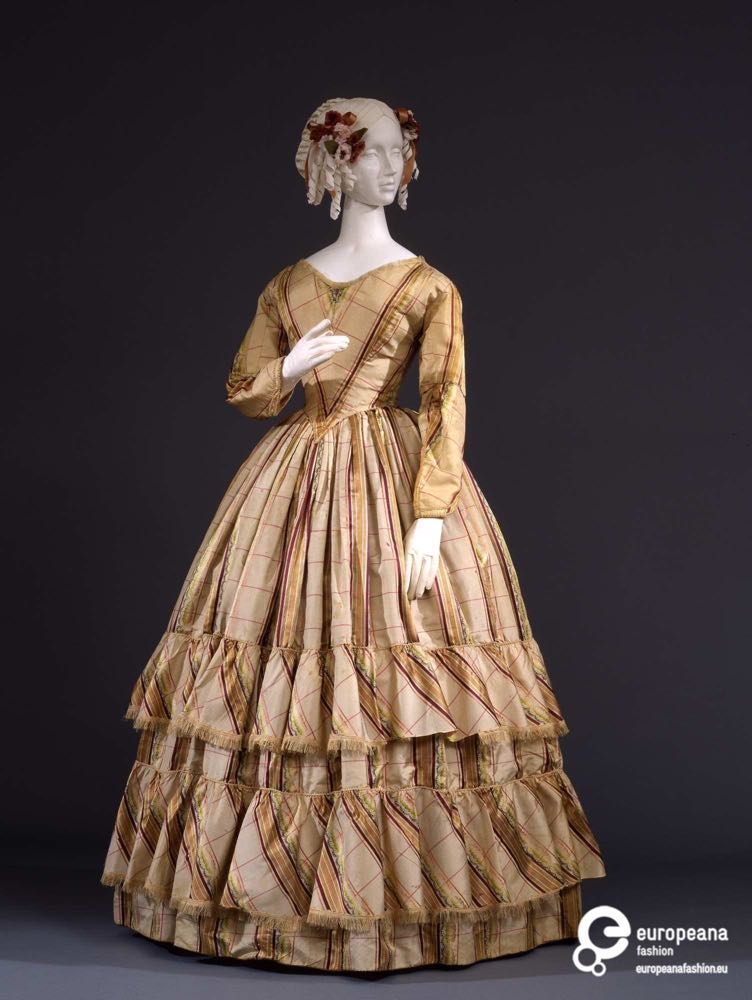
This week: an 1840s day dress in gold stripes

Like the 1910s ‘Ring o Roses’ dress from two weeks ago, this 1840s frock features a palette of warm gold, with touches of green and pink,  and a deep purple borrowed from last week’s dress.

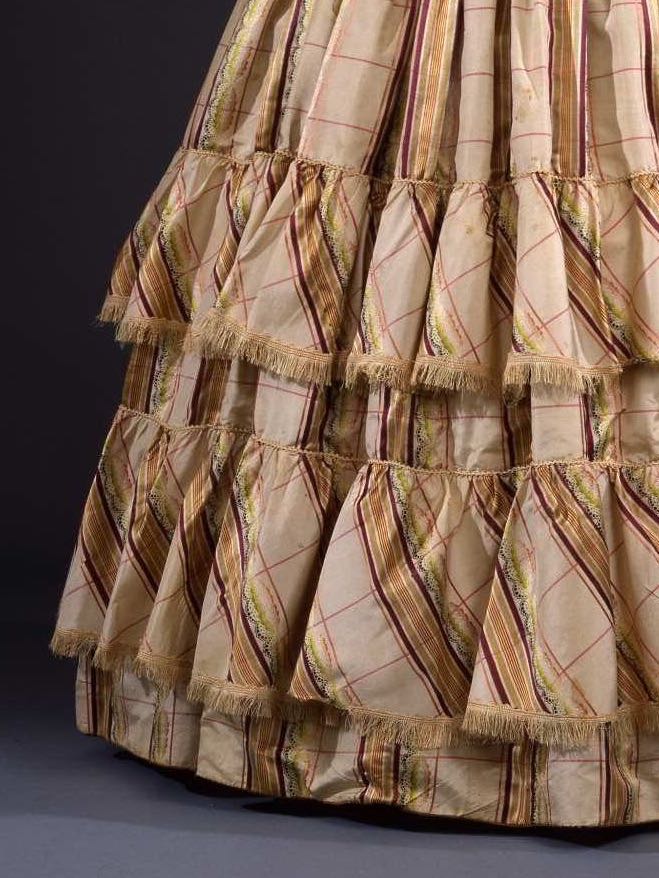
It ALSO has fringe at the hem, albeit in a much more subtle variation, just a narrow length trimming the bottom of each bias ruffle.

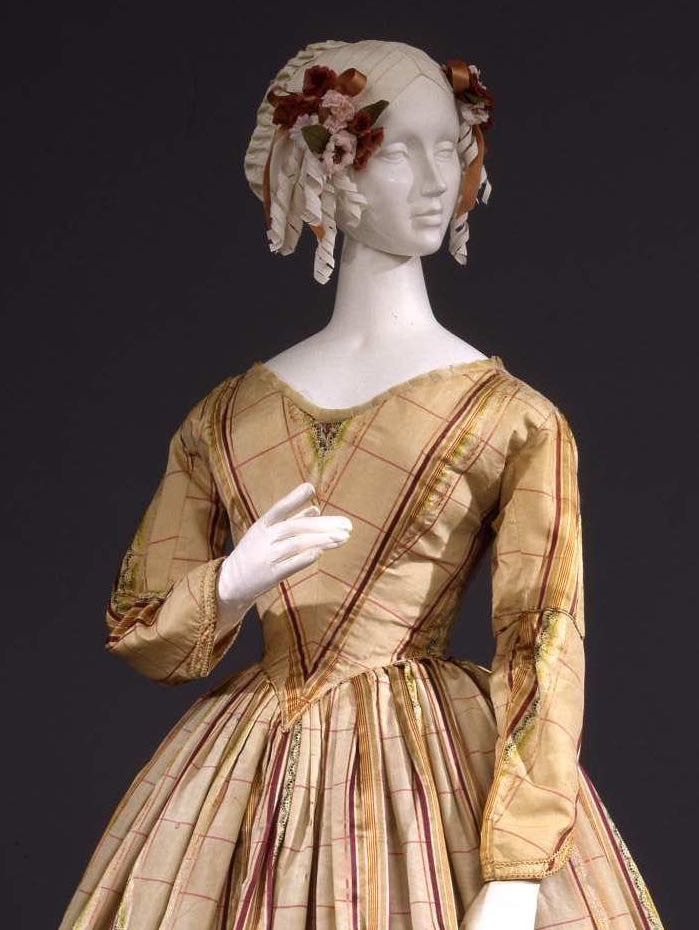
Similarly to last weeks dress, this garment sits between formal and informal dress.  The long sleeves indicate a day dress, but the lower neckline suggests evening wear.  It could have been appropriate for a less formal dinner in the cooler months, or might have been worn with a fichu or wider lace collar for daywear.

The fabric combines stripes, plaid, and a lacey figural design, typical of the inventive patterned weaves made popular by advances in the jacquard loom.

The bodice is simple, but plays with the grain of the fabric for visual effect, using the stripes to emphasise the pointed waist.  The same bias is echoed in the hem ruffles.

What do you think?  As an example of its era, does this dress work?

Rate the Dress on a Scale of 1 to 10

A reminder about rating — feel free to be critical if you don’t like a thing, but make sure that your comments aren’t actually insulting to those who do like a garment.  Our different tastes are what make Rate the Dress so interesting.  It’s no fun when a comment implies that anyone who doesn’t agree with it, or who would wear a garment, is totally lacking in taste.

(as usual, nothing more complicated than a .5.  I also hugely appreciate it if you only do one rating, and set it on a line at the very end of your comment, so I can find it!  Thanks in advance!)


Otari Hoodie Sew Along thedreamstress.com

The Otari Hoodie Sew-Along #4: View A Pockets

In this post I’ll be showing how I sew the classic banded pockets of the Otari Hoodie View A.  I’ll be covering both the pocket construction method shown in the pattern, and an alternative method.

The Otari Hoodie by Scroop Patterns scrooppatterns.com

If you want to join in you’re not to late to catch up with the Sew-Along!

Buy the Otari Hoodie Pattern Here

And don’t forget that all Scroop Patterns are on sale until the end of October with the code:

IPM2018  

In the previous Otari Hoodie Sew Along posts I covered:

Now it’s time to actually start sewing!

View A Pockets by the Pattern Method:

I absolutely hate the feel of raw edges inside hoodie pockets.  They just feel so unfinished, and I continually find myself worrying them with my fingers.  The sewing method I show in the Otari Hoodie pattern creates pockets that are fully lined and finished, with no raw edges at any point.

It is a little fussier and trickier to sew, but I think the end result is well worth it.

The numbering of the instructions in this post corresponds to the numbering of the patterns instructions.

1. Start with your Piece G pocket binding pieces.  Fold the right sides together, lengthwise.  Sew across each short end.

View A Pockets Otari Hoodie Sew Along scrooppatterns.com

Clip your corners.  Grade your seams if you are working with a bulky fabric (my merino is very lightweight, so I’m only trimming the corners).

View A Pockets Otari Hoodie Sew Along scrooppatterns.com

Turn your strips right side out, and press.

View A Pockets Otari Hoodie Sew Along scrooppatterns.com

2. Place a pin at the absolute end of each strip, with the pin sitting firmly against the inner fold of  Binding strip G.

View A Pockets Otari Hoodie Sew Along scrooppatterns.com

Pin the binding to the right side of Pocket Piece F outers, matching notches and placing the end of the binding strip exactly 3/8″/1cm from the end of each pocket.

View A Pockets Otari Hoodie Sew Along scrooppatterns.com

Place Piece F lining over the pocket and binding, right sides of Outer F & Lining F facing.  Secure at each end of binding (I like to use clips for this step).

View A Pockets Otari Hoodie Sew Along scrooppatterns.com

Stretch the binding to distribute it evenly across the curve of the pocket opening, and clip in place.

View A Pockets Otari Hoodie Sew Along scrooppatterns.com

3.  Using a stretch stitch, sew along the short straight edges and long curved edge of your pockets.  I’m using a stretch-as-you-sew straight stitch.

View A Pockets Otari Hoodie Sew Along scrooppatterns.com

Sink and turn your needle at the corners, taking care not to catch your binding ends in your stitching at the corners.

View A Pockets Otari Hoodie Sew Along scrooppatterns.com

And here is what the stitching should look like:

View A Pockets Otari Hoodie Sew Along scrooppatterns.com

4. Clip corners and grade seams as needed, and then turn the pockets right side out and press:

View A Pockets Otari Hoodie Sew Along scrooppatterns.com

 5. Using a stretch as you sew straight stitch, topstitch along the curved edge of the pocket 1/8″/3mm from binding.

Before I show you how to attach the pockets for this view I need to finalise my pocket choices for my jacquard double-knit hoodie.  I can’t decide which pockets I ought to use, so I sewed both up:

View A Pockets Otari Hoodie Sew Along scrooppatterns.com

What do you think?  View A, with the pockets cut on the same grain as the fabric, or View B, with the pockets cut on the bias?

View B Pockets by the Alternative Method:

The alternative method for sewing the View A pockets can be easier or trickier than the method given in the pattern, depending on the fabric you use, the finish you want, and your sewing style.    It does have the unfortunate drawback of leaving raw edges feel-able on the inside of the pockets along both short, straight edges.

Start with your interfaced and prepped pockets and binding strip.  Press the binding strip in half lengthwise, wrong sides together:

View A Pockets Otari Hoodie Sew Along scrooppatterns.com

Sandwich pocket binding G between pockets F outer and lining, with the right sides of the outer and lining facing, and all raw edges matching.  Stretch binding to match the curve of the pocket and pin (or clip) in place:

View A Pockets Otari Hoodie Sew Along scrooppatterns.com

The short ends of bindings G should sit flush with the short straight edges of the pocket.

Using a stretch stitch, sew along the curve of the pocket, securing binding in place

View A Pockets Otari Hoodie Sew Along scrooppatterns.com

Turn pocket right side out and press:

View A Pockets Otari Hoodie Sew Along scrooppatterns.com

Topstitch along the curved edge of the pocket, 1/8″/3mm from binding.

View A Pockets Otari Hoodie Sew Along scrooppatterns.com

Press under the two short edges of the pocket 3/8″/1cm

View A Pockets Otari Hoodie Sew Along scrooppatterns.com

Place pockets on the front of the Hoodie, matching notches and ensuring that the top edges of the pockets are perfectly even across both sides:

View A Pockets Otari Hoodie Sew Along scrooppatterns.com

Pin pockets in place:

View A Pockets Otari Hoodie Sew Along scrooppatterns.com

If your binding fabric isn’t too bulky you can fold under the raw corners of the binding, to ensure it won’t show outside your stitching:

View A Pockets Otari Hoodie Sew Along scrooppatterns.com

View A Pockets Otari Hoodie Sew Along scrooppatterns.com

Stretch stitch along the bottom and zipper edges of the pockets:

View A Pockets Otari Hoodie Sew Along scrooppatterns.com

And topstitch along the two short straight edges of the pockets:

View A Pockets Otari Hoodie Sew Along scrooppatterns.com

Instead of backstitching at the pocket opening corners, you can sew little triangles, which distribute the tension of the sewing over a larger area, and help to reinforce the pocket ends over time.

View A Pockets Otari Hoodie Sew Along scrooppatterns.com

And that’s it!  The pockets are on!

In the next Sew Along post:

Sewing the View B Pockets

Want to join in?  Buy your Otari Hoodie Pattern Here  

Otari Hoodie Sew Along thedreamstress.com

The Otari Hoodie Sew Along #3: Sewing Prep

In the previous Otari Hoodie Sew Alongs I covered:

Want to join in?

Buy the Otari Hoodie Pattern Here

And don’t forget that all Scroop Patterns are on sale until the end of October with the code:

IPM2018  

Today’s Sew Along  post is a quick and easy one: sewing prep!

Interfacing:

First you’ve got some interfacing to do:

Otari Hoodie Sew Along scrooppatterns.com

View A Body, View B hood interfacing

Interface all the areas shown on your pattern.  DO NOT interface the front of the Hoodie, where the zip will go.

Otari Hoodie Sew Along scrooppatterns.com

View B Pocket Interfacing

I prefer a lighter weight woven interfacing on a cotton base (the kind I use is sold here in NZ under the name gyclee) but knit interfacings are also a good choice.

I do not recommend non-woven or knit interfacings: they don’t move with the fabric over time, so end up pulling away from your fashion fabric over time, creating unattractive bubbling.

A tip:

If your hood fabric is fairly lightweight, you may need multiple layers of interfacing to help reinforce the area around the grommet.

Cut each layer of interfacing slightly smaller than the previous one, so that there isn’t a bulky, heavy edge at the end of your interfacing:

Otari Hoodie Sew Along scrooppatterns.com

The navy blue merino I’m using for my navy & kelly green hoodie definitely needed this treatment.

Once everything is interfaced, you’re almost ready to sew: you just need to set up your machine, and choose your stitches.

Sewing machine setup:

Put in a nice fresh jersey needle:

Otari Hoodie Sew Along scrooppatterns.com

I use a size 70/10 needle for lighter hoodie-weight knits, like my navy & kelly green merino, and a size 80/12 for heavier hoodie-weight knits, like my patterned double-knit.

And thread up your machine with quality polyester thread:

Otari Hoodie Sew Along scrooppatterns.com

I used to prefer Mettler thread, but their quality has been very inconsistent since they moved some of their production to China, so now I primarily use Gutterman (except when I have Mettler in the right colour in my thread stash).  If you are using Mettler I recommend making sure it’s German made.

Now, choose your stitches.  The pattern switches between Stretch Stitches (zig-zag, lightening, stretch-as-you-sew or overlocker/serger stitches), marked on the pattern with SS, and Non-Stretch straight stitches, marked on the pattern with NS.

Four ways to sew with knit fabrics, thedreamstress and scrooppatterns.com

You might find this post on sewing knit fabrics, and the pros and cons of the four most common options, helpful in choosing which stitch to use.

With every pattern I sew I like to write down the exact stitches I’ve chosen for seams and topstitching, so that I can keep track of them as I sew.

And now you’re ready to go!

In the next Sew Along post:

Sewing the View A Pockets

Want to join in?  Buy your Otari Hoodie Pattern Here